Category:

Printer Issues

Printer is Connected But Won’t Print [Troubleshooting Guide]

by printerhelp

Steps To Resolve Printer is Not Printing Issue even It is Connected Properly:

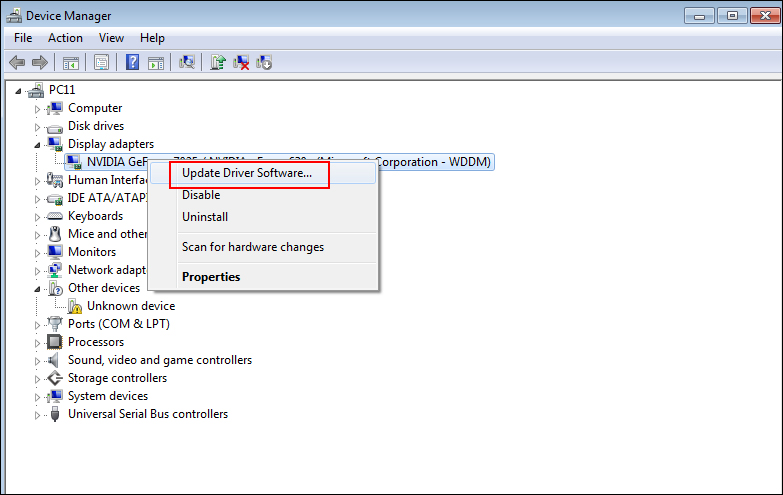
 The printer is connected, but won’t print because of mistakes or issues like printing black or color ink, it is offline and so on. Restore the driver and use real ink cartridges to solve the problem.

  • Fixed Error: Connected Printer But Do Not Print Document Open, select File and then Mac Print.
  • Select the Quality or Media and Quality Menu for Paper Type.
  • To save settings for future print jobs, choose Save from the presets menu and then name the new preset.
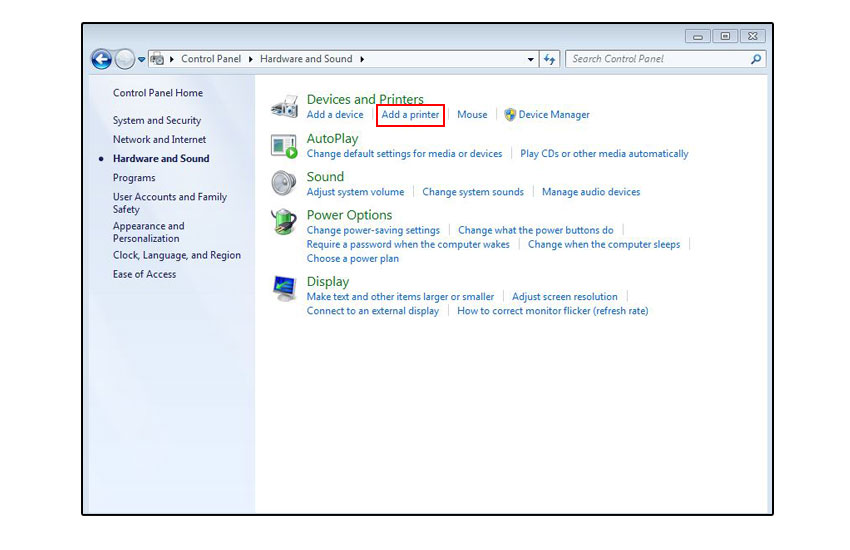
  • Select Windows software application file.
  • Choose Print to open the window of the printer.
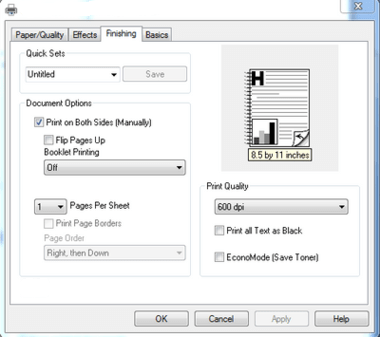
  • Open the dialog box Properties or Preferences.
  • Change settings such as paper type, paper size, quality printing, etc. Select OK and then select Print.

Short steps: Connected But Not Printing Issue

Make sure you use the paper to print. Check the estimated ink levels and substitute the new one for the empty or low ink cartridges to fix the connected printer but won’t print problem.

Select File in the software application and then select Print to see the printing settings in Windows. The Properties dialog box opens and opens the Print window. And change the paper type, print quality, paper size, etc. depending on the print job. Select OK to print the settings and then choose Print.

Reinforce the area around your ink pockets by collecting lint-free tissue, dry foam rubber swabs or any other soft material to fix the connected but not printed printer.

Hold the handle on the printer sides. Then raise the door of the cartridge until it locks in. And the cartridge moves to the printer center.

Wait until the cartridge is silent and idle before you go on. Take the power cord from the printer’s back. Lift the cartridge lid from the slot to release the cartridge. Then push the lid back lightly until it stops.

Remove the ink cartridge from the slot. Hold the sides of the ink cartridge. A lint-free tissue or foam-rubber swab is lightly moisturized by distilled water.

Squeeze from it any excess water. Clean the face and edges in the swab around the ink nozzle. Allow the cartridge to sit down for 10 minutes, allowing the purified area to dry or use a new swab to dry.

Hold the ink cartridge to the printer on the sides with the nozzles.

Slide the cartridge in the slot forward. Then close the cartridge deck to secure the cartridge. And close the access door to the cartridge. And solve connected printer, but will not print problem.

0 comment

123 HP Laserjet p4015 Duplex Printing

by printerhelp

123 HP Laserjet p4015 Duplex Printing

The HP Laserjet p4015 printer offers the possibility to print duplex printing on both the pages of a document. Automatic and manual printing can be done by the HP Laserjet p4015 Duplex Printing.

Solutions on how to print with the Laserjet printer Load enough paper on the main input channel. Load a large amount of paper

  • Open the printable document and choose the menu File.
  • Click Print and, if necessary, select Show Details.
  • Select and locate the option on two sides.
  • Select Layout in the Print tab and mark the checkbox.
  • From the two-sided tab select the Binding option and click Print.
  • Remove from the output tray the first printed pages.
  • In the input tray, place the pages and click “Further.”

Best procedures for duplex printing using Laserjet p4015 printer

  • Place plates of A 4 in the main input table to overcome the page ordering problems, with the best procedures for duplex printer using laserjet p4015.
  • Test for installation of Toner Cardboards.
  • Windows: Document open and menu File selection. Select Print and choose a Laserjet p4015 printer name. Printing option.
  • Open the Printer Preference or Document Properties window by clicking the Printer Properties, Preferences or Printer Setup option.
  • Verify the presentation of a shortcut printing tab and then click Printing or Printing on both sides (HP Laserjet p4015 Duplex Printing). Choose the Finishing, Layout or Features tab if the duplexing menu is not available.
  • Select the Print option for both sides and choose Bind or Flip page.
  • Click Print to select the OK button. Please remove the first pages printed from the output tray and tap on a even surface. Introduce the first pages printed in the input panel and press Continue to print other pages.
  • Mac: Use the manual duplexing method if your Laserjet printer does not support the automatic duplexing feature. Verify your printer’s type of paper tray and click on the option Paper Handling at the center of a screen.
  • Choose Odd from the Pages to Print only and select reverse or automatic option based on the model of your Laserjet printer. Remove the strange pages in the output tray and load them to the ingot tray after the print job has been completed.
  • Return to the Print window and select Even Only. Select the print option by clicking Normal Mode.
  • Smartphones: Download your mobile HP Smart app. Open the application and click Home Print. Select the Print Document and select the document to be printed. Select your printer, Click-> More Settings-> HP Laserjet p4015 Duplex Printing–> OK-> Print.
0 comment

How to Troubleshoot ‘Access Denied’ Error While Sharing a Network Printer

by printersetup

Troubleshoot ‘Access Denied’ Error While Sharing a Network Printer

How to Troubleshoot ‘Access Denied’ Error While Sharing a Network Printer Troubleshoot ‘Access Denied’ Error While Sharing a Network Printer

There is a possibility that an Access Denied error occurs when users attempt to share a printer on a network.

When a user doesn’t have a network-based user account administrator login credential and the file and printer share service aren’t installed on a Windows PC.

File and Share Printer Installation

File and Share Printer Installation
  • Click the Start button, open the Control Panel, and in the following window search for network and sharing center.
  • Click Change Adapter Settingsright-click LAN, select Properties, and choose Microsoft Networks File and Printer Sharing.
File and Share Printer Installation
  • Click Install and select Service If you can not find the option.
  • Click on Add and, as mentioned, select the option File & Printer Sharing.
  • To install a windows service, click OK in the dialog box that pops up and close.
  • Restart the PC to complete the installation if Windows prompts.

Ensure Printer Connections

  • The Devices and Printers folder maintains a list of printers installed on Windows.
  • To open the windows and r keys, enter the Control Panel, press and hold Windows and r to reveal the dialog box, clicking on Control Panel, find and open the Devices and Printers.
  • This list would display your printer icon. If not, ensure a tightly-sitting USB cable interface with the computer.
  • However, if you first connect the printer to the PCinstall the drivers and software of the printer with the CD or download it from the website of the printer manufacturer.

Configure for Network Sharing

Configure for Network Sharing

It is necessary if your printer is out of the box or is not previously configured to be shared across a network. Follow the following steps to control or change the sharing status:

  1. Right-click on the printer icon under Devices and Printers and select Properties.
  2. Start Sharing make sure that you select Share this printer checkbox to enable network sharing and click OK.

Connect to the Shared Printer

Connect to the Shared Printer

Once the network printer is shared, you need the network printer to connect to another network system.

  • Click Add Printer
  • Choose to Add a Network Printer to follow the prompt for the installation of the shared network printer on the screen.
  • Click on Add Printer. That’s it.
0 comment

How to Fix Two Copies Printing Error?

Common Printer Issues

In the country, most companies rely heavily on computer printers to achieve their daily work and monthly business objectives. Any business that attempts to survive with no printer and computer is currently often viewed by customers and competitors as old-fashioned. So it is best to use both devices, as they help increase your employees ‘ productivity.

Unfortunately, many small companies often fail to understand the need to use modern printers, and they still rely on old printers. One of the main problems for computer printers of old age is that they are too slow. Modern printers can in fact provide 100 plates per minute, meaning that in only a couple of hours you can print tons of documents.

In addition, most of the companies using old computer printers face many printer issues on a regular basis. The most important factor is to invest in the most advanced computer printers with new practical features and options. If so, you might need assistance from the expert repair technician of the Canon printer to solve the problem. Thankfully, by switching to a new computer printer, you will be able to easily avoid such problems.

Two Copies Printing Issue

Several users of computer printers updating their device’s operating system to Windows 10 have been complaining that when they run a print job, their printers always print 2 copies. Computer printer mistakes, for example a printing error, are very common and multiple copies can be fixed by a few simple troubleshooting steps.

If you’re new to printer troubleshooting, contact a Canon repair technician for help. The following steps for troubleshooting computer users with a rough idea of how to fix printer printing and printer errors should be attempted.

Change Copying Number

  • Press your keyboard’s Windows button, then type into the search box in Control Panel. To proceed to the next step, click on the Control Panel option.
  • In the Control Panel window, select the hardware and sound option, and then select it.
Control Panel
  • The Devices and Printer option will now be located on the next screen.
Hardware And Sound
  • Select  Number of copy and click on Printer Properties. Change it to 1 if the copy number is set to 2,
Printer Properties

You now have to run a print test job to see if the printer is correct in printing an error of two copies. Otherwise, proceed to the next step.

Enable two-way support Uncheck

  • Go to the control panel on your PC and navigate the hardware and sound > devices and printer, as mentioned above.
  • Right-click the printer name on your computer you are currently using. Select  Printer Server Properties, and select Options for Ports.
Device And Printers
  • You must now check if the bidirectional support option is enabled. If so, uncheck and click on Request to confirm your choice Apply.
Printer Ports

If your printer problem is not solved, proceed to the next method of troubleshooting.

The latest printer driver install

  • Once you have clicked the option, a Device or Drucker will be displayed on the devicemark. Go to Devices and Printers and click Add a printer.
Printer Server Properties
  • The printer I want will not be listed, but you must then select Add a local printer or network printer with the manual setups and then click Next. Computer users will not be able to see their printer.
Add A Printer
  • Now you should select the port where your printer will be used and click Next to move to the next step.
Printer Options
  • Choose Windows Update and choose the printer name. You will need to go back to Find a printer using other options if your printer is not found in the results. Select the printer and install all available updates to correct problems with your printer.

If all the above steps have been attempted before, but the printers have not yet fixed and the two copy errors have been printed, then you should contact our Canon expert repair technicians. You can access your PC remotely, and in a matter of minutes solve any frustrating printer problems. They will also take the required steps to prevent such printer errors from occurring in the future.

0 comment

How to fix Ink Jet printer dried cartridges?

Fix Dried Ink Cartridges

Cartridges are the main elements of the inkjet printer to strip in a specific design of the ink onto the paper for text or image generation. There are several microscopic tubs underneath the cartridge that throw the ink in a precise volume to create different colors on the paper. Any failure of the cartridges can completely stop the printing function and for a number of reasons it can be caused. A common problem, that prevents printing, is the drying of tin cartridges. It causes the ink to coagulate into the cartridges and keeps them out of the boxes.

Dry Ink Cartridge Reasons

Ink cartridges tend to dry up and interfere with normal printing function, for several reasons. Unless the printer is used often, the cartridges can dry up quickly. One way to correct this problem is to run the printer at least once every week and do some cleaning of the nozzles and testing of imprint.

A printer cartridge has a date of expiry and can cause it to fail after the intended date. The air can also become trapped inside recharging cartridges, which can cause the tin to dry up quickly. Also known to impact on the ink in the cartouches is the room temperature.

Fixing a Dry Ink Cartridge

Printer Cartridge Issues Troubleshooting

The first step in solving a dried incense pad is by using the computer to perform the printed head cleaning function. It can remove any block from the buckets and thus permit the free flow of printing ink needed. Run a print test and check if the print contains faded areas or unplaced colours.

When the cartridge still doesn’t work properly, release it gently from the print head and water it warmly. In fact, warm water can loosen the dried ink and thus flow properly from the nozzle. The portion of the nozzles must also be rubbed carefully with a cotton swab in warm water.

Repeat the action until the ink is released. Wipe off any excess ink using a towel of paper and then fasten to the head of the printer. To inspect if the cartridge is working properly, run a test print. If the issue persists, it is better to substitute the ink cartridge.

0 comment

My Printer Printouts are Blotchy

Common Printer Issues

High-performance machines are unheard of every once in a while. Laser printers are one example of this. If a single component does not do the way it is meant, all the following can also be a failure. Although major difficulties are rare with laser printers, sometimes this happens, mostly because of a shortage of toner.

A common problem with Windows printers is a blotchy printer. This means that the page has toner smudges that make it difficult to read words. Then you can fix the problem with the printer.

If it is a Leaking Cartridge

  • Turn the printer off and pull the power cord out.
  • Remove the toner cartridge.
  • Check out the heads of the print. This may be causing the problem if they are blocked. Toner wipes, tissue or tissue soaked with alcoholic beverages.
  • Check how the cartouche of toner holds. See whether it can be reused or if a replacement is needed.
  • Put into the printer a toner cartridge, old or new.
  • Insert the printer and activate it.
  • Do a test print.

If the toner is installed on the drum unit

Corona Wire Has Failed

Turn the printer off and pull the power cable out.

  • Take the drum out of the printer and place it over a clean cloth to avoid a stain or spill.
  • Remove the blotchy impression to find out which drum unit needs cleaning when you are using the color laser printer. The color of the blocks makes this evident.
  • Turn the drum to find the place in which the toner has been installed.
  • When you find it, remove the build-up and clean the surface with a swab.
  • Return to position and return the drum unit in the printer.
  • Plug in the printer and activate it.
  • Do a test print.

If the corona wire is missing

  • Off and remove the power cord, switch the printer off.
  • Let the printer cool the corona wire for some time.
  • Take out the battery and put on a clean dry tissue.
  • Wipe the wire out of the corona. You simply have to slide the blue tab to each side for this. Don’t touch the wires as you do that.
  • Switch on the blue tab.
  • Return to position and replace the drum unit in the printer.
  • Plug in the printer and activate it.
  • Print a test to confirm that the printer problems have been fixed.
0 comment

How can I fix Error 0x00000057 in printer installation?

Printer Installation Error

Our life was made much easier by computer printers. These devices allow us to print thousands or hundreds of documents every day without delay. It is safe to say that millions of staff members and employers from around the world are heavily dependent on computer printers.

Printers need regular maintenance and proper care just like other electronic devices and machines. Offline printers and other common printing errors are probably not available if you fail to take good care of your printer. One of the most common errors reported by several computer users using printers on a daily basis is 0x000057 error.

Apart from this, the most common errors are those of the printers. This is a disturbing computer printer error since a printer is not added on to the PC by users. Error 0x00000057 usually occurs due to corrupt drivers, but there are many other reasons for this error. Below are a few straightforward troublesheets that can help you fix the 0x00000057 error.

  • To select the control panel from the options lists, press Windows on your keyboard key.
  • Go to Control Panel’s Devices and printers section and scroll down until the Add a Printer is visible
Devices And Printers
Add Printer
  • Select Create a new port, then choose Local Port Type
  • You now need to enter \ComputerNameSharedPrinterName, the Network Path to the Computer Printer.
Create A New Port
  • From the options list, select the printer and then click Replace the existing driver option.

Now there is a dialog box that will ask you whether or not you want to share the printer. If you want to, you will have to give the device a name. If you are still having Error 0x0000000057 and if you are not in a position to add printers to your computer, you should look for help from expert printer support technicians.

You can either select your proposed name or name as you wish. These experts have handled several common printer problems, including unavailability of the printer driver and offline Wireless Printer errors. This means they can easily fix the problem.

0 comment

Error 0x00000709 in Windows

Common Printer Issues

Error 0x00000709 denotes a situation, as soon as a user can’t configure a default printer to one that’s been configured as default in Windows or a different printer. A glitch in Windows Registry settings can get the error or the scenario where Registry prioritizes a previously printer as default.

For troubleshooting printer problems such as Error 0x00000709, it is necessary to have a back from the Windows Registry. To take a backup, press R key and Windows key concurrently and key in regedit from the Run dialog box. After the dialog box of User Access Control pops up next, seeking permission to run Registry Editor as Administrator, click Yes so as to run it.

Modifying Windows Registry Settings

From Registry Editor window, browse to Document > Export, assign a title to the backup Registry document then Save it. After that, click HKEY_CURRENT_USER, enlarge Software folder, then scroll to and click on Microsoft. After that, click to enlarge Windows NT and choose Windows folder. Subsequently, right-click on the REG key tagged Apparatus to the ideal side of this Windows Registry Editor, and then select Modify in the context menu that pops up.

Troubleshooting Printer Problems

Fix Error 0x00000709

Fix Error 0x00000709 Next, assign the name you want the default printer device to set up with the Windows PC. Note that you should leave the text string after the spooler is denoted without editing while configuring the printer’s name.

If Windows is sending an instant such as Can not Edit Unit, then immediately click OK. To enlarge, right click Windows directory to the left of the Registry Editor. This will start the Windows dialog box permissions. In this window, under heading Permissions for All, select the Full Control option.

If you can not solve Error 0x00000709, please click the Start button, find and open Devices and Printers on the Control Panel. Run Printer as Windows Administrator. Once the Printers are opened on the screen, right click on the name of the printer and select See What is Printing. Then in the queue window, choose Open as Administrator and in the next menu, Set as Default Printer.

0 comment

Steps To Fix the Printer Error State Issue?

Printer in Error State

Error State Issue

You must have enquired of a “Printer in error State” error at least once in your life if you’re a computer user with the printer in his / her office for many years to print a series of documents. Some people who experience the frustrating computer printer mistake often ask how they can fix the “Error State Printer” problem.

It’s true that solving such printer problems requires a certain number of computer skills. So it is better to seek the assistance of an experienced printing support technician if you’re new to the world of troubleshooting printer issues when your computer informs you your printer is in an error state. The experts will help you to solve the problem quickly and make sure you don’t have any such problems on a longer-term basis.

It is important to note that this is a typical printer error, so that you can resolve the problem easily. There are therefore some tips and techniques here below that may help you solve the problem, if you plan to try to solve the “Error State issue printer” on your own. It is best to hire printer support technicians if you have no clear idea how to take these measures.

Check the Printer Connection

Troubleshooting Printer Problems

Update Printer Driver

What you need first and foremost is to make sure all connections to your printer are correct. So the connections between the computer and the printer must be carefully monitored. If the connections are not correctly established, make them again before you proceed to the next problem solving step and perform a test press assignment.

Restart Devices

A number of common imprimer errors and problems can in most cases be easily fixed when the printer is restarted. Turn off your computer and your printer a few minutes and activate the two devices. To verify whether or not the problem is resolved, you must run another test print task.

You may be a little surprised to hear that most common printer problems arise because users use an outdated printer driver version. So make sure you use an older printer version or not. If yes, it will help you to fix the problem by updating a printer driver.

0 comment

Unable to Print a Web Page on Internet Explorer

Troubleshooting Printer Issues

Common Printer Issues

Sometimes, when you print a web page on the Internet Explorer, you may run into a script failure. If this happens, even if the Print Preview page is open, you can not use the printout. Normally, the printing problem can arise for some reason: the video driver or card of the computer is corrupt or outdated.

  • For the internet security zone of a web page, the protected mode is turned on.
  • The temporary system folders are problematic, and the low folder below the time folder is missing.
  • A problem or computer malware related to the website.
  • Follow the following steps in the exact order for troubleshooting printer problems that occur during printing a webpage on Internet Explorer.

Only proceed to the next step if a method does not resolve the problem of script or printing. Alternatively, call for rapid assistance from our certified browser support technicians.

Open the same webpage on a different browser

Of course, you must eliminate possible reasons for your failure to print on the Web. What if a different browser isn’t loading the web page? If so, it may be because of web connection issues or computer malware, which may be the case when you are not able to print from a browser.

Drivers updating You may fail to take printing of your system files, or a web page if there’s anything wrong with your printer driver or video card driver. You must install your newest updates from your manufacturer’s website if the printer is not up-to-date. This step is often recommended to fix printer problems, even offline.

To open the search results on a Start Menu press the Windows key, search Device Administrator.

Click on Display adapters from the new window, right-click the driver of a video card and select the software to update the driver. Then follow the prompts on the screen to have the latest update installed.

Device Manager

Recreate the missing low-folder You should not use Internet Explorer as you take this step to Troubleshoot printer problems. Leave the browser and follow the steps below.

  • Simultaneously press Windows and Run keys. Type temp percent and click OK within the Run dialog box.
  • When the Temp directory opens, right-click on a clear area, then select New, and then the folder.
  • Call the folder Low, close the Temp folder to print the website and open the Internet Explorer.

Reset the low level of integrity of the newly-created folder

  • Look for Command Prompt in the Start menu.
  • Right-click on that when it appears and select Run as admin.
  • In the ICACLS DOS box, type “percent user profile percent AppDataLocalTempLow”/setintegritylevel (OI)(CI)low to go to the webpage in Internet Explorer to print and view the error solved by pressing the Enter Reboot system.
Windows Command Prompt

The above troubleshooting steps helped you correct the error of printing. Again, if you have problems with the printer again, please contact the Tech support professionals via the above toll-free number for troubleshooting Windows printer issues.

0 comment