Category:

Other Printer related Queries

Which Printer Is Connected To This PC?

by printerhelp

Steps To Connect The Printer To PC

The printer setup involves connecting the printer to the computer and the basic computer hardware set. what Printer is connected to this PC. You may use the Wireless Direct functionality and know what Printer is linked to this PC to connect the printer to a wireless device such as a laptop, computer, or mobile.

  • Easy and simple steps for connecting the printer to the system Complete the printer hardware configuration.
  • Turn on your computer system and HP printer.
  • Where the printer is to be disconnected, any USB or Ethernet cable.
  • Remove the name of the printer from the menu on your system installed devices.
  • Install or download the corresponding printer driver from the installation disk given to the printer.
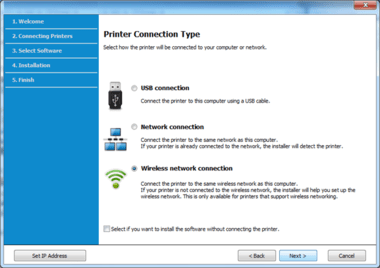
  • Choose the USB connection type when the installer is prompted.
  • Use a USB cable to connect your system and printer.

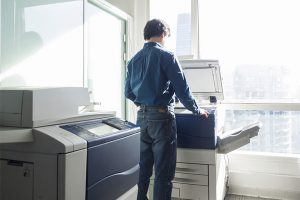
Detailed description for connecting the printer to your computer system

what printer is connected to this pc

You can connect every printer to your PC depending on your system. Buy your PC-friendly printers. On the printer, remove the packaging material. Delete the security material from the input panel, scanner unit, and access range for the cartridge. Plug-in a cord end in your printer’s back and a port in your computer in the other side. To power the printer, push on the power button on the control panel to know the connection of the printer setup to this computer.

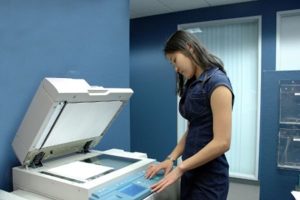
Pull out the paper input tray of the printer and load in the input tray the required paper. Pull your printer’s cartridge access door and wait until the car is moved to the printer centre. Remove the yellow tapes found on the cartouches without touching the toes or the copper contacts.

Add the new ink cartridges in the carriage of the printer. Make sure the cartridges are fully sitting. Close your printer’s access door. If the printer and your computer have already been connected using a USB cable prior to the HP driver installation, remove the printer from computer to make sure the USB setup is successful. Open your system’s Devices and Printers folder, find the printer name.

Insert the computer with the installation CD. If your CD does not exist or your driver can not work with your system’s operating system, you can download the driver from our homepage by following steps.

Click on the following link. If necessary, type the printer model and press Enter. Click Download the latest printer driver version. Extract your system’s files. To execute it, double-click the.exe file. Accept the installer terms and conditions, and select the installation purpose, if you know what the printer is connected to this PC and you know it successfully.

Disclaimer: printerssetup.org is an independent website for providing you with information regarding HP printers. This site doesn’t have specific association with “HP” and its services. All the information and images used in this website are for informational purpose only. We do not sell products or services of HP in any form. We do not provide any warranty or services associated with manufacturer. You should approach the manufacturer for the same.

0 comment

How To Test My Printer Connection

by printerhelp


Print your wireless network test report to test my printer connection and check your network connection. Check and make sure you don’t have a private network connection. Check whether the router is enabled. Ensure that no network is connected to your printer and computer. Check your printer’s IP address.

 How to check your connection to the Printer Network?

  • Make sure your router is activated when the wireless network is connected.
  • Print the Test Report for the Wireless Network.
  • Check and confirm that the PASS indicated connectivity area.
  • If the connection fails, connect your printer to the router connection.
  • Check and confirm that the network name matches your network in the configuration area.
  • Make sure you haven’t changed recently in the router.
  • Type the IP address of the current IP address of the printer on the wireless network test report.
  • Set a static IP address so you don’t have to manually change the IP address.

Steps To Test Your Printer Network Connection

  1. Turn on your network router and set up the wireless network connection to test your Printer Network connection initially. Connect the power cable of the printer to an electric source and turn your printer on. Print the Wireless Network Test Report to verify your network-connected printer. Tap the Setup button on the control panel of the printer. Click the Print Network Configuration Page from the Network Settings or Network Setup.
  2. Load blank papers to print the test report of my printer connection on the input tray. After you tap the Network Configuration or Wireless Network Test Report command, the printer starts to print the Report. Check the report and ensure that it is mentioned as PASS in the connectivity area. If it is PASS, you can confirm your network connection.
  3. If the connection to the network has failed, check whether the router has connected to the network. Check and make sure your name matches the network name (SSID) on your computer in the configuration area. Uninstall or deactivate the security software on the network connection because the security software can block the network connection.
  4. If you have recently updated your network password on the router, you should also upgrade in the configuration area. If you don’t change your password in the configuration field, you may fail to connect and the printer won’t connect to your network to test my printer connection.
  5. If you have enabled the filtering MAC address in your router, turn it off and search for the MAC address of a printer. After finding, add the MAC address of your printer to the list of devices that can connect to your network.
  6. If you have changed your IP address, check the IP address of the Printer and the IP of the network settings report. There will be no problems if it matches. If you find different, type in the IP address of the report in the configuration area of the printer.
  7. If you find problems with connection to the network, use the troubleshooting tool to automatically diagnose and solve the problem. If the test problem of my printer connection continues, try to reconfigure network connection settings on a router and your printer even after attempting all troubleshooting steps.
0 comment

See If The Printer Is Connected

by printerhelp

Try printing a network configuration page and check for connectivity in the network to see if the printer is connected to the network. Make sure your router is closer to the printer. Check and confirm that the IP address of the printer matches the IP address of the router.

How can I see if the printer is connected to the web?

  • Switch on your router and allow Wi-Fi access.
  • Connect to the wireless network of your printer.
  • If you use a wired network connection check the Ethernet cable connection.
  • Check and match the router and configuration area network name.
  • Match the IP address of the router with the IP address of the printer.
  • Print a connectivity status wireless network report or network configuration page.
  • Make sure the network connection is not blocked by security software.
  • Confirm in the filter list that you have added the MAC address of the printer.

Steps To Check The Network Connection On Your Printer

  1. Take the first step to plug in your printer with a power source connected to the power cable to check and see if the printer is connected. Turn on the printer and press the power button. Turn on your router and connect to the broadband or other services that provide quick and safe internet access.
  2. Make sure you do not use telephone cables instead of ethernet cables when connected via a wired Ethernet connection. Remove the Ethernet port protective covers and connect the cable. Do not connect to an Ethernet cable via any USB hub or docking station because it may not work well.
  3. Ensure that every switch, access point, joystick and other connecting device is active. Connect your printer to the Wi-Fi connection when the router is enabled and the network connection is enabled. Make sure the indicator shows that the active internet connection is brilliant.
  4. If the Wi-Fi light is not illuminated, check the router name and the configuration SSID for the network name and confirm that both are the same. Similarly, update the network password in the setting area if the router password has been changed to see if the printer is connected.
  5. Place the router with the Wi-Fi range and make sure your printer and computer have access to the entire network. When using a Network MAC Address Filter, make sure to add a MAC address of your printer to the MAC Address Filter List to allow the network connection of your printer.
  6. Check your network connection by printing a network settings page or a wireless network test report after setting up the whole connection. Place blank sheets on the input tray to print the report. If you connect to the network, the report says it passes through the connectivity area. If you are not connected, the connectivity status is shown as a failure.
  7. If the connection fails, try disabling the security software to connect the network. Because security software can sometimes block the connection to the network. If the connection problem continues, try reconfiguring the network connection or reset it. If you use a wired connection, use another Ethernet cable to configure the network connection and only connect when you have to connect the USB network connection if the USB cable is required to see if the printer is connected.
0 comment

How to Ensure Printer USB Cable Works Fine?

by printerhelp

How to Assure Printer USB Cable Works?

How To Fix A Printer That Wont Print

Examine Physical Damages

Even a faulty USB cable on the printer is liable if you face problems with printing unexpectedly. The USB cable is probably disrupted in printing when the printer starts, and then stops when you move. Before the replacement of the existing USB printer cord is purchased, however, wait and confirm whether operating defects follow the steps below.

Examine Physical Damages

Switch off the printer and remove from USB ports the connected cable. Check for damages on the USB cable like cuts or crimps. Check whether the USB connector point connected to the rest of the cable is secure. Only replace it if there is any damage.

Measure its Length

When the printer’s USB cable is longer than 6 feet, the cable is likely to be defective. When you have pauses for printing, measure how long the USB cable is and only replace it with a shorter cable if necessary.

Confirm Cleanliness

Check whether dust or dirt has accumulated on both ends alongside the USB ports of the computer and the printer. If so removed by a handheld air duster from the connectors and ports.

Ensure Connection Is Right

Printer Problems In Windows

Common Printer Issues

The printer is not supported by an USB hub and other intermediate device without connecting it to the PC. Make sure the USB cable is fixed at both ends on the USB ports of the computer. Switch on and retry the printer for the printer. Try to change the USB port on your computer if it fails to solve printer access problems.

Reverse the USB Port

To eliminate connectivity to the PC using the same cable as the underlying cause or a defective usb cable, connect the cable on a different computer or printer. Turn off the computer and the printer, if it works properly, make sure that this is not the cable’s fault. Disconnect all USB devices, like the mouse and the keyboard.

Boot up the PC and reset the printer to see if the new hardware is detected in Windows. In the notification bar beneath the desktop, check for Safely remove the hardware icon. If there is an interruption in printing, connector or defective USB cable is unlikely to cause it.

0 comment

It would be a costly strategy to buy a fresh Canon ink cartridge for replacement of the current one. Purchase compatible refill ink instead and complete the tin cartridges. The following steps will assist you to refill the canon printer in tin cartridges.

The quick guide to refill ink cartridge on Canon Printer

  1. Power on printer.
  2. Check your cartridge for the ink level.
  3. Open the printer’s front cover.
  4. To be refilled, press the cartridge until you hear a click.
  5. Remove the cartridge from the slot and put it on a towel of paper.
  6. Locate the sponge fill hole and fill the sponge region with ink.
  7. Look for a tiny circle under the code that denotes the ink cartridge colour.
  8. Drill the hole and fill the ink through the hole.

Detailed instructions for refilling ink cartridges in canon

Power up and wait until your Canon printer is idle. Check the cartridge icon for the lights and make sure that the cartridge to refill is empty. Pull the output tray and the output tray expansion to fill up the canon. Open the front cover of the printer and wait until the cartridge holder moves to the place of a substitute. Touch the FINE holder of the cartridge until it stops.

Press the empty cartridge down to a place. The cartridge is released. Remove the cartridge and put it on a smooth towel. The cartridges may be leaked with ink. Get a canon kit of refill ink cartridges consisting of a tin bottle, syringe and thumb box. Fill in the syringe ink. Now discover the sponge region on the cartridge and the hole from the ink. Fill the sponge with a few inks to refill the cannon.

Screen the outlet hole with a band to avoid the ink leak after the canon cartridges have been refilled.

Now find a tiny color code underneath the cartridge. You’ll see a tiny circle with a bug. Drill the thumb box in the center of the dimple. Put the needle in the hole and fill the ink. Do not overfill the cartridges to refill the cannon.

Remove the needle of the syringe from the hole and put on a towel. Screw the hole with glue or hot wax. You can also use a sealing electric tape. Remove the tape from the sponge region.

Restore the recharged ink cartridge to the printer and close the front cover. Run a cleaning cycle after the cartridge has been installed. Give the sponge all fresh tin cartridges. Now align the print head to refill the cannon with the steps below.

Make sure the input tray contains enough paper. Press the STOP button four times to print a printhead alignment sheet until the Alarm light is blinked. Lift the lid of the scanner and place the plate on the glass. Close the deck and then click Black. The printer scans the page and automatically adjusts the printhead position. After the alignment is complete, the ON lamp will be lit. Remove the sheet from the glass scanner for canon filling.

0 comment

The first step to be taken after the purchase is to set up the Samsung Wireless Printer. The setup process usually involves the unpacking of the printer, the connectivity setting, the loading of the correct papers, the installation of the ink or toner cartridges, the driver downloading, and a WiFi. The configuration process must be carried out in order to access the entire Samsung wireless printer features. Make sure you correctly execute the configuration instructions, otherwise the wireless Samsung printer may be a problem. The brief directions on installing Samsung wireless printer are addressed on this web page.

The Samsung Wireless Printer is easy to set up

  1. Test whether the seal is on top of the printer case.
  2. Take out the Samsung printer and place it on a flat surface.
  3. Dispose of all Samsung portable printer dvds.
  4. Connect the electrical cord between the back and outlet of the Samsung printer.
  5. Convert Samsung’s printer and fill sheets, then connect the cartridges of the toner or dye.
  6. Click the Select icon on the front side of the printer. Tap the Wireless link and press Set WPS.
  7. Choose a PIN and you’ll see an 8-digit token on the control panel.
  8. Type the PIN on the network attached computer and load the driver to complete the installation.

Samsung Wireless Printer Configuration Guidelines

To download Samsung’s wireless printer setup, open the box and remove all supplies. Take from the packed box the Samsung printer and put it on a levelled field. Make sure your printer doesn’t have any impact. Connect your Samsung printer’s power cord to the back.

Attach the other end of the chord into a functioning tube. Choose and click the Power button on the Samsung printer to turn the system on. Place sufficiently leftover document stack in the key input tray. Mount in the slots the original cartridges.

Windows: Step 1: Download your personal computer with the Samsung Wireless Easy Setup app. Begin deployment with the downloaded file going. Select the Next button and wait until the installation is finished.

Phase 2: Press Start and then run the Samsung Quick Wireless Setup app. On Samsung’s Wireless Printer, choose Next and Power. Tap the Next button and you will see a dialog box Choose the Wireless Setup Template on your screen. Switch on the radio button next to the USB cable selection.

Phase 3: Press Next and from the list on accessible networks pick the name of your Network Set Identifier. Select Next and type the network password key or WPA key. Wait until the connection process is over; it could take a few minutes.

Step 4: Click and click on the Wireless button, then print a test page. To finish the connectivity, disconnect USB cord from the Samsung printer and computer.

Mac: Step 1: Insert the USB cable on the Samsung printer into the USB port. Link the other end of the USB cord to the Mac personal computer. Upon completion of the connection, run the Wireless Setup App to open the wireless setup. The Samsung Quick Wireless Setup website unlocks the Key Configuration dialog box.

Step 2: Start the Samsung wireless printer setup download process by choosing the Next button. Click the link form for the first time using a USB cable. Make sure the Samsung printer is attached via a USB cable to the Mac device. Select Next and the Installation Wizard detects all network-related devices.

Phase 3: Pick your SSID name from the network chart, then click the Next icon. Type the security code WEP, WPA, or WPA2 into the Mac system Network Password field and touch Next. Do not continue until the network is wired to the Samsung printer.

Phase 4: Click Next now and press Start on the trigger window on the computer. Check if your Samsung printer name is displayed in the System Preferences window to finish downloading Samsung wireless printer configuration.

0 comment
Troubleshooting Printer Issues

Office Printer Pooling

The majority of offices, particularly large offices, are configured to operate more than one printer simultaneously. There may be a lot of in-house documentation and documents to finish, so it can take some time to finish printing tasks. The best solution is often for the high volume printing of printers. This allows a printer collection to work as a single printer.

The printing work is processed at the same time. Only one software and name are needed, and the first available printer receives more than one queue. There is no time of waiting between the end and start of printing tasks and no build-up.

It saves time because it won’t be necessary to wait. This has a positive effect on productivity and improves workflow efficiency.

In case of malfunctions, you get backup printers. When you have a pooling printer, you can still print on other printers even if one is faulty and has to resolve problems with the printer. There will be no delays for another reason.

The Cons

Office Printer Pooling

Common Printer Issues

The standard print grouping features in all operating systems are not found. Shared Printer Issues In the Windows range, this is only possible for XP, NT, 2000, Windows 7 and Vista. Later operating systems allow an unlimited number of users or printers to be pooled.

  • You need the same software and driver for all when you pool printers.The printer models also need to be the same or at least the same. The remaining printers must, for example, be the same or at least similar model if you are using LaserJet Pro M1132.
  • Pooled printers must be placed side by side. This is the only sensible way to use a single queue of prints with more than one printer. If not, problems may arise. You’d have to move all the way to get all your printed documents together in a large office, where the printers are kept away.

Despite the snacks, bundle printers in many businesses have demonstrated a very helpful system. The ease with which the printing tasks can be completed together with the saved time is sufficient in most offices to increase productivity. It works also well when the printers are suitable for office use and for pooling.

0 comment

To check the level of the printer ink, tap the ink drop icon on the access table to check the level of the ink. A drop-shaped icon of ink is located on the control panel on most touchscreen printers. After the printer has been activated, tap the icon and view the ink levels.

Check Printer Ink using the Windows device HP Printer Assistant Tool

  • Click the Windows Start or Windows icon.
  • Fill in the Start Search field in Devices and Printers.
  • Select from the search results the Devices and Printers option.
  • Wait until you see the computer-connected printer list.
  • Click on the printer to control the ink levels.
  • Locate the ink and toner levels on the bottom of the status area.
  • Expand the register and view the estimated cartridge ink levels.
  • Double-click on the printer icon for additional printer information.
how to check printer ink

Check Estimated Tin Levels on Cart Using MAC Tools

To check ink level of the printer, first turn on the Mac computer and then click the Apple icon. Access the Menu Bar System Preferences option. Click the option for Print & Fax, Printers & Scanners, or Print & Scan. Select from the list the HP printer you are using. Expand the menu Options & Supplies and click on the Supplies tab. Both cartridges show the ink levels on the screen.

USING HP SURE SUPPLY

Open your system browser and type HP Sure Supply in the address bar. If you already have one, click Search and on the Results Screen, sign in using your account and other login credentials. Go to the end of the page and click on the Create Account button if there are no login details available.

Type your personal information, set a new password and click the’ I accept the Terms & User Agreements ‘ checkbox on the next page. Access the Home menu My Account window. Click on Add Printer and type in a Printer Model Box the name of your HP printer with the model number. Wait for a while and a list of printer models will appear and the process of checking ink is continued.

Locate your printer from the list and select the Add to List option to open the window that was added to your printer. Now click Shop to buy new ink supplies or add an additional printer. HP SureSupply monitors the ink pad and notifies you of low ink levels.

WINDOWS–HP SMART APP FOR WINDOWS 10

Get and install HP Smart from the Windows Store. After the installation process is complete, start the app and register your printer with the necessary credentials. Go to the Ink menu on the home screen. To open the Ink window, click View Ink levels or Estimated Ink Levels. Replace the ink cartridges if the ink is low.

EPSON

Open your computer’s internet browser. Click Print to navigate to the File menu. To access the Epson printer settings and controls, select the Properties or Preferences button. Access the Maintenance tab and select the Epson Status Monitor icon. The graphic on the ink level of the printer appears in the Ink Levels menu. Click OK to leave Epson Status Monitor and click Cancel to finish the dialog box for maintenance to conclude the process of checking ink levels for the printer.

0 comment

 Is there a connection to my printer?

You must print the wireless test report to check that my printer is connected. Check whether the printer connects to the network after printing the report. Following are instructions for printing the test report on the wireless network.

  • Please press on the wireless button of your printer to see whether you have access directly to the report to print.
  • For more detailed instructions, please refer to the printer manual.
  • In the diagnostic results area of’ connectivity’ check that Connected is indicated as PASS.
  • If Connected is not specified as PASS your HP printer is not connected to the network.
  • Check whether the wireless router is enabled. See also whether the router works correctly.
  • Try connecting the printer back to the network.
  • In the current configuration zone, check if the network name matches your network name. Current configuration area.
  • If it’s not connected or if my printer is connected, use the following instructions to connect a printer to the network.

The detailed procedure for reconnection of the wireless printer

Utilize these instructions to see if a printer is connected to the network. If you are unsure whether your printer is connected or not. Go to the printer control panel and try to print the test report on the Wireless Network. Check to ensure direct access to this report by pressing the Wireless button.

Refer to the printer’s manual if you wish detailed instructions. You have to check the following things when the Wireless Network Test report has been printed. Locate the’ Connectivity’ area of the diagnostic results of the test report and check whether Connected is shown as PASS.

It means that a printer is not connected to a network if it is not indicated as a PASS. Please ensure the wireless router has been switched on and that it works correctly. See if any messages can be found at the top of the report.

If yes, the page instructions will be followed. In the Test Report, search the currently configured field and verify if your network name is identical to the network name (SSID). Try this again if the printer is not connected to the network.

You are encouraged to choose the connection mode during installation in the printer. Select USB, Ethernet, and Wireless and continue to use the on-screen prompts. To connect the printer to a wireless network, you can use HP Wireless Direct and Wi-Fi Direct.

See, if the cable is connected to a printing network port, and to the available port of the router if you have a wired network connection. Make sure that the light is constant in the green link. Make sure that the light blinks with the orange activity.

Open the Wireless Network or the Settings Menu on the printer if it’s a wireless network connection. Check then if you are activating the wireless signal. Confirm the light on and constant of Wireless Icon. It will then mean that the primer is connected to the wireless network if all of the above are met and will clarify your request to my imprimer.

0 comment

Print My Printer Connection Print a document from the computer to verify my printer connection. When the printer prints the document, this indicates that the printer is connected to the computer and the rest of the operations are continued.

How do you connect a wireless network to my computer?

  • Switch on the computer and allow it to fully boot.
  • Enter your computer’s login credentials to sign in.
  • Go to and activate the WiFi settings in the computer control panel.
  • Power the router and wait for a stable connection.
  • Check on the router for connectivity lights.
  • To use it later, collect network information such as ID and password.
  • The computer looks for the nearby networks.
  • Enter the connection password.

How to connect my computer to the printer?

The computer needs to be connected to the printer and can be downloaded gratuitously from our website. Make sure the newest version is downloaded from our website when the printer driver is downloaded. Follow the instructions step by step to connect to the computer for My Printer Connection Check.

A router, a computer and a printer are required to establish a proper connection. Connect the router with the printer to the computer. First, connecting the computer to a wireless Internet network, connecting the printer to the computer, allowing computer to boot up completely. Enter your computer’s login credentials for signing in.

Go to and activate the WiFi settings in the computer control panel. Power the router and wait for a stable connection. Check on the router for connectivity lights. To use this information later, collect network details such as ID and password. The computer looks for the nearby networks. Enter the connecting password.

Download the driver on the machine by selecting the right model printer. In addition, make sure that your driver is the latest and the bit version is suitable for your OS. After all parameters have been checked, click on the download button.

To start driver installation, navigate to the computer download folder and double-click on the file. Select the driver’s language for installation once the installer has been opened. Agree with the installer’s terms and conditions for the connection to start.

After all these terms are agreed, the printer asks to choose the connection type. When using a USB connection type, the USB cable should be inserted into the printer when the installer is prompted. Select the country and area to install the printer driver.

After the driver installation has completed, click Finish. Ensure the printer driver is installed correctly in the printer. Test Print a paper to test the computer-to-printer connection that solves Check My Printer Connection.

0 comment
Newer Posts