Category:

Printer Issues

How To Fix Printer connection problems [Updated]

by printerhelp

The printer connection issues can be resolved if devices are moved closer to the router, Wi-Fi interference can be minimized, etc. Restart and disconnect your printer, too. Make sure your printer is activated and connected.

Printer connection issues and their solutions

  • Make sure the power source of the printer is on and connected correctly.
  • Restart the printing machine.
  • Update the drivers of the printer.
  • Move your printer closer to your router.
  • Minimize interference with the Wi-Fi channel.
  • Make sure the printer is linked to the right network.
  • Check and ensure that the USB connection of the printer is properly connected to your printer computer.
  • In case of wireless printers, check for wireless connection.
printer connection problems

The solution to resolve the problem of printer connections

  1. Sometimes power cycling can resolve the problem of printer connection. Switch off and unplug your printer.
  2. Wait 30 seconds and plug your printer back. Then switch the printer on again.
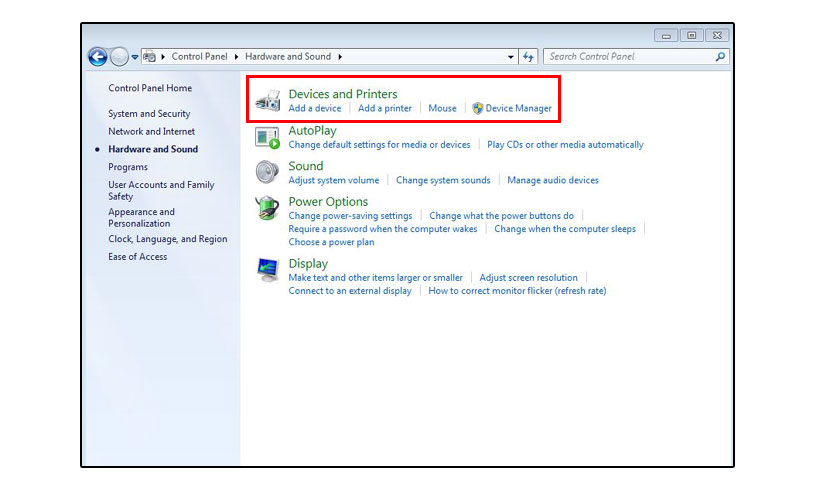
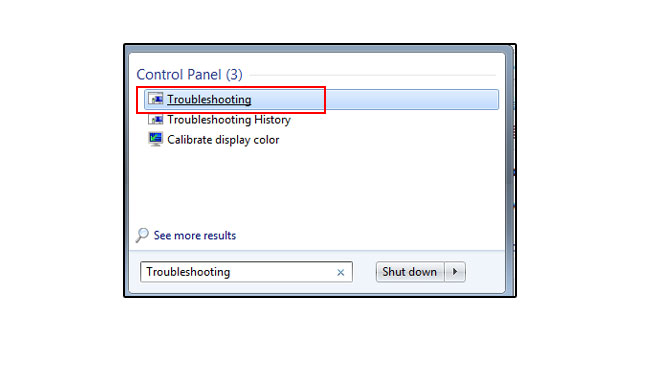
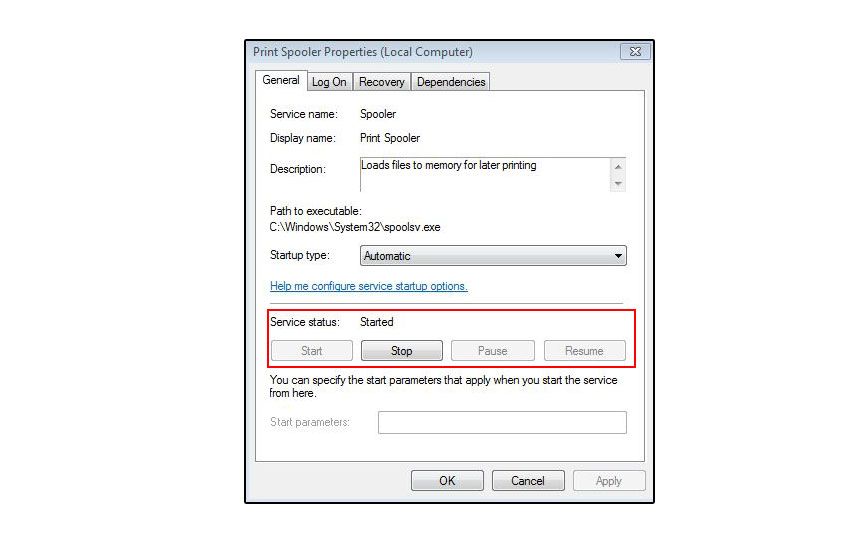
  3. Update the driver by selecting the Start button and type the Device Manager in the taskbar search box.
  4. And select Device Manager from the results list. You can request an admin password to prevent problems with the printer connection.
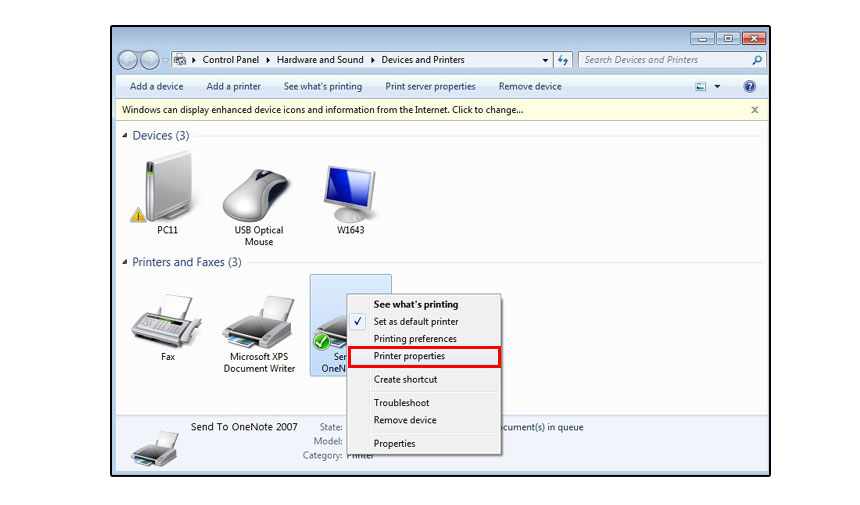
  5. Expand Printers, see the printer in the list. Right-click and select Driver Update.
  6. Automatically select Search for updated driver software. Then install the Driver software and download it. Now the driver of the printer is updated to solve problems with the printer connection.
  7. If you’re too far from the router, your printer and your computer could be too weak.
  8. To improve the signal strength, move the computer and printer closer to the router.

Wi-Fi signals may interfere with the nearby networks using the same router channel. Thus, you can minimize Wi-Fi interference by checking for local networks on the channel and changing it to a different channel by configuring the router to avoid problems in printer connections.

Disclaimer: printerssetup.org is an independent website for providing you with information regarding HP printers. This site doesn’t have specific association with “HP” and its services. All the information and images used in this website are for informational purpose only. We do not sell products or services of HP in any form. We do not provide any warranty or services associated with manufacturer. You should approach the manufacturer for the same.

0 comment

How to Troubleshoot Insufficient Memory in a PostScript Printer

by printerhelp

Troubleshooting Insufficient Memory in a PostScript Printer

Troubleshooting Printer Issues

Troubleshoot Insufficient Memory

Fixing problems of a printer in Windows can be a quick step, especially if users don’t need to try a few complex steps to solve the problem. Even if you have attempted to print a document on a PostScript printer and found an “Insufficient Memory” error message, workarounds are available to correct it.

The error is exactly what is written; the print work you started with a PostScript printer requires more device memory. An incomplete part of the printer will also result in the printout indicating that the printer is so to speak running out of memory. For example, if you have a true-type font downloaded as a font type42 in the to-printed document, then the printer’s memory might not be enough to apply the source in native, TrueType format. The printer will seek to space the font, but finally its memory will overrun and the error message will be displayed on it.

Firstly, you have to add memory to your device for troubleshooting printer issues within PostScript software. See a user manual that is combined with the printer for information on how to add memory to a PostScript printer. You may need an overview to get a poor error message to pop up in your control panel or Windows PC until the memory of such printers with PostScript software is expanded.

 PostScript print workflows

To address this problem, you need to optimize PostScript printing in such a way that the printer can supply the output in the future. Try to set up the TrueType Font Download option as displayed in the following steps.

  • Use the administrative account to login to Windows PC.
  • To find and open devices, printers or printer and faxes, click the Start button and search the Control Panel.
Devices And Printers
  • Right-click the printer and select Properties from the pop-up folder.
Printer Properties
  • Choose Layout and Advanced to choose the Print Preferences option.
 Printing Preferences
  • Click on the PostScript Options to download the native font
  • If selected earlier, please click on Bitmap or outline. Click the Auto in TrueType Font download checkbox.
PostScript Options
  • Save and lock the Printer and Control Panel Settings

In the event that you find it difficult to troubleshoot printer problems after the above steps, you should contact a reliable printer support team for a prompt response.

Disclaimer: printerssetup.org is an independent website for providing you with information regarding HP printers. This site doesn’t have specific association with “HP” and its services. All the information and images used in this website are for informational purpose only. We do not sell products or services of HP in any form. We do not provide any warranty or services associated with manufacturer. You should approach the manufacturer for the same.

0 comment

Open The Printer Troubleshooter And Run The Troubleshooter – Printers Setup

by printerhelp

Open and run the printer troubleshooter to diagnose and resolve any problems with the printer. The problems can be connected with the printer’s hardware or software. Use the HP Print and Scan Doctor tool if you have small problems with printing or scanning.

Steps For Opening Printer Troubleshooter Use the printer troubleshooter steps.

  • Get your computer or phone with the HP Print and Scan Doctor.
  • Use this application to solve problems with printing.
  • Use this tool to solve scanning problems.
  • Download and install the software on your computer.
  • Run the application from the downloaded location and view the problems it shows.
  • Fix the problems following the onscreen prompts.
  • View the other applications available to solve your printer problems.
open the printer troubleshooter

Diagnosis The Problem And Run The Printer Troubleshooter

There are many problems with your hardware or software related to a printer. You may have problems performing operations such as printing, scanning, establishing the wireless connection, and similar problems and then open the printer troubleshooter tool to help fix your problems.Tools are available to fix printer problems. If you have a Windows computer, your tools are different from the one you use if you have a Mac. Besides the troubleshooter tools, troubleshooting steps are also useful for solving the problems.Check the kind of problem you face and view the suggestions for opening the problem solver printer tool to fix it. If your printer shows an offline display or does not respond, the first step from your Mac is to reset the system for printing. The first step in troubleshooting is resetting.Fix the problem by resetting the printer. Turn on your printer if it is in sleep mode to reset your printer. To wake up your printer, press the Power switch. Load correct paper type on an input tray, install appropriate incoming cartridges in your slots and ensure that the printer control panel does not contain blinking error lights.Restart and not proceed until your printer is ready. Try to print and see whether the problem has been resolved. Then tap the Apple menu and tap Preferences for System. Click Print & Scan, Print & Fax and any displays of Printers & Scanners. Just type anywhere within the window of the Printers and tap Reset printing system.In the confirmation window, tap Reset. Type the name and password of the administrator and select OK to complete the reset process. After your printer has been restarted, you should not forget to add your printer to the list. Try to print and if the problem remains, other troubleshooting steps are available to solve the problem.The troubleshooting app for HP Print and Scan Doctor is not available on Mac. You can use the correct drivers and software on your devices instead of that tool to prevent the issue and then solve it by opening the printer troubleshooting.

Disclaimer: printerssetup.org is an independent website for providing you with information regarding HP printers. This site doesn’t have specific association with “HP” and its services. All the information and images used in this website are for informational purpose only. We do not sell products or services of HP in any form. We do not provide any warranty or services associated with manufacturer. You should approach the manufacturer for the same.

0 comment

How to Troubleshoot Google Cloud Printer Offline Issues

by printerhelp

 Troubleshooting Steps for Google Cloud Printer Offline Issues

Printer Offline Fix

Cloud Printer Issues

For using the Google Cloud Print service or for printing over the cloud, users require a Google Account, a printer that supports the service, or a PC which can run Chrome browser and is connected to a compatible printer, or a mobile device that is capable of sending print tasks to Google Cloud print service. The service of Google works like a breeze most of the time, but there are occasions when it may go offline.

In fact, the reasons as to why a Google Cloud ready printer turns offline are yet to be known to the tech world. At least, bringing such printers back online is not a best-kept secret. If Google Cloud printer is not working, you need a solution that extends beyond uninstalling and reinstalling the compatible printer driver and then linking it to the Google Account to retry printing over the Cloud Print service. Instead of that, you can follow the below steps on either a Chrome-enabled device or a computer with Google Chrome installed in it.

Prior to trying out the below Google Cloud printer offline fix, ensure that the below things are in order:

  • The Google Cloud Print compatible printer is turned on.
  • The computer has not gone into a hibernation state or sleep mode.
  • The internet connection is enabled on the PC.
  • Google Chrome is installed in the computer, it is connected to the printer, and that you are logged into Google Account.

If the printer is still shown as offline, try the below troubleshooting steps to bring back the Cloud printer to the online state.

  • Open Google Chrome browser on the computer or compatible smartphone.
  • Enter chrome://devices on the address bar of the browser and press Enter key to navigate to the path.
  • If the Google Cloud ready printer does not switch from offline mode to online automatically, click on Manage button next to the linked printer listed under My Devices and you are good to go.
Google Cloud Printer

In fact, the compatible Printer for Google Cloud should wake up and start printing when opening the Devices website. This is particularly the case if documents are still to be printed. If the Google Cloud print fix above does not work, contact the support team for assistance. If it doesn’t work.

0 comment

Troubleshoot “Printer Not Responding Error” on Windows 7

Troubleshooting Printer Problems

Common Printer Issues

If a printer stops reacting, an error message is displayed on the Windows PC when it tries to print something. Several facts cause this error such as misconfiguration, faulty links, buggy printer drivers, spoolers, etc. If you find the error, find the following steps to resolve printer problems.

Basic Troubleshooting

First, make sure that the connection from the printer to the computer is good. Make sure no loose cables are available if you use physical connections. The same applies even if you rely on a Wi-Fi network. Turn off the printer, the PC, and the Wi-Fi router if you use wireless connections, and then keep them off for a long time before recharging them. Then try printing on Windows PC to see whether this will solve the problem.

Run the Printer Problem Fix Utility

Windows has a built-in troubleshooter to find and troubleshoot printer problems if applicable. If you discover a printer that has not responded to a problem with Windows 7, follow the steps below to resolve this problem with the Printer Problem Resolution.

  • Click the Start button and enter the problem resolution into the search box.
Troubleshooting Printer Issues
  • Click Use a printer below Hardware and Sound in the next window of the control panel.
Hardware And Sound
  • Follow the troubleshooter wizard instructions and click Next. In the event the tool finds printing problems, either it or resolutions from other sources have to be solved.
Troubleshoot Computer Problems

 Restart Printer Spooler Service

Follow the steps below to restart the printer spooler services that manage print jobs on Windows.

  • If you use a Guest account, restart the PC and sign in.
  • Then click on and hold down Windows and R keys simultaneously, enter the services.msc key in the Run dialog.
Windows XP
  • The Print Spooler in the list of Windows Services is located in the following window. Click Print Spooler service to open it with a double click.
Print Spooler Services
  • Click on Stop Under the Services Status option in the Print Spooler Properties dialog box to restart the spooler. Click Start and OK if you are deleted, to confirm your action. In the event it is deleted.
Print Spooler Properties

If the printer does not respond to an error, contact a professional printer service for further advice on troubleshooting printer problems, although you are trying all the above steps.

0 comment

A hard reboot is performed on the printer to fix printer you will not print from the computer. Look at the ink cartridges and make sure they are installed correctly. Check the connection network / USB. If you are connected to a network, don’t use USB. Drivers and firmware update.

My printer will not print, copy, scan from computer

  • Check Network connection status on printer and computer.
  • Make sure both devices are connected to the same network.
  • Make sure you unlock the USB cord when you connect wireless.
  • Uninstall and re-install the printer driver in the latest version.
  • Check whether the ink cartridges are complete and properly installed.
  • Review and change the print settings accordingly.
  • Check for firmware updates and proceed if one is available.
  • To print and copy your documents, use a proper application.

Steps To Do The Printer Print From the Computer

USB PROBLEMS

Fix Printer will not print from the computer. At least a minute wait. Wait. Connect the cable back to another USB port. If your computer or laptop has a USB 3.0 slot, plug the cable rectangle into the slot. It is best to use a USB 3.0 cable for quick data transmission.

If other USB connected devices are not in use, remove them from the laptop. Enter a command and add the printer to the current Mac or Windows printer queue. If USB settings are overlapped, the current printer driver should be uninstalled. Reboot your computer and reinstall the driver by the Apple Software Update or Windows Update.

WIRELESS PROBLEMS

Check that the printer is connected to an active and continuous Internet connection at an accurate access point. The wireless network frequency should not exceed 5.0 GHz. To check the network connection, IP address and signal strength, always print an information page from the printer.

Get your computer’s latest version of the HP Print and Scan Doctor tool to fix wireless issues and your imprimer will not print from your computer. Click the Fix Print option on the Start screen of the tool and then select the printer you wish to troubleshoot. Go with the prompts on the screen to solve connection issues. You can also try to default your printer to print.

RESET THE PRINT ENVIRONMENT

Wait a minute or until the printer turns idle before the next step is taken. Detach the USB connector at the back of the printer from the USB port. Leave the printer connected to a network or a USB source. Unlock and open the access door for cartridges; wait until the carriage turns passive. If you remove the ink cartridge from the printer, keep the printer on and disconnect the electric cord from the power port of the printer and the wall outlet.

After about a minute, plug the cable back into the power source. Attach the other end of the cord to the power port. Wait until the printer automatically switches on and, if it fails, press the power button for a long time. Once powered, the printer is warmed up with the lights blinking continuously on the access panel. When the process is complete, reinsert the tin cartridges into the tin slots and close the access door of the cartridge and resolve the printer will not be printed from the computer.

0 comment

Let you start how to fix the printer driver by upgrading the printer driver software, setting the printer as the default printer to avoid duplication, etc. The driver software connects the printer and the computer, and the driver has to be installed.

 Quick steps in searching and opening for Windows

  • Update on Windows to fix printer drivers.
  • Select Update Check and select the updates you want to install.
  • To install only essential updates, choose Install Updates.
  • You can choose Optional Updates to select all the updates available.
  • Choose updates from the Optional and Important tabs list and choose OK. Reboot the computer after the updates are installed.
  • Select the icon for Windows, select Devices and Printer.
  • Right click on the HP Printer, set the default printer and next to the printer the checkmark appears.

Preparation Steps to Fix Printer Drivers

  1. Sometimes the problem of the printer driver is due to updating the printer driver problem and how to fix it. In order to update printer driver, search Windows Update and open it in Windows.
  2. Choose Update check and install updates. HP recommends that both Important and Recommended updates be selected.
  3. Important updates are critical for computer health. Select Install Updates to install only essential updates.
  4. There are no optional upgrades, but they are recommended. To select all available updates, select Optional Updates to fix the error using the printer driver manual.
  5. Select updates from the Important and Optional Tabs list and then select OK. The computer restarts after the update is installed.
  6. Sometimes Windows can not manage the default printer if multiple printers are connected or network printers are used. It is therefore good to manually create a certain printer as a standard device. This helps to print documents in the standard printer. Go to the Control Panel and turn the view into large icons. The Devices and Printers search option.
  7. Please select any printer connected and choose Set as the Default Printer option. To confirm it, choose OK.
  8. Select the Apple icon, choose System Preferences, then select Print & Fax.
  9. The printer and fax window is opened and the drop down menu next to the default printer is selected and the device can be deleted by following the manual for fixing the printer driver.
0 comment

 How To Fix Printer Scanner Problems?

Printing, scanning and faxing are available on all-in-one printers. Problems can occur if the printer is not properly configured. Fixed printer problems Scan solutions can be found and your printer can be scanned based on the displayed error.

  • The Scan Issue checks Settings and connections leading to printers for troubleshooting scanning issues in the Printer.
  • Print to ensure that the error only occurs during scanning.
  • Analyze the printer’s network connectivity status.
  • Download the printer driver again and reinstall the printer software.
  • Check the acquirement settings for Windows Image.
  • Mute your computer firewall temporarily, as it can block your printer connection.
  • To solve the problem automatically use the Print and Scan Doctor tool available.
  • Clean ADF rollers and the printhead.

Effects to Eliminate Misrepresentations

fix printer problems scan

In a scan analysis, print and scan the problem. You should connect the ethernet port to the router. Make sure the orange and green lights are bright on the router. If there are no consistent lights, restart printer and router to correct scanning problems with the printer.

Use the wall power outlet instead of the adapters. Shorten and shut down the computer all other applications that run on your computer. Turn the printer and computer on after a while. Hunt on the computer for your model printer name and double-click to login.

Many routers operate with a frequency of 2.4 and 5.0 GHz, but not all printers support this frequency range. To view the connection status and position your printer and desktop nearby, click the Network icon present in the toolbar. Place your printer and system near the router if the signal is incorrect.

Print and Scan Doctor free download. You can download the tool from the link. Click Set Fix from the displayed options. If there is no problem, a tick mark will appear, a tooled logo will appear when a problem has been fixed and if the test fails an exclamation mark.

The Windows Imaging Acquisition (WIA) is a computer-to-scanner support assistant. Sometimes scanning may fail when WIA is not enabled. Turn on the WIA in the local settings. The “Started” or “Automatic” status should be given. Change the settings when showing “Disabled.”

The Automatic Feeder Document (ADF) is some printer. The ADF can cause the scanner to function incorrectly if it is unclean or covered with remaining pieces of paper. To wipe the residues, use a clean, lint-free cloth and not to wipe the ADF using any water.

Firewall usage may block your printer’s network connectivity. The firewalls are designed to block your computer’s suspected network connections. It blocks your network of printers as well. To scan and correct printer problems, check firewall settings and temporarily block your firewall.

0 comment

How to Fix Printer Issues in Windows 10

Offline errors, cartridge mistakes, print quality problems, connectivity problems, etc., are common problems in printer settings. Some of the problems can be solved directly from your computer’s printer or operating system. If your computer’s operating system is upgraded to Windows 10, the printer may not work correctly, therefore you must fix windows 10 printer problems.

Removing printer problems with Windows

  • Download and install on your computer the HP Print and Scan Doctor software.
  • To resolve offline mistakes, scans problems and other common errors, run the software.
  • Make sure you set the printer on your computer to be the default printer source.
  • Please update your printer’s USB driver.
  • Reset the printing spooler and clear all tasks for printing.
  • To identify and solve the problem, use the Windows troubleshooter printer.
  • If necessary, clear the queue of the print.
  • Contact us for any assistance by dialing the toll-free number.
fix printer problems windows 10

Solutions to fix printer problems installed on Windows 10

If the printer is running on any other computer, USB drivers might be problematic. Press the Windows and R key to open the Run dialog box on your computer. In the dialog box, type dvmgmt.msc, then press Enter. Enter an admin password and fix windows 10 Printer problems with the printer if prompted.

The Universal Serial Bus Controller will be opened and then developped. Locate your driver for the USB port that starts on the chipset or controller name. Don’t take into account the driver names from mass storage, generic USB etc. Give your USB controller the right-click and choose your software for update driver. In the next opening window, choose the option’ Automatically search for updated drivers.’ Click OK when the process is over. The reboot of the printing spool service and the printing tasks can be resolved. To open the Run window, press Windows and R Keys, and type’ services.msc’ in order to open the service window. Scroll to and right-click the Print Spooler option. Choose “Stop” now. This will stop your print queues process.

Now open the folder “My Computer” to open the window. The queue service of the printer is blocked already. The next step will therefore be to remove the jam. Right-click the Windows folder Print Spooler option and select the Reboot option. Remove all fires from the folder, open the Spool folder. Close the window of Explorer. Restart the Print Spool service, go back to the Services window. Try to print after the services window has been closed.

The problem solver can automatically detect and resolve problems. Press the Ctrl + R keys and enter Control on your search field. Open the Execute Dialog box. Hit Enter. Hit Enter. Type Troubleshooter and click on the troubleshoot option in the following box to open.

Select the Printer option to go to Hardware and Sound item. Enter the password for the manager when requested. Next tab click and wait to scan problems for the troubleshooter. Fix windows 10 printer problems by following the instructions.

0 comment

why My printer does not work? [Solved]

The problem with the printer is due to problems such as black or colored ink, not printing, the printer is offline, etc. To solve the problem of black or color-ink non-printing, reinstall the printer driver and use genuine ink cartridges.

  • Steps To Fix Printer Does Not Work Open the document, choose the File and select Mac Print.
  • Select the Type / Quality paper or Media and Quality menu.
  • To save the settings for future print jobs, select Save in the Presets menu and then name the new preset.
  • Choose File from Windows software application.
  • Select Print that opens the window of the printer.
  • Open the dialog box of Properties or Preferences.
  • Change settings such as paper size, quality of printing, type of paper, etc. Choose OK and then choose Print.

Detailed steps to solve the problem solving of the printer ensure you use the appropriate printing paper

printer does not work why

Check the estimated tin levels and replace the new one with the low or empty tin cartridges and find Printer Don’t Work Why.

Select the file in the software application and select Print for the print settings in Windows. Open and open the Properties dialog. The Print window opens. Change the paper type, print quality, paper size and more depending on the job you print. Select OK to apply the settings and then select Print after selecting the print settings.

Reinforce the area around the ink buckets by collecting lint-free cloth, dry rubber buckets, or any other soft material.

Hold the handle on the printer sides. Then raise the access door to the cartridge until it is locked. And the cartridge is moving into the printer’s center.

Wait until the cartridge is silent and idle before you go on. Remove the power cord from the printer’s rear. Lift the deck on the cartridge slot to release the cartridge. Then push the lid back gently until it stops.

To remove the slot, pull up the ink cartridge. Keep the ink cartridge on its sides. A lint-free towel or foam-rubber swab with distilled water lightly moisturize.

Squeeze from it any excess water. Clean the face and edges of the ink nozzle in the swab softly. Let the cartouche sit for 10 minutes to let the cleaned area dry or dry with a new swab.

Hold the ink cartridge to the printer on the sides with the nozzles.

Slide the cartridge in the slot forward. Then, close the cartridge deck to secure the cartridge. And close the access door of the cartridge and resolve Printer Does Not Work Why.

0 comment
Newer Posts