Author

printersetup

123.hp.com/oj3830 Setup

by printersetup

123.hp.com/oj3830 Printer Setup & Installation

123 HP Officejet 3830 Printer Setup

When you require printing a page instantly, you need not step out to do the print job when you have your own printer at home. 123.hp.com/oj3830 Here, you have the best printer right before you with surprising features in it.

The Officejet 3830 printer has good mobile connectivity options such as the HP AiO Remote app and more. The printer has built-in fax capabilities through which you can easily send and receive faxes. The photo quality is good as well.

123 HP Officejet 3830 Printer Features

123 HP OJ 3830 AiO Remote app

When it comes to mobile printing, HP AiO Remote app is the perfect choice. With the HP AiO Remote app, you can send and receive high-quality pictures and documents through your handy devices.

123 HP OJ 3830 Photo Quality

This is an ideal budget printer for those who want to print photos from phone and tablets with paramount quality; it produces splendid photo prints at a good speed.

123 HP OJ 3830 Built-in Fax

The printer has built-in fax capabilities where you can send and receive faxes from the web or email at an instant speed. You can contact our professionals for any fax related issues.

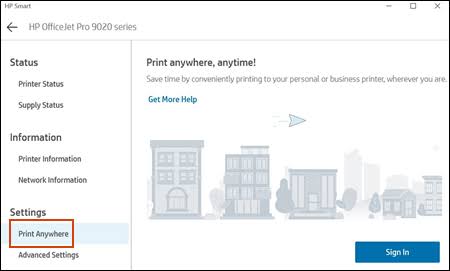
123 HP Officejet 3830 Mobile Application Setup

123 HP Officejet 3830 Airprint Setup

AirPrint is an exceptional feature with which you can print a document or a photo from an Apple device by connecting your HP compatible printer to a wireless network. If you are using an HP AirPrint compatible printer that contains wireless features, then these instructions help you set up AirPrint.

Read More

123 HP Officejet 3830 ePrint Setup

HP ePrint is a cloud-based service that generates prints easily from your Android, Smartphone or Tablets. Print from anywhere with a live Internet connection. You can email the document or photo you need to print directly to the 123 HP ePrint enabled printer.

Read More

123 HP Officejet 3830 Cloud Print Setup

Google Cloud Print allows you share printers with just a click. Any type of app when connected to a web-connected device, can use Cloud Print. You can connect a printer to your Google Cloud Print account and start printing on it. Handling printers and print jobs in Cloud-ready printers is simple.

Read More

HP Officejet 3830 Latest Driver & Manual Download

123.hp.com/OJ3830 Driver Setup

Download the Updated Printer Driver:

  • Avail the latest version of the printer driver from 123.hp.com/oj 3830 us within seconds.
  • Click the link to download 123 HP Officejet 3830 for Windows and Mac compatible printer.

Driver Download

123.hp.com/OJ3830 Manual

Download the Easy Procedural Guide:

  • Our easy step-by-step instructions help you setup and troubleshoot printer on your own.
  • Click the link to download the user manual for your corresponding 123 HP Officejet 3830 .

Manual Download

123.hp.com/OJ3830 – Printer Quick Tips

  • Turn off your printers when it is not in use as they tend to produce heat while they are turned on.
  • Do not use a wet cloth or tissues to clean the print head and inside the printer.
  • Never compromises on the quality of the hp officejet 3830 cartridges. Make sure you use the best-in-quality cartridges for your printer from 123.hp.com/oj3830.
  • Use only purified or bottled water to clean your hp oj 3830 printer (Do not use tap water).

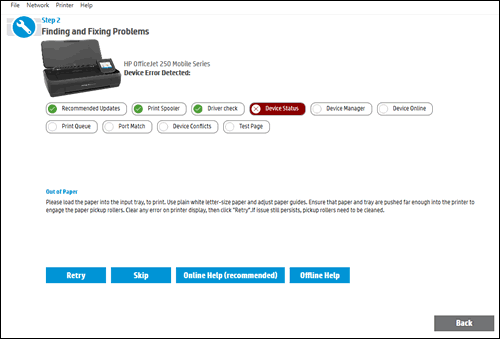
123.hp.com/OJ3830 – HP Officejet 3830 Printer Troubleshooting

What if my printer does not print after connecting to the network?

You have configured the printer to a wireless network successfully, but the connection is lost. When the printer does not maintain the connection, you might encounter hassles when printing and scanning. There are several possibilities through which you can resolve this connection issue,

  1. Sometimes, your printer may not be connected to the network properly. To resolve this issue,
    • To see if there are any connection issues, you will need to print a Wireless Network Test Report from the printer’s control panel. On the Network report’s result page, the connection issues if any will be displayed at the top of the report.
    • If there are no issues displayed on the Report page, access the Printer’s Homepage. To do this, you will need to detect the printer’s IP address from the report page. If you can’t access the printer’s Homepage, try power cycling the printer and your router and then try again.
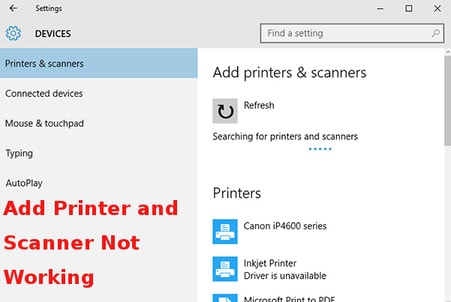
  2. Your computer might not have connected to the same network as your printer. To resolve this,
    • Open any of the web browsers that you have installed on your computer and type the printer’s IP address in the address bar to access the printer’s home page.
    • If you are able to access this web page, then your computer and printer are connected to the same network.
  3. Sometimes, the firewall software or antivirus you use might be blocking the printer. Disable the firewall software by clicking ‘Always allow’ for HP printers, in the popups shown by the firewall software.
  4. Your wireless router may not work well.
  5. The issue may also befall when the IP address of your printer is changed. Then, you will need to update the software with the modified IP address. To update the software with a new IP address:

If you are using Windows XP, Windows Vista or Windows 7 computer:

  • Click, select Programs, then choose HP from the list of options.
  • Under HP, choose your printer name and then select Update IP Address.

If you are using a Windows 8/8.1 computer:

  • Open the printer software from the Start screen.
  • On top of the Printer Software screen, choose ‘Utilities’.
  • Click Update IP address and enter the new IP address.

Why does my scanned output have vertical streaks all over it?

While scanning a document, there may be vertical lines all over the scanned output. Some of the common sources that lead to distorted outputs are:

  • Static interference
  • The USB cable or power cable not connected properly
  • Fingerprints, smudges, lint, or dust that are existent on the scanner glass
  • Dust or debris on the scanner lid or that remains inside the printer
  • Damaged or scratched scanner glass
  • Poor internal connections
  • Faulty or defective scanner bulb or parts

To evade these distorted outputs, do remember to keep your printer and scanner components clean. If the connection issue persists even after in-depth cleaning, you will have to follow the steps given below to reset the 123.hp.com/oj3830 printer.

  • Ensure that the printer is powered on and then disconnect the power cable from it.
  • Detach the USB cable, from the printer and the computer, and reconnect it.
  • Detach the power cable from the wall socket, and connect it again.
  • Now connect the power cable to the printer.
  • Press the Power button and turn on the printer.
0 comment
123-hp-com-envy5530

About 123 HP DESKJET 3052A Printer

  • 123.hp.com / 3052A Setup
    A multipurpose color printer
    Allows you to search, copy and print a picture in color
  • Comes with optimized wifi
  • Wirelessly print connection of your smartphones , tablets and other wireless devices to 123.hp.com/dj3052A setup
  • HP Supported Wireless Printing
  • Comes with direct wireless printing feature.
  • Comes with automatic 2-side printing feature which reduces your paper usage by 50 percent
  • Manage your tasks of printing , scanning, copying, and faxing using HP all in one remote program.
  • Page size is between 100 and 400
  • 123 HP Deskjet Setup 3052A comes with borderless printing function
  • Black print rates are up to 9.5 ppm and color up to 6.8 ppm
  • Supports Mac operating systems with Windows Driver
  • Scan to email feature helps you to transfer the scanned documents , files or images directly from your printer to the recipient.

123 HP DESKJET 3052A Features

123 HP Deskjet 3052A Print

Quick to print, with Deskjet 3052A 123 HP
All-in-one printing press. Connect your Tablet or smartphone wirelessly to the printer. Use the print functionality without a network; share this All-in-One with other wireless devices.

123 HP Deskjet 3052A Scanner

123 HP Deskjet 3052A Quick to search
All-in-one printing press. Link your Smartphone or Tablet wirelessly to your printer. Without a network, use the scanning feature; share this All-in-One with other wireless users.

123 HP Deskjet 3052A Fax

Simple manual faxing. Link your Smartphone or Tablet wirelessly directly to your printer. Enjoy faxing features, share this all-in-one 123 HP with other wireless-enabled computers.

123-hp-com-wireless-setup-windows

Unboxing Set Up 123 HP DESKJET 3052A
Printer

  • HP Deskjet printer, first ensure all the parts are included in the package, and then remove the printer from the box. Now remove all of the printed tapes, packaging substances carefully.
  • Within the scanner lid you can find other packaging materials. Send them down, too. And closing the lid carefully to the scanner.
  • Remove the packaging material from left in the region of the ink cartridge. Now open the paper tray, and remove the paper tray tapes. Slide out the guides now, and push in the tray.
  • Plug in the back of the printer on one side of the cord, and the wall outlet on the other.
  • ON and choose settings on your printer. You get prompted to use the language, region / country, and other general setting dialog box.

123 HP DESKJET 3052A CONNECTIVITY MODES

Learn how to connect hp 3052a to wireless network

123 HP Deskjet 3052A Wireless Printer Setup

Setup, download and update information for starting your 123.hp.com/dj 3052A Wireless Setup is provided in the details given below. Learn how to ready for installation, download the HP Deskjet 3052A driver and connect wirelessly. For any questions or inquiries, please contact our professional expertise.

123.hp.com/dj 3052A Wireless Setup on Windows

If you want to start with wireless installation 123.hp.com/dj 3052A, first you should know the name and password of the network. Once you have the name of the network and password you can start installing the wireless system.

123-hp-com-wireless-setup-windows
  1. Switch on your printer, router, and computer machine HP Deskjet 3052A.
  2. You will learn about SSID network. The SSID is the identifier for service set and is the name of the network.
  3. Gather your WEP key or WPA, which is a password for your network
  4. Confirm your link to your wireless network.
  5. You should have actively accessed the internet.
  6. Confirm the connection of your 123HP printer to your machine, and make sure both are on the same network
  7. Switch on your 3052A HP Deskjet Printer
  8. Place your printer next to the machine 123.hp.com/dj 3052A. (Make sure printers and computers are placed within the router’s range during the setup and installation process.)
  9. If any of the USB cables or Ethernet cables are disconnected, link to your printer.

Connect to the HP DJ3052A Wireless Network

  1. With the aid of the Wireless Setup Wizard you will connect your HP Deskjet 3052a printer to your network. If the HP printer installer is attached, your printer will be located during the installation process.
  2. Swipe the Dashboard off the printer control panel
  3. Now tap the button of Wireless. Touch the icon and select Setup
  4. Go to Network Configuration, and go to Wireless Settings 123.hp.com/dj 3052A
    Wireless Setup Assistant
  5. Choose your network name from the list of networks available now Confirm on OK
  6. If your network name does not appear in the list , select Enter New Network Name
  7. Now follow the on-screen directions to reach your network
  8. Then enter the WEP or WPA key when asked Sign up with Done
  9. If you hit OK, return to home screen

Download the HP DJ3052A Driver for Windows

Make sure you download the new printer program from 123.hp.com/dj 3052A to its complete capacity.

  1. Go to 3052A/123.hp.com
  2. From the list pick your model number
  3. Click On Start
  4. Tap The Download
  5. Go to Downloads directory
  6. Double click HP file name Quick Start now
  7. Now follow the instructions on your computer and complete installation process for the system and driver.
  8. Finally, go to 123.hp.com to complete registration and activation.

HP Deskjet 3052A Wireless Setup on Mac

To start with, you should first gather the network name and password, 123 HP Deskjet 3052A Wireless Setup and Mount.
Once you have the name of the network and password you can start installing the wireless system.

123-hp-com-install-wireless-setup-install-for-mac

HP Deskjet 3052A Software installation For MAC

  1. Switch on your printer, router, and computer machine 123 HP Deskjet 3052A
    You will learn about SSID network. The SSID is the identifier for service set and is the name of the network.
  2. Gather your WEP or WPA key which is a password for the network
  3. Confirm your link to your wireless network.
  4. You will have the active access to the internet.
  5. Confirm that your printer attaches to your machine 123.hp.com/dj 3052A
  6. Make sure printer and machine are located on the same network
  7. Check that the machine turns on your printer, router, and.
  8. Place your Deskjet 3052A 123hp printer right next to your machine.
  9. During setup and installation process, position your printer and computer within the range of the router
  10. When connected to your 123HP Deskjet 3052A Printer, disconnect USB or Ethernet cables.

Connect to the HP DJ3052A Wireless Network

  • Using Wireless Setup Wizard, connect your 123 HP Deskjet 3052A Printer to your network.
  • During the installation procedure HP installer will find your printer 123.hp.com/dj 3052A
  • Swipe down the control panel of the 123HP printer and open the dashboard
  • Touch Icon Wireless
  • Choose The System
  • Go to Enable the Network
  • Go to Settings on Wireless
  • Wireless Setup Assistant
  • Now pick your network’s name from the list of available networks
  • Confirm on OK
  • If your network name does not appear in the list then select Enter New Network Name
  • Now follow the on-screen directions to reach your network
  • Then type in the WEP or WPA key
  • Sign up with Done
  • If you hit OK, return to home screen

Download the HP DJ3052A Driver for MAC

Make sure you download the new and full-featured printer program from the HP website (123.hp.com/dj 3052A or) 123.hp.com. Disconnect all attached USB Cable and Ethernet cable to your computer and the printer.

  • Tap Download At 123.hp.com/dj 3052A
  • Access the Downloads folder
  • Double-click on ‘HP Quick Start’ file name
  • Follow the instructions on your computer and finish setup and installation of the driver
  • From the Download screen pick HP Quick Scan
  • Tap Next
  • You will see Your app connected and checked on your computer
  • Tap Add Gadget
  • Now pick Print Test Page or Scan Test Page (this option confirms setup of the printer)
  • To complete the setup, continue and follow the on-screen instructions
0 comment

123.hp.com/oj5740 Setup Printer Installation

123.hp.com/oj5740 Printer Setup Configuration

Transform your home office into a more creative work space with the sleek and full-featured HP Setup OfficeJet 5740 All-in-One. Haste through the home and work tasks with comfort, and generate laser-quality documents and border less, lab-quality photos.

Print wireless at home or on the go 123.hp.com/oj5740, while helping your busy family inexpensively accomplish its goals.

123.hp.com/oj5740 Printer Features

Use the HP Connected website

Use HP’s free HP Linked website to setup augmented security for HP ePrint, and specify the email addresses that are permitted to send an email to your printer. You can also get product upgrades, more apps, and other free facilities.

Send a fax using monitor dialing

When you send a fax using monitor dialing, you can perceive the dial tones, telephone stimuli, or other sounds over the speakers on the printer. This allows you to respond to prompts while dialing, as well as

123.hp.com/oj5740 Duplex printing

Is duplexing what you are looking for in a printer? Then, opt for the HP Setup Officejet 5740 printer without any hesitation. It saves your money, paper and time.

123.hp.com/oj5740 Mobile Application

123 HP Officejet 5740 Airprint

AirPrint is an exceptional feature with which you can print a document or a photo from an Apple device by connecting your HP compatible printer to a wireless network. If you are using an HP AirPrint compatible printer that contains wireless features, then these instructions help you set up AirPrint.

Read More

123 HP Officejet 5740 ePrint

HP ePrint is a cloud-based service that generates prints easily from your Android, Smartphone or Tablets using 123.hp.com/oj5740. Print from anywhere with a live Internet connection. You can email the document or photo you need to print directly to the 123 HP ePrint enabled printer.

Read More

123 HP Officejet 5740 Cloud Print

Google Cloud Print allows you share printers with just a click. Any type of app when connected to a web-connected device, can use Cloud Print. You can connect a printer to your Google Cloud Print account and start printing on it. Handling printers and print jobs in Cloud-ready printers is simple.

Read More

123.hp.com/oj5740 Latest Driver & Manual Download

123 HP Officejet 5740 Driver

Download the Updated Printer Driver:

  • Avail the latest version of the printer driver from 123.hp.com/oj5740 us within seconds.
  • Click the link to download 123 HP Officejet 5740 for Windows and Mac compatible printer.

Driver Download

123 HP Officejet 5740 Manual

Download the Easy Procedural Guide:

  • Our easy step-by-step instructions help you setup and troubleshoot printer on your own.
  • Click the link to download the user manual for your corresponding 123 HP Officejet 5740.

Manual Download

123 HP Officejet 5740 Printer Quick Tips

  • Improve your print quality by regulating the pace of your dialing.
  • NFC touch-to-print:
  • With near field communication (NFC), you can speedily print documents and images from a mobile device (such as a smartphone or tablet) just by tapping the device on the printer. View on the front of the printer, back of the printer control panel, and then tap your mobile device to this area to print-no additional setup required.
  • Right paper settings.
  • If your ink cartridges dry up and an outcome isn’t printing well , then try dipping the print head on the cartridge into some water for few seconds.
  • Use the printer once a while to ensure the printer is working well.

123 HP Officejet 5740 Printer Troubleshooting

The printer cannot receive faxes but can send faxes

  • If you are not using a typical ring service, monitor to ensure that the Distinctive Ring feature on the printer is fixed to All Rings.
  • If you have a voice mail service at the same phone number you use for fax calls, you must obtain faxes manually. This means that you must be accessible to respond in person to receive fax calls.
  • If you have a computer dial-up modem on the same phone line with the printer, ensure that the software that came with your modem is not fixed to receive faxes mechanically. Modems that are set up to obtain faxes automatically take over the phone line to accept all incoming faxes, which averts the printer from receiving fax calls.

If you have an answering machine on the similar phone line as the printer, you may have one of the following issues:

  • Your answering machine may not be set up properly with the printer.
  • Your outgoing message may be too long or too loud to permit the printer to notice fax tones, and the sending fax machine might separate.
  • Your answering machine may not have sufficient quiet time after your outgoing message to permit the printer to notice fax tones. This issue is most common with digital answering machines.

The following actions may help resolve these problems:

When you have an answering machine on the similar phone line you use for fax calls, attempt linking the answering machine straight to the printer, choose here to go online for more information.

  • Ensure the printer is fixed to receive faxes automatically.
  • Ensure the Rings to Answer setting is fixed to a more number of rings than the answering machine. Separate the answering machine and then attempt receiving a fax. If faxing is fruitful without the answering machine, the answering machine may be causing the problem.
  • Relink the answering machine and record your outgoing message over. Record a message that is around 10 seconds in duration. Speak gradually and at a low volume when sound tracking your message. Pause for at least 5 seconds of silence at the end of the voice message. There should be no contextual noise when recording this silent time. Attempt to receive a fax again.
  • If the printer bonds the same phone line with other kinds of phone equipment, such as an answering machine, a computer dial-up modem, or a multi-port switch box, the fax signal level might be reduced. The signal level can also be condensed if you use a splitter or connect extra cables to spread the length of your phone. A condensed fax signal can cause problems during fax response. To find out if other equipment is causing a problem, disconnect everything except the printer from the phone line, and then try to receive a fax. If you can receive faxes positively without additional equipment, one or more pieces of the other equipment are causing problems; try adding them back one at a time and receiving a fax each time, until you identify which equipment is causing the problem.
  • If you have a distinct ring pattern for your fax phone number (using a distinctive ring service over your telephone company), ensure that the Distinctive Ring feature on the printer is set to match.

The printer cannot send faxes but can receive faxes

  • The HP Setup Officejet 5740printer might be dialing too wildly or too soon. You might need to supplement some pauses in the number order. For example, if you required to access to an outdoor line before dialing the phone number, supplement a pause following the access number.
  • The number you arrived at when sending the fax is not in the proper format or the receiving fax machine is having issues. To monitor this, attempt calling the fax number from a telephone and listen for fax tones. If you cannot perceive fax tones, the receiving fax machine may not be switched on or linked, or a voice mail service could be intrusive with the recipient’s phone line. You can also ask the recipient to monitor the receiving fax machine for any issues.
0 comment

How to HP Printer Maintenance?

We ensure your printers run efficiently and consumers have been raving about our consistent support and services. Printers should be taken good care of to get an elongated life. Service your printer to avoid intermittent paper jams, connectivity issues and more. Enjoy the multiple functionalities of your wholesome and flexible printer maintenance.

How to hp printer maintenance for Windows?

For excellent and proper functioning of any gadget, proper maintenance is required. This is also done to ensure that the constant running of the device is not affected or altered.

Step 1: Constant maintenance can also detect possible malfunctions and minor repairs. Many people tend to neglect printer maintenance due to their perception that a printer is just a simple machine.

  • Make sure you do not touch the scanner window with your finger. Do not use isopropyl alcohol to clean the scanner window.
  • Turn off your printer and lift the document cover. Remove any document that is left behind on the scanner glass.
  • Spray isopropyl alcohol on a lint free cloth and the cloth should be lightly damp. Clean the scanner glass and the white flim with the damp lint free cloth.
  • Keep the document cover open until the scanner bed drys.Lift the ADF unit and remove any document that is left behid in the feeder.
  • Use the damp lint free cloth and clean the white bar and glass strip. Wait until the ADF unit dry and then you can load the documents.

Step 2: Printer maintenance is an easy job and does not require the intervention of someone with special skills to do it, unlike some other aspects of maintenance where especially skilled personnel are required.

  • Make sure that you do not use isopropyl alcohol to remove dust and dirt from your printer’s control panel. It may cause a crack on the panel.
  • Turn off your printer. Wait for a few minutes for your printer to cool down as some internal parts may be extremely hot.
  • In order to clean the inside of your printer, open the scanner cover. Remove the drum unit assembly from the printer.
  • Wipe the electrical contacts with isopropyl alcohol on a cotton swab and wipe the gears with a clean dry cloth.
  • Gently wipe the scanner window and the toner sensor with a clean dry cloth and do not use isopropyl alcohol to clean these parts.

Step 3: To achieve best desired outcomes and results the printer maintenance must be done effectively on a routine basis. It entails the aspects such as calibration, cleaning and replacement of defective parts.

  • Handle the drum unit with care as it contains toner. If the toner scatters and your clothes get dirty, immediately wash it off with cold water.
  • It is recommendable to place the drum unit on a drop cloth or disposable paper to avoid scattering and spilling toner.
  • Turn the drum unit upside down and carefully clean the primary corona wire inside the drum unit.
  • To clean the primary corona wire gently slide the tab from right to left several times. Return the tab to Home position.
  • Printed pages may have vertical stripes, if the tab is not returned to Home position. Reinstall the drum unit and close the scanner cover.

How to hp printer maintenance for Mac?

Performing regular maintenance will ensure it is in proper working order when you need it and will prolong its life. Printer maintenance tasks take a little time, but they are simple and require no or little expense.

Step 1: Changing the cartridge is a maintenance activity that anyone who possesses a printer must come across. The cartridge will run out of ink in the due course of time and hence the requirement for a fresh replacement is quite important.

  • Check the estimated ink level on your printer’s control panel or on your printer’s software. Open the cartridge access door.
  • Remove the cartridge that is out of ink. Unpack a new cartridge from its package. Hold it by its sides and insert it into the cartridge holder.
  • Make sure the cartridge snaps firmly in its place. Close the cartridge access door and align the ink cartridge.
  • On your printer’s control panel, select Align the printhead option. The printer will align the cartridge and will print an alignment page.
  • Load the cartridge alignment page face down on the scanner glass. Lower the scanner lid, and then press OK.

Step 2: Clean the outside of the printer, regularly cleaning the outside of the printer helps prevent dirt and grime from making its way inside the printer where it can do damage.

  • Remove all the documents from the input tray, output tray, ADF and scanner bed. Use a damp lint-free cloth to clean all these places.
  • Clean if there is any paper debris in the roller feed area. Clean the main and pressure rollers with a damp paper towel.
  • Open the printer and check for any jammed paper in the inside of the printer. Use a cloth and wipe the dust and debris inside the printer.
  • Disconnect the power cord and USB cable or Ethernet cable (if used). Reset the printer to factory settings.
  • Reconnect the power cord and connect the printer to the local network. Use any printer cleaning utility to automatically clean the printer.

Step 3: Contact your printer’s manufacturer or an office supply store to find a cleaning kit available for your printer model. The kit should include lens covers, wipes, lubrication for the rods and rollers and instructions.

  • Remove all the cartridges from your printer and place them on a paper towel with the ink nozzle pointing upward.
  • Lift up to remove the printhead. Dampen a clean, lint-free cloth and then wipe the electrical contact area on the printhead.
  • Use a damp lint-free cloth to wipe any accumulated debris or ink from the edge between the nozzles and the contacts.
  • Use a dry lint free cloth to wipe the previously cleaned areas. Clean the electrical contacts inside the printer.
  • Reinstall the printhead and then slide each cartridge into its empty slot until it snaps securely into place.
0 comment

Fix Printer Driver is Unavailable issue For Windows and Mac OS:

Drivers are a major element of a printer, and the absence of them can prevent you from getting an imprint. This can be rather frustrating because the printer can stop or print more slowly. It can be quite frustrating. A network of fully functional, efficient printers is critical especially in offices to guarantee productivity.

A printer driver is usually unavailable as long as your computer is inaccessible. It is software-related, and good experience will help you to point out the problem out by providing professional tech support. Many printer problems are generally caused by driver errors or incompatibility and do not cause hardware defects.

Choose you Method to Fix Printer Driver unavailable Problem:

Steps to Fix Printer Driver is Unavailable Error:

A problem that may arise when you use your printer extensively to execute bulk prints is the printer driver unavailable. This driver issue can also occur and prevent your printer from working in homes where printing requirements are mediocre. The driver’s non-accessible error may occur on your device for several reasons. Incompatibility between the driver and the computer can actually prevent communication.

The function of a driver is to make it possible that the printer and the computer are connected successfully. It can also cause a Printer driver unavailable error on your computer when your Windows or other OS has been updated. By implementing various troubleshooting approaches such as updating or reinstalling the drivers, you can partially solve the problem.

However, in this way you are not actually resolving the problem, but are also finding ways to temporarily remove it so that your current printing tasks are again possible. Impressive driver errors may require a complete debug or reinstall, usually outside the ability of a lay user. Professional tech support can be very important in such cases to restore the normal working of your printer driver.

Printer driver is unavailable issues on Windows 10

When a Printer shows “Printer driver is unavailable” error while installing the driver on Windows 10 Device, then there is a problem in driver Software installation. This problem occurs due to the Printer Driver is not updated. Corrupted Printer Driver. when happens this,

  • Reinstall the Printer Driver and Try Again.
  • Try to Install the Windows updates manually.

Why Choose Us

If the driver is unavailable during use at all times, it is better to call us immediately. If you just ignore a professional service and perform troubleshooting, your printer driver can make this problem worse. We understand your home or office requirements of a functional printer and are ready to offer anytime support. We shall either remotely perform the required tweaks or send out our specialist technicians on your request to allow your printer to resume its functioning in no time.

Steps to Fix Driver is Unavailable Error in HP Envy Printer:

An issue that may emerge when you utilize your Envy printer broadly to execute mass prints is the printer driver inaccessible. This driver issue can likewise happen and keep your printer from working in homes where printing necessities are fair. The driver’s non-available mistake may happen on your gadget for a few reasons. The contradiction between the driver and the PC can really avoid correspondence.

The capacity of a driver is to make it conceivable that the Envy printer and the PC are associated effectively. It can likewise cause a Printer driver inaccessible blunder on your PC when your Windows or the different OS has been refreshed. By actualizing different investigating approaches, for example, refreshing or reinstalling the drivers, you can incompletely tackle the issue.

In any case, along these lines, you are not really settling the issue, but at the same time are discovering approaches to incidentally expel it with the goal that your present printing errands are again conceivable. Great driver mistakes may require a total investigate or reinstall, like a rule outside the capacity of a lay client. Proficient technical support can be significant in such cases to reestablish the ordinary working of your HP Deskjet Printer Driver.

Steps to Fix Driver is Unavailable Error in HP Deskjet Printer:

A problem that may arise when you use your Deskjet printer extensively to execute bulk prints is the printer driver unavailable. This driver issue can also occur and prevent your printer from working in homes where printing requirements are mediocre. The driver’s non-accessible error may occur on your device for several reasons. Incompatibility between the driver and the computer can actually prevent communication.

The function of a driver is to make it possible that the Deskjet printer and the computer are connected successfully. It can also cause a Printer driver unavailable error on your computer when your Windows or other OS has been updated. By implementing various troubleshooting approaches such as updating or reinstalling the drivers, you can partially solve the problem.

However, in this way you are not actually resolving the problem, but are also finding ways to temporarily remove it so that your current printing tasks are again possible. Impressive driver errors may require a complete debug or reinstall, usually outside the ability of a lay user. Professional tech support can be very important in such cases to restore the normal working of your HP Deskjet Printer Driver.

Steps to Fix Driver is Unavailable Error in HP Officejet and Officejet Pro Printer:

A problem that will arise once you use your OJ/OJPRO printer extensively to execute bulk prints is that the printer driver is unavailable. This driver issue also can occur and stop your printer from working in homes where printing requirements are mediocre. The driver’s non-accessible error may occur on your device for several reasons. Incompatibility between the driving force and therefore the computer can actually prevent communication.

The function of a driver is to form it possible that the oj/ojpro printer and therefore the computer are connected successfully. It also can cause a Printer driver unavailable error on your computer when your Windows or other OS has been updated. By implementing various troubleshooting approaches like updating or reinstalling the drivers, you’ll partially solve the matter.

ojpro printer driver unavailable

However, during this way you’re not actually resolving the matter, but also are finding ways to temporarily remove it in order that your current printing tasks are again possible. Impressive driver errors may require an entire debug or reinstall, usually outside the power of a lay user. Professional tech support is often vital in such cases to revive the traditional working of your HP OJ/OJPRO Printer Driver.

Steps to Fix Driver is Unavailable Error USing HP Print and Scan Doctor:

We can also fix the HP Printer Driver unavailable issue using HP Print and Scan Doctor.

HP Print and Scan Doctor is a Windows OS based free tool that helps to resolve all HP Printing problems.

Download and Install HP Print and Scan Doctor App. Make sure the printer is turned ON and Properly connected. Then the Scan Doctor starts to Scan. If any Problems detected especially the Driver issue, It automatically troubleshoots the Problem and Resolves it by either installing a new driver or fixing the existing printer driver.

scan doctor

Steps to Fix Driver is Unavailable Error USing HP Smart App:

HP Smart App Provides an efficient solution for Troubleshooting Printer Driver Issues.

Ensure your Android device is hooked up to the same wireless connections that your printer is connected to.

  • Download and setup HP Smart App.
  • Follow the on-screen prompts to attach your printer.
hp smart app
0 comment

Sometimes the printer and scanner fail to work properly, and the print and scan functionality is seriously impaired. We should uninstall and reinstall the driver software to recover this problem. Reset the printer and check the power source to work properly without errors or problems to fix the printer and scanner.

Fix “Printer And Scanner Not Working.”

add-printer-and-scanner-not-working
  • Issue Find and switch on the Power button on the printer.
  • Search and open the Windows Control Panel.
  • Select Uninstall a program to open a list of programs installed under Program and Features or Programmes.
  • Select the name of the HP printer to open the confirmation uninstall window.
  • Choose Yes to complete the removal of software.
  • Make sure the printer is connected.
  • Make sure the cartridges are installed.
  • Ensure the plain paper is placed on the main tray and re-install and download the driver.

Elaborate steps to fix “Add Printer and Scanner Not Working”

  1. Find and press the Power button on your printer. Search and open the Control Panel in Windows.
  2. Select Uninstall a program to open the list of installed programs under Program and Features or Programmes.
  3. Select the name of the HP printer to open the confirmation uninstall window and choose Yes to complete the removal of your software.
  4. Make sure the printer is on, cartridges are installed and the paper is loaded in the main plate. Download and reinstall the driver.
  5. In the Dock and menu bar, select Finder, Go, select Applications and in Mac, open the HP folder.
  6. Dual-click HP Uninstaller to uninstall the software and prepare the printer for the installation of the driver. If the HP Uninstaller isn’t in the folder, drag and drops the HP folder into the Dock icon to solve the problem of adding printer and scanner that doesn’t work.
  7. Select Go, select Go to Folder in the menu bar, type Library Printers and then select Go. Choose and drag the HP file to the Dock Trash icon. And click on the Trash icon to right-click or Ctrl+ and choose Empty Trash.
  8. Prepare the driver installation printer. Make sure it is enabled, cartridges are installed and the paper in the main chamber loaded. And download the driver and install it.
  9. If a scanner does not work, disconnect the power cord from the printer with the printer on.
  10. Then disconnect the power cord from the power source and wait 30 seconds. Connect the power cord to the back of the printer and turn to the printer and fix the problem of not working the add printer or scanner.
0 comment

123.hp.com/envy4500 – HP Envy 4500 Printer Setup & Installation

Connecting your HP Envy 4500 Driver printer through a cable and printing under a wired network have become obsolete. If you are planning to print, you can now avail a 123.hp.com/envy4500 printer that is up to date with all the leading features.

With all the leading features in printing technology, the Envy 4500 printer comes out as an ideal choice. From wireless printing to duplex printing conveniences, this printer takes up the major place.

123.hp.com/envy4500 Setup Features

123.hp.com/envy4500 Wireless connectivity

Envy printers are exclusively designed for wireless printing convenience with the ePrint and AirPrint support. Avail the advantages of wireless connectivity with this all-round printer.

123 HP Envy 4500 Wi-Fi Direct

A multi-function device that includes the WiFi Direct feature that lets you print mobile devices. This printer makes the whole process seem uncomplicated and user-friendly.

123 HP Envy 4500 Print Speed

A portable and easy to use the printer that provides optimum print speed and quality. A point to note is that this 123.hp.com/envy4500 printer offers good print performance and quality at an affordable price in a compact package.

123.hp.com/envy4500 Mobile Printing Setup

123 HP Envy 4500 Airprint Setup

AirPrint is an exceptional feature with which you can print a document or a photo from an Apple device by connecting your HP compatible printer to a wireless network. If you are using an HP AirPrint compatible printer that contains wireless features, then these instructions help you set up AirPrint.

123 HP Envy 4500 ePrint Setup

HP ePrint is a cloud-based service that generates prints easily from your Android, Smartphone or Tablets. Print from anywhere with a live Internet connection. You can email the document or photo you need to print directly to the 123 HP ePrint enabled printer.

123 HP Envy 4500 Cloud Print Setup

Google Cloud Print allows you share printers with just a click. Any type of app when connected to a web-connected device, can use Cloud Print. You can connect the 123.hp.com/envy4500 printer to your Google Cloud Print account and start printing on it. Handling printers and print jobs in Cloudy-ready printers is simple.

Latest 123 HP Envy 4500 Driver & Manual Download

123.hp.com/envy4500 Driver

Download the Updated Printer Driver:

  • Avail the latest version of the printer driver from 123.hp.com/envy 4500 us within seconds.
  • Click the link to download 123 HP Envy 4500 Driver for Windows and Mac compatible printer.

123.hp.com/envy4500 Manual

Download the Easy Procedural Guide:

  • Our easy step-by-step instructions help you setup and troubleshoot printer on your own.
  • Click the link to download the user manual for your corresponding 123 HP Envy 4500 Printer Manual.

123 HP Envy 4500 Printer Quick Tips

  • Always use high-quality cartridges. Using cheap quality cartridges leads to printhead clogging.
  • Do not use different kinds of papers to print. Use the right kind of papers to evade paper jam and paper feed issues.
  • Regular cleaning is required to maintain and care for your HP Envy 4500 Setup printer device.
  • Be sure that your hp envy 4500 troubleshooting printer is located in a well-circulated environment.

123.hp.com envy4500 Printer Troubleshooting

Troubleshooting Mobile Printing Issues When Using Mopria Print Service

If there befall any connectivity issues while printing from your Mopria-compatible Android mobile device, you can make use of these solutions to resolve the issue.

Cannot print using the Mopria service on an HP Slate or Android device

When printing with the Mopria Print Service from your Mopria compatible mobile device, some connectivity issues may occur. Here are some solutions to troubleshoot common settings and connectivity issues.

Solution 1: Ratify that Mopria Print Service is enabled on your Android device

  • Open Settings on your Android device.
  • Select the document or photo that you want to print and then touch Printing.
  • Look for Mopria Print Service on your Android device, and then touch On, if it is not enabled already.
  • Try to print the required file now.

Solution 2: Restart all devices and check the connections

Try restarting the HP Envy 4500 Driver Printer, router, and mobile device to see if it resolves the network-related printing issues.

Step 1: Restart the mobile device, router, and your HP Envy 4500 printer

Restart the network router, the HP Envy 4500 printer, and your Android device and then try printing again.

  • Switch off the router.
  • Touch base with the router manufacturer and get an idea on how to turn off the router.
  • Press the Power button to turn off your HP Envy 4500 printer.
  • Then, turn off the mobile device.
  • Turn on the router, hold on for around 30 seconds to complete the printer’s startup process.
  • Turn on the mobile device and get it connected to your wireless network.
  • Use the Power button to turn on your 123.hp.com/envy4500 printer.
  • Try to print.

Step 2: Make certain that the printer is connected to your mobile device

To make sure that the HP Envy 4500 Printer and the mobile device are connected to the same network, you can follow the steps given below.

  • Print a network configuration report to open the network settings. The network settings can be accessed directly from the printer’s control panel.
  • Make certain that the network name displayed matches the name of the wireless network you use with your Android device.

Step 3: Update the latest firmware for your Envy printer and the router

  • Outdated printer or router firmware leads to mobile printing issues. To evade from mobile printing issues, you can update the firmware from our website 123.hp.com/envy4500 .
  • Be sure to install hp envy 4500 updated firmware for your HP Printer. To know how to install the updated printer firmware, you can visit our website 123.hp.com setup 4500 for detailed instructions.
  • Ensure that your router can forward mDNS packets and has the latest firmware updated from the router manufacturer.
  • Check the features and specifications or support documentation for your router, or you can contact the router manufacturer, to make sure that your router supports DNS.
  • If you have installed any other print services on your mobile device along with the Mopria Print Service such as the HP Print Service or AirPrint when printing, you might see all the print services listed for the same printer.
  • Ensure to select your Mopria-compatible printer or accessory labeled with ‘Mopria Print Service’ from the list of other printers.
0 comment

123.hp.com/envy4512 Printer Setup

123.hp.com/envy4512 Printer Illustration

Do more with the affordable 123 HP ENVY 4512 all-in-one – the flawless match for your modern technology. Hold tasks with the easiest way to print from your smartphone or tablet. Obtain wireless printing and lab-quality photos and documents in a few steps. The HP Envy 4512 All-in-One Printer is proposed for home use.

It’s also deceptive when you reflect the way this inexpensive inkjet MFP handles various kinds of output, with moderately high quality photos and graphics, but sub-par quality for text in our tests.

123.hp.com/envy4512 Printer Features

The printer provides a number of features that make it available for people with disabilities.

123.hp.com/envy4512 Visual

The HP software delivered with the printer is accessible for users with visual losses or low vision by using your operating system’s accessibility options and features. The software also aids in most assistive technologies such as screen readers, Braille readers, and voice-to-text applications. For customers who are color blind, colored buttons and tabs used in the HP software have simple text or icon labels that deliver the appropriate action.

123.hp.com/envy4512 Mobility

For users with mobility impairments, the HP software works can be performed through keyboard commands. The HP software also aids in Windows accessibility options such as Sticky-keys, Toggle-keys, Filter-keys, and Mouse-keys. The printer doors, buttons, paper trays, and paper width guides can be functioned by users with limited strength and reach.

123.hp.com/envy4512 Quiet Mode

Quiet Mode slows down printing to reduce overall noise without affecting print quality. Quiet Mode only functions for printing with Normal print quality on plain paper. To decrease printing noise, turn on Quiet Mode. To print at a normal speed, switch Quiet Mode off. Quiet mode is off by default.

123.hp.com/envy4512 Mobile Application

123.hp.com/envy4512 Airprint

AirPrint is an exceptional feature with which you can print a document or a photo from an Apple device by connecting your HP compatible printer to a wireless network. If you are using an HP AirPrint compatible printer that contains wireless features, then these instructions help you set up AirPrint.

123.hp.com/envy4512 ePrint

HP ePrint is a cloud-based service that generates prints easily from your Android, Smartphone or Tablets. Print from anywhere with a live Internet connection. You can email the document or photo you need to print directly to the 123 HP ePrint enabled printer.

123.hp.com/envy4512 Cloud Print

Google Cloud Print allows you share printers with just a click. Any type of app when connected to a web-connected device, can use Cloud Print. You can connect a printer to your Google Cloud Print account and start printing on it. Handling printers and print jobs in Cloud-ready printers is simple.

123.hp.com/envy4512 Latest Driver & Manual Download

123 HP Envy 4512 Driver

Download the Updated Printer Driver:

  • Avail the latest version of the printer driver from 123.hp.com/envy 4512 us within seconds.
  • Click the link to download 123 HP Envy 4512 for Windows and Mac compatible printer.

123.hp.com/envy4512 Manual

Download the Easy Procedural Guide:

  • Our easy step-by-step instructions help you setup and troubleshoot printer on your own.
  • Click the link to download the user manual for your corresponding 123 HP Envy 4512.

123 HP Envy 4512 Printer Quick Tips

Tips for ink

  • Use original HP cartridges. Original HP cartridges are intended for and tested with 123 HP Envy 4512 printers to help you produce great results, time after time.
  • Make sure the cartridges have adequate ink. To view the estimated ink levels, tap (Ink) from the Home screen.

Tips for paper

  • Mount a stack of paper, not just one page. Make sure only one type of paper is loaded at a time.
  • Alter the paper width guides in the paper tray to fit snugly against all paper.
  • Fix the print quality and paper size settings according to the type and size of paper mounted in the paper tray.

123.hp.com/envy4512 Printer settings tips (OS X)

  • On the Print dialog, use the Paper Size pop-up option to choose the size of paper mounted in the printer.
  • On the Print dialog, select the Paper Type/Quality pop-up option and choose the appropriate paper type and quality.
  • To print a black and white document using only black ink, select the Paper Type/Quality, choose the Color Options disclosure triangle, and select Grayscale from the Color pop-up menu.

123.hp.com/envy4512 Printer Troubleshooting

123.hp.com/envy 4512 – Fixing Scan Quality Issues

Step 1: Check if the issue is not printing-related

  • If quality issues happen when printing from the computer, do not proceed with these steps. Index your printer model number if required, then look for print quality to view the Fixing Poor Print Quality document for steps to resolve the issue.

Step 2: Wipe the scanner

  • Fingerprints, smudges, dust, or debris on the scanner glass, below the scanner lid, or in the document feed slot can cause lines and color bands on your prints. Wipe these parts with a soft, lint-free cloth sprayed with glass cleaner.
Wipe the ADF rollers

If your printer has an automatic document feeder (ADF), dust or paper deposit on the rollers or separator pad inside the ADF can end up causing in scan quality issues. Access the ADF, then wipe the ADF rollers and separator pad.

  • Eliminate the original document from the ADF and switch on the printer.
  • Separate the power cord from the back of the printer and access the ADF cover.
  • Locate the paper pick rollers and the separator pad inside the ADF.
  • Dampen a clean, free cloth, then squash any excess liquid.
  • Use the damp cloth to take away any residue off the paper pick rollers and the separator pad.
  • Leave the ADF cover exposed for two minutes to permit the paper pick rollers and separator pad to dry.
  • Shut the ADF cover.
  • Remount the original document print side up in the document feeder tray.
  • Glide in the paper width guides until they are snug against the paper.
  • Relink the power cord to the printer and attempt to scan.

Step 3: Alter the scan settings

Alter the scan settings in the HP Easy Scan app
  • Mount the item on the scanner glass, in the document feeder slot, or in the automatic document feeder (ADF), contingent to your printer type and features.
  • Look in the Mac for scan, then select HP Easy Scan in the option of results.
  • In HP Easy Scan, choose your printer name from the Scanner drop-down
  • Choose your scan type from the Presets
  • To alter any basic settings to the preset you chose, like scan color, orientation, or quality, select Edit Settings.
  • Select Scan.
  • Select Scan Next Item to add additional pages, or choose Done.
  • Select the thumbnail version of the scanned item in the left panel. The item exhibits in the right preview pane.
  • Select Edit to alter colors, straighten the scan, or crop the size.
  • To save your scans to a folder on the Mac, choose Send in the bottom right corner of the window, then select Folder.
  • In the window that exhibits, select the Where menu to browse to the folder you want to save the file to, then select Save.
  • To look for your scan, access the folder in which you saved the scan, then double-click the file.

Step 4: Arrange the printer

Rearranging the printer can force some kinds of scanners to calibrate, which may fix the problem.

  • Eliminate any items from the scanner glass and automatic document feeder (ADF), then shut the scanner lid.
  • With the printer switched on, detach the power cord from the printer and from the wall outlet or power strip.
  • Pause for at least 60 seconds.
  • Plug the power cord back into a wall socket.
  • Re-join the power cord to the printer.
  • Mount the original document or photo, then attempt to scan.
0 comment

123.hp.com/envy7155 Printer Support

123 HP Envy 7155 Printer Specification

The HP Envy Photo 7155 printer is designed for those who love to share photos. It includes a dedicated photo tray, borderless printing and SD card slot. You can print, scan and copy with this 123.hp.com/envy7155 printer. Once you connect it with the HP Smart app you can print from social media, the cloud and the camera-roll gallery.

123.hp.com/envy7155 Printer Quick Technical Support

123 HP Envy 7155 Printer Features

  • It is capable of printing through Wi-Fi, USB and dual-band Wi-Fi.
  • Supports both Black & White and Color Copy.
  • The Copy resolution of black and white is up to 300dpi and of color is 600 dpi.
  • Supports Automatic duplex printing.
  • It has a monthly duty cycle up to 1000 pages/month.
  • The HP Envy Photo 7155 printer is compatible with a Secure Digital memory card.
  • The printer supports mobile-printing solutions such as Air Print, ePrint, Wireless Direct printing and HP ePrint.
  • Supports HP PCL 3 GUI as the print languages.
  • Uses HP Thermal Inkjet Print technology and also provides Borderless printing.
  • The scan resolution is up to 1200 dpi and the scanner is a flatbed type.
  • The scan is featured with Twain version.
  • Hp Envy 7155 is compatible with Windows, Mac and Linux.

123.hp.com/envy7155 Mobile Printing Setup

123 HP Envy 7155 Airprint

AirPrint is an exceptional feature with which you can print a document or a photo from an Apple device by connecting your HP compatible printer to a wireless network. If you are using an HP AirPrint compatible printer that contains wireless features, then these instructions help you set up AirPrint.

123 HP Envy 7155 ePrint

HP ePrint is a cloud-based service that generates prints easily from your Android, Smartphone or Tablets. Print from anywhere with a live Internet connection. You can email the document or photo you need to print directly to the 123 HP ePrint enabled printer.

123 HP Envy 7155 Cloud Print

Google Cloud Print allows you share printers with just a click. Any type of app when connected to a web-connected device, can use Cloud Print. You can connect a printer to your Google Cloud Print account and start printing on it. Handling printers and print jobs in Cloud-ready printers is simple.

123.hp.com/envy7155 Latest Driver & Manual Download

123 HP Envy 7155 Driver Setup

Download the Updated Printer Driver:

  • Avail the latest version of the printer driver from 123.hp.com/envy 7155 us within seconds.
  • Click the link to download 123 HP Envy Photo 7155 for Windows and Mac compatible printer.

123.hp.com/envy7155 Manual

Download the Easy Procedural Guide:

  • Our easy step-by-step instructions help you HP Envy 7155 Setup and troubleshoot printer on your own.
  • Click the link to download the user manual for your corresponding 123 HP Envy 7155.

Replacing Ink Cartridges

If you notice that the ink out light is flashing or is on, replace the cartridge by following the guidelines given below.

  • Switch on the 123.hp.com/envy7155 printer, if it is not on. Now, open the ink cartridge access door. You may notice that the carriage moves to the center of the printer. Now, press in the tab on the front of the ink cartridge.
  • Make sure that you do not lift the latch next to the carriage to install the ink cartridges. This may lead to cartridge and printing problems. Note that the latch must remain down to install the ink cartridges correctly.
  • Do not switch off the printer when ink cartridges are missing. Ascertain that you replace any missing cartridges immediately to avoid print quality issues and possible extra ink usage or damage to the ink system.
  • Now, take out an ink cartridge from its package and then remove the orange pull-tab and plastic wrap completely before you remove the orange cap in the next step.
  • This is to avoid the ink leak from the cartridge. On removing the plastic wrap, the paper label on the top of the ink cartridge may tear slightly, which is necessary to properly vent the ink cartridge.
  • Make sure that you twist the orange cap counter-clockwise to snap it off. Now, with the nozzle and contacts facing down, slide the ink cartridge into its slot and then press down on the ink cartridge until it snaps into place.
  • Ascertain that the colored icon on the ink cartridge matches the colored icon on the slot. If the ink cartridge does not snap into place, you need to remove the ink cartridge from the carriage.
  • Now, gently bend the tab away from the cartridge and then reinsert the ink cartridge into the carriage. Make sure that you do not bend the tab away from the cartridge more than 1.27 cm (0.5 in).
  • Repeat the above steps for each ink cartridge that needs replacement. Note that when you insert a new ink cartridge, the printer automatically prompts you to align the ink cartridges.

Repair Ink cartridge setup

Sometimes due to the problem in the cartridge, the alignment page may not print as expected. You can follow the solutions given below to resolve this issue.

  • Make sure that you check the printer for packing materials or other debris and then realign the printer. If there is any material left in the printer, the alignment may fail and the alignment page may not print.
  • Check for any obstructions in the printer and discard all the paper from the paper tray. Now, open the inner access door and then take out any packing material or debris from the printer.
  • Now, carefully close the inner access door and then reload paper into the paper tray. Make sure that the paper in the stack is of the same size and type and free from dust, wrinkles, tears or folds.
  • Ensure that the stack of paper fits within the paper tray and is not higher than the top of the paper width guide. Now, remove, inspect and then reset the cartridges to realign the printer.
  • If the printer is off, press the power button to turn it on. Now, open the cartridge access door. You may notice that the carriage moves to the far right side of the printer.
  • Now, press down on the top of the color cartridge to release it and then pull the cartridge out to take it out from its slot. If the protective tape is still attached to the cartridge, carefully hold the cartridge by its sides.
  • Pull the pink pull-tab on the cartridge to discard the tape. You can repeat the above steps to remove, inspect and then reset the black cartridge. Carefully close the cartridge access door.
  • You may notice that the printer automatically prints an alignment page when you reinsert the cartridges and close the cartridge access door.

Troubles with printing paper

Make sure that you use paper within the required specifications to avoid printing issues. The paper should be free from wrinkles, curls, dust or debris. Ascertain that the papers in the stack are of same size and type. Follow the tips below if there are any jam issues.

  • Discard any loose paper from the paper input tray. If the paper is a visible part way through the front of the printer, then you need to carefully pull the paper to take it out.
  • Also, clear the jam from the back of the printer. Switch off the printer, then unplug the power cord from the back of the printer and then remove the rear access door from the printer.
  • Now, discard any paper stuck in the rollers. You need to check the rollers and wheels for torn pieces of paper if the paper tears when it is removed from the rollers.
  • Note that if all the pieces of paper are not removed, then more paper jams are likely to occur. Plug in the connections and then turn on the printer. If the issue continues, you can clean the rollers.
  • Wipe the rollers with a clean cloth, then allow the rollers to dry completely and then replace the rear access door. Lift the top cover and clear the jam inside the cartridge access door. Close the paper jam and print cartridge access door.

123 HP Envy 7155 Wireless Setup 

Make sure that the 123.hp.com/envy7155 printer is connected to the wireless network. Follow the basic instructions given below to set up your 123 HP Envy Photo 7155 printer on the wireless network.

  • Collect the network name and password and then you need to make sure that the PC and printer are prepared for the installation. Check if your computer has an internet access.
  • Now, check if the printer, router and computer are on and that the computer is connected to the same wireless network to which your HP Envy Photo 7155 printer is connected.
  • Make sure that you use the printer’s built-in Wireless Setup Wizard to open or search for the printer folder in the list of installed software programs. Now, you can download an app that is compatible with your OS.
  • This app may help you find the network name and then you can type the network password to connect your printer to this network. Now, switch on the printer and proceed to the next step.
  • Follow the instructions on the control panel to connect the printer to this network. Make sure that you install the current version of the full feature software.
  • Now, choose a suitable method to identify the printer model 123 HP Envy Photo 7155. You can follow the instructions on the screen to go to the download page. Click download next to the full feature driver or select Basic Drivers for other driver options from 123.hp.com/envy7155.
  • Download the latest driver for your system from our website 123.hp.com/setup 7155. Note that during the HP Envy Photo 7155 printer software installation, the printers without a touch display can use the USB wireless setup method.
  • Only when you are instructed by the software, connect and disconnect the cable. Follow the instructions on the screen to get help to configure your printer’s wireless connection.
0 comment

123.hp.com/setup 7640

123 HP Envy 7640 Setup and Install Solutions

  • Learn More HP Printer Setup Printer Settings First Time HP Envy 7640 Printer Setup
  • Remove tapes from the box of a packaging card on your 123.hp.com/setup 7640 printer and read the printer manuals carefully.
  • Install your HP printer in accordance with the printer manual.
  • The newest HP Envy 7640 printer control is installed on a driver install CD that is bundled with your HP printer after you have configured the printer. It is available to download the HP Printer Manual at
  • 123.hp.com/envy7640 or support.hp.com/us-en HP Envy 7640 Setup and Installation.
  • Ensure your Internet connection is active because an active Internet connection is necessary to use some features such as HP ePrint.
  • Check the printer manual that can be downloaded from our website for further information concerning setup and installation.

Download the latest updated 123.hp.com/envy7640 Driver from your Windows Computer.

Aid Step by Step Instructions 123 HP Envy 7640

  • The latest version of the driver available from 123.hp.com or you can install the HP Envy 7640 wireless installation with the HP Envy 7640 installation disk.
  • Go to your browser at 123.hp.com/setup 7640. Enter the model number of your printer in the box and click Start.
  • To run your driver installation, double click the downloaded driver software setup file.
  • To complete the HP ENVY 7640 Software Driver Installation, please click Next.
  • WiFi Protected Setup (WPS) and wireless installation PIN methods are supporting HP Envy 7640

E-all-in -one Printer Setup: HP Envy 7640 Wireless Protected Setup (WPS)

The initial configuration can be done with instructions in the printer manual on your HP Envy 7640 e-all-in – one printer.

Steps: You can follow WPS mode of wireless set-up with a wireless router that supports WPS mode.

If you don’t support WPS on your wireless router, you can go to a wireless menu setup method instead.

Wireless Protected Setup (WPS) HP Envy 7640:

  • Press the Wireless Button onto the press.
  • The wireless light starts to blink after the above step.
  • On your wireless router, press WPS (Wi-Fi Protected Installation).
  • The wireless set-up is initialized after the above step and is complete for 2-3 minutes.
  • Method: Click on the Wireless Button on the control panel of the printer.
  • Select Wireless Setup Wizard and go to Settings.
  • Follow the wireless connection instructions on the screen.
  • Enter your information during the setup process, such as network username and password.
  • Please insert your CD-ROM 123.hp.com/setup to install software for the printer Envy 7640.
  • To complete the wireless setup, follow the instructions on-screen.
  • You can print directly documents or images from your Windows 10 mobile device to your HP Envy 7640 printer. You can print directly on your HP Envy 7640 printer.

Make sure you have the same wired (Ethernet) or wireless network connection with HP Envy 7640 printer and your Windows 10 mobile device.

  • Turn to Wi-Fi settings and connect them to your wired or wireless network on the Windows 10 Mobile device.
  • Open a document or an email app with the file to be printed.
  • Click on the icon for Print.
  • After the above step, a preview screen is displayed in which you can select your printer 123.hp.com/envy7640.
  • Click Print once the required changes are made.
  • It also offers options such as number of copies, printed colour, paper size, paper size and orientation.

The following issues could occur if the print job is not printed then: Poor, or no network saving mode is available

Power Save Mode is ON Printer is OFF In order to cancel a print job:

Follow the steps below to cancel or check the print job status, print the queue of the print icon on your Windows 10 cell.
Download the display, you will find current print jobs.
Choose the print job to cancel, then press Cancel.123.hp.com/envy7640.

How to print from HP Envy 7640?

How to use 123 HP Envy 7640 printer Learn More Issues & Solutions

Use the HP printer software to print from your HP Envy 7640 e-all on a single printer. Print quality and paper type changes can be made manually with a print preview or from the control panel of the printer. Follow and learn more about the steps provided below.

How to use HP Envy 7640 Airprint?

HP Envy 7640 AirPrint print wirelessly. Apple AirPrint is a portable solution that works on iOS devices such as iPhone 5, iPhone 5s, iPhone 6, iPhone 6s, and the latest iPhone SE.

How to use ePrint in HP Envy 7640?

HP ePrint Envy 7640 is a free HP Envy 7640 application that enables you to printed documents in the device’s emails. Word materials, PDFs, photographs can be ePrinted and easily printed anywhere.

HP Envy 7640 Setup Windows 10

The Windows 10 HP Envy model printer supports Windows 10  . You can now install HP drivers from 123.hp.com/setup 7640, when a Windows 10 PC or laptop is available. Follow the following simple steps to download HP Envy 7640 and to install it.

How to print HP Envy 7640 iPhone Printer?

HP Envy 7640 Ensure that when the ink values are significantly small, replace the HP Envy 7640 e-all-in-one tin cartridges. HP automatically sends cartridges when your cartridges are low, if you sign up for HP Instant Ink programs.

How do I print from HP Envy 7640 to Windows 10?

Follow the steps below to resolve the print problem after your computer has been upgraded to Windows 10. After upgrading restart the PC and printer 123.hp.com/7640 set up, all of your drivers and latest updates will be properly loaded.

There are several different types of HP Envy 7640 Windows 10 drivers available for Windows 10. Continuing read €/HP Envy 7640 Windows 10. Based on the model of your printer, you can upgrade your printer HP Envy 7640 to a full function driver and base driver software.

HP Envy 7640 Ink cartridge Installations

HP Envy 7640 Ink Cartridge Installations Envy 7640 Ink cartridges When the ink is critically low, you must replace the Hp envy 7640. HP automatically sends cartridges if your cartridges are low at ink.123.hp.com/envy 7640 when you have signed up for HP instant ink programs.

— Our website is only intended to provide technical support, and especially to the users of printing machines. Continue reading. We are not liable for damages or losses resulting from any action you are taking with regard to the information on this Website. For more information on property and third parties ‘ rights, see our statement of policies.

0 comment
Newer Posts