Category:

HP

HP LaserJet 600 m601 duplex printing

by printerhelp

How To do Double-side Printing On 123 HP LaserJet 600 m601 Printer?

With an automated duplicating feature, the HP LaserJet 600 m601 printer is able to be printed on both sides of a single page, without having to flip pages from one side. The following instructions will be provided for both the 600 m601 duplex printing manual and HP LaserJet.

HP LaserJet 600 m 601 printer Quick Duplex Printing Guide The document should be opened for printing.

  • Select printer name and click Properties or Preferences. Click File in the software application
  • In the next window to open, click the Finish tab.
  • Check the printed box (hand-by-hand) on both sides.
  • Click OK now. Now. On the first side of your page the printer begins to print.
  • Remove the printed page and reload it to the input pane in order to face the printed page.
  • To begin printing on the next page, press OK on the control panel of the printer.

Detailed printing instructions on both sides of the page with HP LaserJet 600 m 601

hp laserjet 600 m601 duplex printing
  • Power up the printer to wait for it to be quiet. Ensure proper installation of the ink cartridges. Remove and load enough paper into a paper input tray for the duplex printing HP LaserJet 600 m601.
  • Turn your computer on. Turn on your computer. Now open the document you want to print and click on the
  • File menu of the software program that opened the document.
  • Select the name of the printer in the printer list displayed in the print window. Click the Print option.
  • On the right-hand side of the Print window, click the Properties tab. Now on the top menu bar, select the Finishing tab. In the Document Options tab, check’ Print on both sides ‘ and click OK.
  • The first side of the page will be printed by the printer. Remove the printed page from the output box once the first side has been printed. In the input tray, place your page to the face of the printed page.
  • Click OK on the control panel of the printer. Now the printer starts printing on the opposite side of the page.
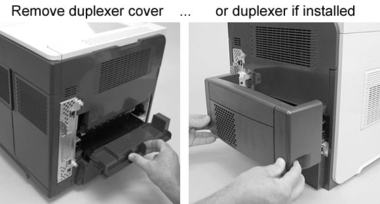
  • Follow the following guidelines for the automatic duplexing of the 600 m 601 HP LaserJet printer. Make sure that you have the automatic duplexer installed in the printer before proceeding.
  • Select the name of the printer in the Print window and click on the Properties tab. Open the document that you are printing and click on the File menu, followed by the Print option. Hit the OK button. Hit OK button.
  • Now, in the Documents options section, click on finish tab in the top menubar and select’ print on both sides.’
  • Choose a suitable orientation and click OK to automatically print HP LaserJet 600 m601 duplex. On both sides of the page, the printer is automatically printed.
0 comment

123.hp.com/envy5541 setup

by printerhelp

123.hp.com/envy5541 setup Printer

123 HP Envy 5541 Printer Illustration

123 HP Envy 5541 printers come with a fixed dimension of 17.5 inches width & 13.2 inches depth, 4.7 inches in height and weight with a kg of 12.3 pounds approximately. HP Envy products are usually obtainable for a cheaper price when equating with other HP Printers. 123.hp.com/envy 5541 has its own pros and cons which mean that it passes with few functions that are easily available with other HP printer models. Whatsoever it may be, your drivers and other software can be downloaded. HP Envy 5541 is an MFP, which comes with duplex printing.

Get nifty printing for your family. Easily generate lab-quality photos and laser-quality text on the go – right from your smartphones and tablets. This e-all-in-one is intended to help you be creative and stay productive – at an abundant value.

123.hp.com/envy5541 Printer Features

Enjoy printing as linked as you are

Enjoy the calmest way to print from your smartphone or tablet – with or without a router or local wireless network. Start printing rapidly with an easy setup from your smartphone, tablet or PC.

123 HP Envy 5541 Step up and create

Print borderless, lab-quality photos that glare and sharp documents with laser-quality text. Print 10 x 15 cm photos from your mobile device deprived of switching paper using the separate photo paper tray. Walk up, edit and print from the 6.75 cm (2.66-inch) touchscreen.

123 HP Envy 5541 Reduce your effect

Save paper and protect resources – consume up to 50 percent less paper with automatic two-sided printing. Decrease your environmental impact – easily recycle your original HP Ink Cartridges.

123.hp.com/envy5541 Mobile Application

123 HP Envy 5541 Airprint

AirPrint is an exceptional feature with which you can print a document or a photo from an Apple device by connecting your HP compatible printer to a wireless network. If you are using an HP AirPrint compatible printer that contains wireless features, then these instructions help you set up AirPrint.

Read More

123 HP Envy 5541 ePrint

HP ePrint is a cloud-based service that generates prints easily from your Android, Smartphone or Tablets. Print from anywhere with a live Internet connection. You can email the document or photo you need to print directly to the 123 HP ePrint enabled printer.

Read More

123 HP Envy 5541 Cloud Print

Google Cloud Print allows you share printers with just a click. Any type of app when connected to a web-connected device, can use Cloud Print. You can connect a printer to your Google Cloud Print account and start printing on it. Handling printers and print jobs in Cloud-ready printers is simple.

Read More

123.hp.com/envy5541 Latest Driver & Manual Download

123 HP Envy 5541 Driver

Download the Updated Printer Driver:

  • Avail the latest version of the printer driver from 123.hp.com/envy 5541 us within seconds.
  • Click the link to download 123 HP Envy 5541 for Windows and Mac compatible printer.

Driver Download

123 HP Envy 5541 Manual

Download the Easy Procedural Guide:

  • Our easy step-by-step instructions help you setup and troubleshoot printer on your own.
  • Click the link to download the user manual for your corresponding 123 HP Envy 5541.

Manual Download

123.hp.com/envy5541 Printer Quick Tips

  • Use the original HP ink cartridges
  • On the print dialog box from the paper size and paper quality pop up menu comma select the size and required paper loaded in the printer.
  • Choose only one type of paper.
  • Make sure you place your 123 HP Envy 5541 printer on an even surface.
  • Prevent clogs in your inkjet nozzles using a humidifier.

123.hp.com/envy5541 Printer Troubleshooting

123.hp.com/envy5541- An Extra Blank Page Prints (Windows)

Step 1: Upgrade your computer antivirus software

Upgrade your chosen antivirus protection program. Then comma scan for and eliminate any viruses, spyware, and malware.

Step 2: Upgrade the printer firmware

The printer firmware might be out of date or corrupted. Download the latest firmware version for your printer.

  • Switch on the printer.
  • If your printer is linked to the computer with a USB cable, detach the cable from the printer.
  • Select Firmware, and then choose Download.
  • Employ HP Easy Download and Install Assistant for a printer driver firmware download and connection or pick Download only to access or install the driver file on its own over your Internet browser’s download capabilities.
Step 3: Uninstall the printer software
  • If you’re 123 HP Envy 5541 printer is linked to the computer with a USB cable, remove the cable from the printer.
  • Browse Windows for uninstall a program, and then select Uninstall the program Control Panel setting in the list of options.
  • In the list of installed programs, choose your HP printer name, and then select Uninstall or Yes to Indore the uninstall.
  • Follow the on-screen instructions to finish the software removal.
  • Reboot the computer.
Step 4: Print directly to the printer

Change the printer spooler menu in printer properties to print directly to the printer.

  • Browse Windows for devices and choose Devices and Printers in the list of results.
  • In the list of installed programs, double-click your printer name, and then choose Printer properties.
  • Choose the Advanced
  • Choose the option Print directly to the printer.
  • Choose Apply, and then tap OK.

123.hp.com/envy5541 – HP ePrint Email Job Does Not Print

When directing a print job using your ePrint email address, nothing prints. Use this document to troubleshoot problems that might cause the HP ePrint server to cancel a print job or display an error message.

Step 1: Monitor the printer status and requirements

Ensure that your printer is on, set up, updated, and linked to a network.

  • Ensure that the printer is turned on.
  • Ensure that your printer is connected to the Internet.
  • Make sure Web Services is turned on. Web Services must remain turned on at all times to use HP ePrint.
  • Ensure the printer firmware is up to date. If the firmware is not up to date, HP ePrint may not work.
  • Monitor the printer’s control panel for any blinking lights or error messages.

Step 2: Examine the email and print job requirements

  • Ensure that the correct printer, email address is in the To:
  • If you detect any extra email addresses in the same field as the printer’s email address, the HP ePrint server stops the print job. For additional recipients, enter the email address in the Cc: 
  • Ensure the subject line has text. A blank email subject line might cause the HP ePrint server to terminate the print job.
  • Monitor the email account you are trying to send to for an ePrint error

Step 3: Network connection- troubleshooting

To troubleshoot and resolute common connection issues, monitor the following items, liable to your connection type. If your printer is not linked to an active Internet connection, HP ePrint does not work.

Avail detailed information on how to link your printer by entering your printer model, and then browse for the document on installing your printer for a wired or wireless connection, or for the error message that exhibits.

0 comment

www.123.hp.com/ojp8730

123.hp.com/ojp8730 Printer Setup

Printer Illustration

Enjoy the benefits of high-quality printing with the HP OjPro 8730 that are designed to bring you the unparalleled performance and proffers an extensive range of efficiency and throughput. The Automatic paper sensor feature in this printer detects the type of paper and regulates the settings automatically to give you optimum photo-printing results.

It facilitates mobile printing features like Airprint, ePrint, Wi-Fi Direct.

123.hp.com/ojp8730 Printer Features

123.hp.com/ojpro8730 Mobile printing

Wherever you go, you have your portable mobile printer that lets you print photos, documents, labels, and more, from anywhere you go, making it easier to carry everything within your bag.

123 HP OJP 8730 Wi-Fi Direct

Start printing using Wireless Direct, a peer-to-peer protocol that lets you to connect a computer or mobile device to the printer directly, without any other device being connected to a router or network.

123 HP OJP 8730 Automatic Paper Sensor

No need to sit near the printer and load the papers in recurrently; the Automatic Paper Sensor senses the paper automatically, thus saving your time and paper.

123.hp.com/ojpro8730 Mobile printing

123.hp.com/ojpro8730 Airprint

AirPrint is an exceptional feature with which you can print a document or a photo from an Apple device by connecting your HP compatible printer to a wireless network. If you are using an HP AirPrint compatible printer that contains wireless features, then these instructions help you set up AirPrint.

123 HP OJPro 8730 ePrint

HP ePrint is a cloud-based service that generates prints easily from your Android, Smartphone or Tablets. Print from anywhere with a live Internet connection. You can email the document or photo you need to print directly to the 123 HP ePrint enabled printer.

123 HP OJPro 8730 Cloud Print

Google Cloud Print allows you share printers with just a click. Any type of app when connected to a web-connected device, can use Google Cloud Print. You can connect a printer to your Google Cloud Print account and start printing on it. Handling printers and print jobs in Cloudy-ready printers is simple.

123.hp.com/ojpro8730 Latest Driver & Manual Download

123 HP Officejet Pro 8730 Driver

Download the Updated Printer Driver:

  • Avail the latest version of the printer driver from 123.hp.com/ojp8730 us within seconds.
  • Click the link to download 123 HP Officejet Pro 8730 for Windows and Mac compatible printer.

Driver Download

123 HP Officejet Pro 8730 Manual

Download the Easy Procedural Guide:

  • Our easy step-by-step instructions help you setup and troubleshoot printer on your own.
  • Click the link to download from 123.hp.com/setup 8730 the user manual for your corresponding 123 HP Officejet Pro 8730.

 123.hp.com/ojpro8730 Printer Quick Tips

Tips to tricks to use your printer efficiently

  • Make use of clear and fresh paper to print your document.
  • If you have difficulties while printing, boot up your printer and computer.
  • Make sure you unplug the cable only after switching off your printer.
  • Check the ink levels recurrently before it totally runs out.

123.hp.com/ojpro8730 Printer Troubleshooting

Discover Your Wireless WEP, WPA, WPA2 Password (Mac)

123.hp.com/envy5540

Wireless printers produce prints to several devices without the need of cables. To generate prints and copies wirelessly, you require the wireless network password. The wireless password can be referred to as the Wi-Fi security key, WPA or WPA2 passphrase or WEP key. Generally, the wireless password is provided by your ISP, and you might have changed a different password previously.

Step 1: Find the wireless password from your PC or laptop

Find out the wireless password from a computer or laptop that is connected to the wireless network using the steps given below. To view the network password on your Mac system, you will need to open the Keychain Access application.

  • Go to the Finder menu bar, click on the option Go, and then choose Utilities.
  • Open the Keychain Access application on your Mac system.
  • In the Keychains list that is displayed, you will need to select Local Items.
  • Then, select Passwords from the Category list.
  • Double-click on the name of your wireless network, and then enable Show password checkbox.
  • Enter the administrator password when prompted, and then click OK.

If the Show Password check box is unreachable or you do not have the administrator password, you can skip to the next step.

Step 2: View the password on the router’s label
  • At the rear end of your wireless router, you will find the password for your wireless network. The wireless network password can also be labeled as wireless key, WPA key, security password, wireless password, WPA password, WPA2 password, or WEP password on your router.
  • If the password is unavailable or if you are unable to view the password from the router’s label or you have changed the password to a different one, you can try the next step.
Step 3: Find the wireless password on the Internet service paperwork (ISP)

Check the documentation paper that comes along with the Internet Service Paperwork (ISP). The ISP includes the network name and password. If the wireless password cannot be found even after executing all the above steps or you found the password provided by your ISP but it does not work, someone might have changed the password. Contact the person who changed the password or recover the password from your router’s configuration page.

0 comment

123.hp.com/oj8702 Setup Printer

123 HP Officejet 8702 Printer Illustration

This 123 HP Officejet 8702 full-featured all-in-one delivers professional-quality color at up to 50 percent lower cost per page than lasers. Stay creative and tackle high-volume jobs with print, fax, scan and copy adaptability. This full-featured wireless all-in-one supplies professional-quality color at up to 50% lower cost per page than lasers.

Stay productive and challenge high-volume print jobs with print, fax, scan, and copy versatility. Finish jobs in a jiffy with an HP Officejet 8702 all-in-one printer designed for fast, high-volume performance for the office.

123.hp.com/oj8702 Printer Features

123 HP OJ 8702 Business apps

123 HP Officejet 8702 Avail the latest business tips, news and more with free apps-supplied on your schedule.

123 HP OJ 8702 Wireless printing

Print and share with notebooks or PCs on a current wireless network, using the liberty of built-in wireless.

123 HP OJ 8702 Easy-access USB port

Walk up and print from your USB drive by means of the easy-access USB port.

123.hp.com/oj8702 Mobile Application

123 HP Officejet 8702 Airprint

AirPrint is an exceptional feature with which you can print a document or a photo from an Apple device by connecting your HP compatible printer to a wireless network. If you are using an HP AirPrint compatible printer that contains wireless features, then these instructions help you set up AirPrint.

Read More

123 HP Officejet 8702 ePrint

HP ePrint is a cloud-based service that generates prints easily from your Android, Smartphone or Tablets. Print from anywhere with a live Internet connection. You can email the document or photo you need to print directly to the 123 HP ePrint enabled printer.

Read More

123 HP Officejet 8702 Cloud Print

Google Cloud Print allows you share printers with just a click. Any type of app when connected to a web-connected device, can use Cloud Print. You can connect a printer to your Google Cloud Print account and start printing on it. Handling printers and print jobs in Cloud-ready printers is simple.

Read More

123.hp.com/oj8702 Latest Driver Manual Download

123 HP Officejet 8702 Driver

Download the Updated Printer Driver:

  • Avail the latest version of the printer driver from 123.hp.com/oj 8702 us within seconds.
  • Click the link to download 123 HP Officejet 8702 for Windows and Mac compatible printer.

Driver Download

123.hp.com/oj8702 Manual

Download the Easy Procedural Guide:

  • Our easy step-by-step instructions help you setup and troubleshoot printer on your own.
  • Click the link to download the user manual for your corresponding 123 HP Officejet 8702.

Manual Download

 123 HP Officejet 8702 Printer Quick Tips

  • Leave the printer to rest after printing too many pages so that the ink does not smear.
  • Ensure that your images are the size or slightly smaller than your paper for borderless printing.
  • Store your inkjet paper in a closed box until you are ready to use it.

123.hp.com/oj8702 Printer Troubleshooting

123.hp.com/oj8702 – To determine print issues (Windows)

Ensure that the printer is switched on and that there is paper in the tray. If you are still incapable of printing, try the following in order:

  • Monitor for error messages from the printer display and resolute them by following the onscreen commands.
  • If your computer is linked to the printer with a USB cable, separate and relink the USB cable. If your computer is linked to the printer with a wireless connection, check that the connection is working.
  • Confirm that the printer is not paused or online or the printer is set as default printer.

To confirm that the printer is not paused or online

  1. Contingent to your operating system, do one of the following:
    • Windows 10: From the Windows Start options, choose All apps, choose Windows System, select Control Panel, and then choose View devices and printers under Hardware and Sound option.
    • Windows 8.1 and Windows 8: Tap the upper-right corner of the screen to access the menu bar, choose the Settings icon, choose Control Panel, and then choose View devices and printers.
    • Windows 7: From the Windows Start menu, choose Devices and Printers.
    • Windows Vista: From the Windows Start menu, choose Control Panel, and then select Printers.
    • Windows XP: From the Windows Start menu, choose Control Panel, and then choose Printers and Faxes.
  2. Either double-click or right-click the icon for your printer and choose See what’s printing to open the print queue.
  3. On the Printer menu, ensure there are no check marks next to Pause Printing or Use Printer Online.
  4. If you have made any changes, attempt to print again.
  5. Reboot the print spooler.

To reboot the print spooler

  • Contingent to your operating system, do one of the following:

Windows 10

  • From the Windows Start menu, choose All apps, and then select Windows System.
  • Choose Control Panel, select System and Security, and then choose Administrative Tools.
  • Double-click Services
  • Right-click the Print Spooler, and then choose Properties.
  • On the General tab, next to Startup type, ensure that Automatic is selected.
  • If the service is not already running, under Service status, choose Start, and then select OK.

Windows 8.1 and Windows 8

  • Choose the upper-right corner of the screen to access the Charms bar, and then select the Settings icon.
  • Select Control Panel, and then choose or tap System and Security.
  • Choose Administrative Tools, and then double-click or double-tap Services.
  • Select and hold Print Spooler, and then choose Properties.
  • On the General tab, next to Startup type, ensure that Automatic is selected.
  • If the service is not already running, under Service status, choose Start, and then choose OK.

Windows 7

  • From the Windows Start menu, choose Control Panel, System and Security, and then Administrative Tools.
  • Right-click the Print Spooler, and then choose Properties.
  • On the General tab, next to Startup type, ensure that Automatic is selected.
  • If the service is not already running, under Service status, choose Start, and then select OK.

Windows Vista

  • From the Windows Start menu, choose Control Panel, System and Maintenance, Administrative Tools.
  • Right-click the Print Spooler service, and then choose Properties.
  • If the service is not previously running, below Service status, choose Start, and then select OK.

Windows XP

  • Click Manage, and then choose Services and Applications.
  • Double-click Services, and then choose Print Spooler.
    • Ensure the correct printer is set as the default printer. The default printer has a check mark in a black or green circle next to it.
    • If the wrong printer is set as the default printer, right-click the correct printer and choose Set as Default Printer.
    • Attempt using your 123 HP Officejet 8702 printer again.
  • Reboot the computer.
0 comment

HP PHOTOSMART D110 DUPLEX PRINTING

Duplexing is supported by the HP Photosmart d110 printer. Print the duplex printing feature on both sides of a paper. Load a document and modify the HP printer driver print settings. The HP Photosmart D110 Duplex Printing can be set automatically or manually.

 PHOTOSMART HP PHOTOSSMART D110

  • Load the printer’s sheet of paper with a pile of papers. Please use HP HP PHOTOSMART D110
  • Use the duplex feature to select a doc or photo to print.
  • Select Print from the list below, click File menu.
  • From the list displayed on the display choose your HP Photosmart printer.
  • Extension and for a few seconds the Printer Properties tab.
  • Check if you open the Print Preferences or Properties tab.
  • Enable the option of two-sided printing on both sides.
  • Press and then click Apply.
how to hp photosmart d110 duplex printing

PRINT ON BOTH THE SIDES WITH MANUAL AND AUTO DUPLEXING

  • Load HP Photosmart’s printer’s paper tray with enough plain paper. Check that the tray is loaded to its limit. You can complete the print task completely and avoid page problems.
  • Open the document for HP Photosmart D110 Duplex Printing on your laptop. Click on the File menu at the top left of the screen. Select the Print option from the drop-down menu.
  • Click from the list and proceed to Printer Properties menu, simply click your HP Photosmart printer model. Wait a while and automatically open the Document Properties / Print Preferences window.
  • Navigate to the Print Shortcuts tab and select any of the options on your screen (print on both sides or duplex print on two sides).
  • If the driver or firmware of your printer is out of date, the Printing Shortcuts tab may not exist. Find the Layout menu at the bottom of the screen.
  • Choose the Layout or Page Flip option to Apply, then OK, then Print. Then, choose the Layout menu. The printing press prints on one side, tightens the paper inside and prints on the other.
  • Check whether both sides are correctly printed. If yes, automatic duplexing is supported by the HP Photosmart d110 printer. You can also print on your HP Photosmart printer using the manual duplexing function.
  • Start the printing process and stop the process temporarily when the printer prints on one side. From the output panel remove the printed paper and place it onto the panel, and face it in the other direction on the printed side.

GUIDELINES TO AVOID PAPER JAMS & PAPER MISMATCH ERRORS

  • Do not print with clear or glassy papers. Do not print on any of the following materials.
  • Do not use duplex envelopes or photo sheets.
  • To achieve HP Photosmart D110 Duplex Print, make sure that the paper weighs more than 16 lbs and less than 105 lbs.
0 comment

123.hp.com/ojpro6960 Setup Printer

 123 HP Officejet Pro 6960 Printer Illustration

123.hp.com/setup 6960 – Easily print from a selection of smartphones and tablets. Connect a smartphone or tablet straight to the printer and effortlessly print without a network. Print wireless and share this all-in-one with new wireless-enabled devices.

Effortlessly manage printing tasks and scan on the go, with the HP Officejet Pro 6960 All-in-One Printer Remote mobile application.

 123.hp.com/ojpro6960 Printer Features

Professional Color for Less

Reasonable, quality color that never runs out. Print professional-quality color documents for up to half the cost per page compared with lasers. Protect up to 50% with HP Instant Ink and never run out. Rely on Original HP ink cartridges to provide durable prints that resist water and last for eras.

123 HP OJPro 6960 Easy Mobile Printing

Unified mobile setup. Easily print from your smartphone, tablet, or notebook PC, and keep trade moving with easy setup-even from your smartphone using 123.hp.com/setup 6960.

123 HP OJPro 6960 Stay Productive

Handle more tasks without slowing down. Protect paper with automatic two-sided printing, and speed through jobs with a 35-page ADF. Click and swipe the touchscreen on the 6960 like you would a smartphone and get instant entree to customization shortcuts for print, scan, copy, and fax jobs.

123.hp.com/ojpro6960 Mobile Application

123 HP OJPro 6960 Airprint

AirPrint is an exceptional feature with which you can print a document or a photo from an Apple device by connecting your HP compatible printer to a wireless network. If you are using an HP AirPrint compatible printer that contains wireless features, then these instructions help you set up AirPrint.

Read More

123 HP OJPro 6960 ePrint

HP ePrint is a cloud-based service that generates prints easily from your Android, Smartphone or Tablets. Print from anywhere with a live Internet connection. You can email the document or photo you need to print directly to the 123 HP ePrint enabled printer.

Read More

123 HP OJPro 6960 Cloud Print

Google Cloud Print allows you share printers with just a click. Any type of app when connected to a web-connected device, can use Cloud Print. You can connect a printer to your Google Cloud Print account and start printing on it. Handling printers and print jobs in Cloudy-ready printers is simple.

Read More

123.hp.com/ojpro6960 Latest Driver & Manual Download

 123 HP Officejet Pro 6960 Driver

Download the Updated Printer Driver:

  • Avail the latest version of the printer driver from 123.hp.com/ojp6960 us within seconds.
  • Click the link to download 123 HP Officejet Pro 6960 for Windows and Mac compatible printer.

Driver Download

 123 HP Officejet Pro 6960 Manual

Download the Easy Procedural Guide:

  • Our easy step-by-step instructions help you setup and troubleshoot printer on your own.
  • Click the link to download the user manual for your corresponding 123 HP Officejet Pro 6960

Manual Download

123 HP Officejet Pro 6960 Printer Quick Tips

  • Ink can occasionally dry up and cause small blockages within the print-heads nozzles, this can lead to your prints being streaky and faded. If this happens to you, you can buy cleaning cartridges that will clean the print-heads within an inkjet printer, they will break up and eliminate any ink that has dried inside the nozzles within the print-head.
  • You may or may not have heard of drivers depending on how much you know about computers. A driver is essentially a piece of software that operates and panels a device that is linked to your computer, in this case a printer. If the driver disk for your printer has been lost and need it to re-install the driver then don’t fear, most of the companies have archives of their drivers on their websites 123.hp.com/setup 6960, you will perhaps end up getting a newer version of the driver this way too.
  • On some printers you can print out a test page without even going through your computers print interface. It differs depending on the model, for example on the hp ojpro 6960 if you clasp the ‘x’ button and the color button then a test page will print. Have a look over you printers manual and see if your printer has this feature.

123 HP Officejet Pro 6960 Printer Troubleshooting

123.hp.com/ojpro6960 – ‘Paper Mismatch’ Error (Windows)

Paper Mismatch or Paper Size Mismatch

This error exhibits to ensure ink is not misused when paper settings in the print driver do not equal the paper loaded in the printer.

Step 1: Alter the paper size setting

Monitor the paper size setting to ensure it matches the paper you want to print.

  • Select File, and then tap Print for the pages you want to print.
  • Ensure your printer is in the Name or Printers drop-down list box, and then select PropertiesPrinter Properties or Preferences.
  • Tap the Paper/Quality
  • Select Advanced, if necessary, and then choose Paper Size.
  • Click the paper size that equals the size and type of paper mounted in the printer tray, and then select OK. If there are no matching paper sizes, choose the size from the option that is closest to the size of the paper mounted in the tray.
  • Select OK, and then attempt to print.

Step 2: Monitor the paper source setting

  • Eliminate all the paper from all the printer input trays.
  • Remount the paper, and then alter the paper width guides so they gently rest against the edge of the paper stack.
  • In the program you want to print from, select File, and then choose Print.
  • Ensure your printer is in the drop down option of Name or Printers, and then choose PropertiesPrinter Properties or Preferences.
  • Select the Paper/Quality tab, and then choose Paper Source to select the correct tray.
  • Select OK, and then print.

Step 3: Rearrange the printer

  • Switch the printer on, if it is not previously on.
  • Pause until the printer is idle and silent before you proceed.
  • Detach the power cord from the back of the printer when the printer is switched on.
  • Release the power cord from the wall outlet.
  • Pause at least 60 seconds.
  • Plug the power cord back into the wall socket.
  • Reconnect the power cord to the hind of the printer.
  • Switch on the printer, if it does not mechanically turn on.
  • The printer may undergo a warm-up period. The printer lights may glare, and the carriage may shift.
  • Pause until the warm-up period diminishes and your printer is idle and silent before you continue.
0 comment

How to Enable duplex printing In HP Officejet 4650 Printer [solved]

The Duplex printing function is supported by the HP Officejet 4650

Keep the paper and time with the duplex print function. Two kinds of manual and automatic printing techniques are available. Automatic duplex printing is supported by the printer. Please read the following steps to begin the printing process for HP Officejet 4650.

Please insert sufficient quantities of paper into the input tray to help print duplex printing from HP Officejet 4650 printer.

  • For a safe alignment, slide the paper width guides.
  • To print your system, open a document or photo.
  • On top of the menu bar, select the File menu. Click Print. Click Print.
  • From the list of devices available, select the printer name.
  • Choose Printer Properties or Printer Setup on the basis of the model printer.
  • Wait for a Windows system to display a Print Preferences window.
  • Enable the Print on both sides option when the shortcut tab is available.
  • To begin the printing process, click Print.

 Develop steps for HP Officejet 4650 duplex printing?

hp Officejet 4650 duplex printing
  • Use the respective power button to switch on the printer and system. For connecting your printer to your system, use a USB cable. Open the input tray for enough paper to be inserted.
  • To print the system, select a document and/or photo. Click File above the application’s menu bar. From the download menu, select Print. The list of printers you can see is displayed.
  • From the list of available devices, select a printer name. Click Properties or Setup of the printer based on the printer model. Refrain from going on until you display the window of Document properties.
  • If you can see the Print Shortcuts tab, view and click Print at both sides. Select Layout features if the option is unavailable. For HP Officejet 4650 duplex printing, find the Print option on both sides.
  • To readability, click Binding or Flip page. Choose OK-> Print. Print.
  • Please leave the output tray on the printed side page. Insert the page in the input tray on the printed side. Insert stacked side facing up if the printer has front loading papers.
  • Continue to touch and on the other side of the printed pages. You can also start the scanning process with the HP Smart App. On the Windows search tab, type HP Smart. Search and set up the app.
  • On the app’s home screen, select Print. Select the name of the printer from the device list. To print duplexes, tap More Settings->. Click OK-> Print. Print.
  • Specify the two-sided option in the Print Dialog screen for a Mac system. The printer is compatible with the Automatic Duplexing option if the Two-sided option is visible.
  • Select Layout and from the menu select a binding option. Click Print. Click Print. Take the printed sheets on the output panel and print HP Officejet 4650.
0 comment

123.hp.com/ojpro8610 Printer Setup Installation

123 HP Officejet Pro 8610 Setup Printer Configuration

HP Officejet Pro 8610 Printer Setup your business to raise with eye-catching color marketing materials for up to 50% lower cost per page than lasers.

Project an expert image with every page, and help keep commercial moving with easy mobile printing at work, home, or on the go 123.hp.com/setup 8610.

 123.hp.com/ojpro8610 Setup Printer Features

123 HP OJPro 8610 Scan to e-mail

Rationalize workflow by scanning a document as an e-mail attachment straight from the 123.hp.com/ojpro8610 printer’s touchscreen.

123 HP OJPro 8610 Wireless printing

Print and share with notebooks or PCs on a current wireless network, using the liberty of built-in wireless.

123 HP OJPro 8610 Easy mobile printing

Stay linked with the easiest way to print from your smartphone or tablet-arrangement is simple.

123.hp.com/ojpro8610 Printer Mobile Printing Setup

123 HP Officejet Pro 8610 Airprint Setup

AirPrint is an exceptional feature with which you can print a document or a photo from an Apple device by connecting your 123.hp.com/ojpro8610 printer to a wireless network. If you are using an HP AirPrint compatible printer that contains wireless features, then these instructions help you set up AirPrint.

123 HP Officejet Pro 8610 ePrint Setup

HP ePrint is a cloud-based service that generates prints easily from your Android, Smartphone or Tablets. Print from anywhere with a live Internet connection. You can email the document or photo you need to print directly to the 123 HP ePrint enabled printer.

123 HP OJPro 8610 Cloud Print Setup

Google Cloud Print allows you share printers with just a click. Any type of app when connected to a web-connected device, can use Google Cloud Print. You can connect a printer to your Google Cloud Print account and start printing on it. Handling printers and print jobs in Cloudy-ready printers is simple.

123.hp.com/ojpro8610 Latest Driver & Manual Download

 123 HP Officejet Pro 8610 Driver

Download the Updated Printer Driver:

  • Avail the latest version of the printer driver from 123.hp.com/ojp8610 us within seconds.
  • Click the link to download 123 HP Officejet Pro 8610 Driver for Windows and Mac compatible printer.

123 HP Officejet Pro 8610 Manual

Download the Easy Procedural Guide:

  • Our easy step-by-step instructions help you 123.hp.com/ojpro8610 setup and troubleshoot printer on your own.
  • Click the link to download the user manual for your corresponding 123 HP Officejet Pro 8610.

123.hp.com/ojpro8610 Printer Quick Tips

Only Part of a Wireless Print Job or Page Prints (Windows 8)

Step 1: Monitor page setup settings

Ensure that your page settings are set to print all pages and to print each page. Settings that may cause some pages not to print are ‘manual duplexing’, ‘print every other page’, ‘print odd pages’, ‘print on both sides’, or alike settings. The names of the page setup settings are diverse liable to what software application you are using to print.

A portion of a page doesn’t print

If part of your printed pages are omitted, then ensure the paper type in your page settings matched the type of paper you are using. Also make sure that your margins are set properly.

Step 2: Download and install Microsoft

For wireless printers that are fix up using a WSD port, Microsoft has unconfined a hot fix to aid prevent dropped data when handling larger print jobs.

Step 3: Deactivate SNMP in Printer Properties (network connection)

  • Find in Windows for ‘devices’ and access Devices and Printers from the list of search options.
  • Right-click the name of your printer, choose Printer Properties, and then choose the name of your printer.
  • Select the Ports
  • Choose the TCP/IP port being used and select Configure Port.
  • Eliminate the checkmark from SNMP Status Enabled, and touch OK.
  • Trial printing again. If problems continue, recap these steps and re-enable SNMP.

Step 4: Make a manual connection

  • On the report, locate the IP Addresssubnet mask, and Default Gateway for your connected network connection type. If your report has discrete numbers for IPv4 and IPv6, then use the numbers opted in the IPv4 section.
  • From a computer linked to your network, locate the URL for the embedded web server(EWS) on the report and type the URL into your Internet browser. If the Web page seems blank, use an altered Internet browser.
  • Choose the Network or Networking tab, and then access the section or page for your network type – wired or wireless.
  • Choose Suggest a Manual IP address if obtainable and the Manual IP addresses are routinely filled in for you.
  • Note down these new numbers on a piece of paper. You might required to use them later when adding a second printer device.
  • Select Apply, and then pause until the changes are set.
  • Proceed to the next step.

Step 5: Add a second printer to Windows

  • Browse Windows for control panel and access Control Panel from the list of search options.
  • In Control Panel, choose Devices and Printers, and then select Add Printer.
  • Choose Add a network, wireless or Bluetooth printer, and then wait for Windows to determine your printer.
  • Select the name of your printer, and then choose Next.

If more than one printer is recorded, choose the name of your printer and ensure the name does not include an alphanumeric code such as ‘HP647FEA’.

The system naturally senses the right driver to use.

  • Choose Use the driver that is currently installed (recommended), and then select Next.
  • If chosen, alter the name of your printer, and then select Next.
  • Choose Do not share this printer, and then select Next.
  • Choose Set as the default printer and then select Finish.
  • Attempt printing again.

Step 6: Download the latest full feature software

  • Switch on the printer.
  • If your printer is linked to the computer with a USB cable, detach the cable from the 123.hp.com/ojpro8610 printer.
  • If required, select a method to recognize your printer model, and then track the on-screen instructions to go to the download page.
  • Choose Download next to the full feature driver (recommended), or select Basic Drivers for other driver options.
0 comment

123.hp.com/oj3830 Setup

by printersetup

123.hp.com/oj3830 Printer Setup & Installation

123 HP Officejet 3830 Printer Setup

When you require printing a page instantly, you need not step out to do the print job when you have your own printer at home. 123.hp.com/oj3830 Here, you have the best printer right before you with surprising features in it.

The Officejet 3830 printer has good mobile connectivity options such as the HP AiO Remote app and more. The printer has built-in fax capabilities through which you can easily send and receive faxes. The photo quality is good as well.

123 HP Officejet 3830 Printer Features

123 HP OJ 3830 AiO Remote app

When it comes to mobile printing, HP AiO Remote app is the perfect choice. With the HP AiO Remote app, you can send and receive high-quality pictures and documents through your handy devices.

123 HP OJ 3830 Photo Quality

This is an ideal budget printer for those who want to print photos from phone and tablets with paramount quality; it produces splendid photo prints at a good speed.

123 HP OJ 3830 Built-in Fax

The printer has built-in fax capabilities where you can send and receive faxes from the web or email at an instant speed. You can contact our professionals for any fax related issues.

123 HP Officejet 3830 Mobile Application Setup

123 HP Officejet 3830 Airprint Setup

AirPrint is an exceptional feature with which you can print a document or a photo from an Apple device by connecting your HP compatible printer to a wireless network. If you are using an HP AirPrint compatible printer that contains wireless features, then these instructions help you set up AirPrint.

Read More

123 HP Officejet 3830 ePrint Setup

HP ePrint is a cloud-based service that generates prints easily from your Android, Smartphone or Tablets. Print from anywhere with a live Internet connection. You can email the document or photo you need to print directly to the 123 HP ePrint enabled printer.

Read More

123 HP Officejet 3830 Cloud Print Setup

Google Cloud Print allows you share printers with just a click. Any type of app when connected to a web-connected device, can use Cloud Print. You can connect a printer to your Google Cloud Print account and start printing on it. Handling printers and print jobs in Cloud-ready printers is simple.

Read More

HP Officejet 3830 Latest Driver & Manual Download

123.hp.com/OJ3830 Driver Setup

Download the Updated Printer Driver:

  • Avail the latest version of the printer driver from 123.hp.com/oj 3830 us within seconds.
  • Click the link to download 123 HP Officejet 3830 for Windows and Mac compatible printer.

Driver Download

123.hp.com/OJ3830 Manual

Download the Easy Procedural Guide:

  • Our easy step-by-step instructions help you setup and troubleshoot printer on your own.
  • Click the link to download the user manual for your corresponding 123 HP Officejet 3830 .

Manual Download

123.hp.com/OJ3830 – Printer Quick Tips

  • Turn off your printers when it is not in use as they tend to produce heat while they are turned on.
  • Do not use a wet cloth or tissues to clean the print head and inside the printer.
  • Never compromises on the quality of the hp officejet 3830 cartridges. Make sure you use the best-in-quality cartridges for your printer from 123.hp.com/oj3830.
  • Use only purified or bottled water to clean your hp oj 3830 printer (Do not use tap water).

123.hp.com/OJ3830 – HP Officejet 3830 Printer Troubleshooting

What if my printer does not print after connecting to the network?

You have configured the printer to a wireless network successfully, but the connection is lost. When the printer does not maintain the connection, you might encounter hassles when printing and scanning. There are several possibilities through which you can resolve this connection issue,

  1. Sometimes, your printer may not be connected to the network properly. To resolve this issue,
    • To see if there are any connection issues, you will need to print a Wireless Network Test Report from the printer’s control panel. On the Network report’s result page, the connection issues if any will be displayed at the top of the report.
    • If there are no issues displayed on the Report page, access the Printer’s Homepage. To do this, you will need to detect the printer’s IP address from the report page. If you can’t access the printer’s Homepage, try power cycling the printer and your router and then try again.
  2. Your computer might not have connected to the same network as your printer. To resolve this,
    • Open any of the web browsers that you have installed on your computer and type the printer’s IP address in the address bar to access the printer’s home page.
    • If you are able to access this web page, then your computer and printer are connected to the same network.
  3. Sometimes, the firewall software or antivirus you use might be blocking the printer. Disable the firewall software by clicking ‘Always allow’ for HP printers, in the popups shown by the firewall software.
  4. Your wireless router may not work well.
  5. The issue may also befall when the IP address of your printer is changed. Then, you will need to update the software with the modified IP address. To update the software with a new IP address:

If you are using Windows XP, Windows Vista or Windows 7 computer:

  • Click, select Programs, then choose HP from the list of options.
  • Under HP, choose your printer name and then select Update IP Address.

If you are using a Windows 8/8.1 computer:

  • Open the printer software from the Start screen.
  • On top of the Printer Software screen, choose ‘Utilities’.
  • Click Update IP address and enter the new IP address.

Why does my scanned output have vertical streaks all over it?

While scanning a document, there may be vertical lines all over the scanned output. Some of the common sources that lead to distorted outputs are:

  • Static interference
  • The USB cable or power cable not connected properly
  • Fingerprints, smudges, lint, or dust that are existent on the scanner glass
  • Dust or debris on the scanner lid or that remains inside the printer
  • Damaged or scratched scanner glass
  • Poor internal connections
  • Faulty or defective scanner bulb or parts

To evade these distorted outputs, do remember to keep your printer and scanner components clean. If the connection issue persists even after in-depth cleaning, you will have to follow the steps given below to reset the 123.hp.com/oj3830 printer.

  • Ensure that the printer is powered on and then disconnect the power cable from it.
  • Detach the USB cable, from the printer and the computer, and reconnect it.
  • Detach the power cable from the wall socket, and connect it again.
  • Now connect the power cable to the printer.
  • Press the Power button and turn on the printer.
0 comment
123-hp-com-envy5530

About 123 HP DESKJET 3052A Printer

  • 123.hp.com / 3052A Setup
    A multipurpose color printer
    Allows you to search, copy and print a picture in color
  • Comes with optimized wifi
  • Wirelessly print connection of your smartphones , tablets and other wireless devices to 123.hp.com/dj3052A setup
  • HP Supported Wireless Printing
  • Comes with direct wireless printing feature.
  • Comes with automatic 2-side printing feature which reduces your paper usage by 50 percent
  • Manage your tasks of printing , scanning, copying, and faxing using HP all in one remote program.
  • Page size is between 100 and 400
  • 123 HP Deskjet Setup 3052A comes with borderless printing function
  • Black print rates are up to 9.5 ppm and color up to 6.8 ppm
  • Supports Mac operating systems with Windows Driver
  • Scan to email feature helps you to transfer the scanned documents , files or images directly from your printer to the recipient.

123 HP DESKJET 3052A Features

123 HP Deskjet 3052A Print

Quick to print, with Deskjet 3052A 123 HP
All-in-one printing press. Connect your Tablet or smartphone wirelessly to the printer. Use the print functionality without a network; share this All-in-One with other wireless devices.

123 HP Deskjet 3052A Scanner

123 HP Deskjet 3052A Quick to search
All-in-one printing press. Link your Smartphone or Tablet wirelessly to your printer. Without a network, use the scanning feature; share this All-in-One with other wireless users.

123 HP Deskjet 3052A Fax

Simple manual faxing. Link your Smartphone or Tablet wirelessly directly to your printer. Enjoy faxing features, share this all-in-one 123 HP with other wireless-enabled computers.

123-hp-com-wireless-setup-windows

Unboxing Set Up 123 HP DESKJET 3052A
Printer

  • HP Deskjet printer, first ensure all the parts are included in the package, and then remove the printer from the box. Now remove all of the printed tapes, packaging substances carefully.
  • Within the scanner lid you can find other packaging materials. Send them down, too. And closing the lid carefully to the scanner.
  • Remove the packaging material from left in the region of the ink cartridge. Now open the paper tray, and remove the paper tray tapes. Slide out the guides now, and push in the tray.
  • Plug in the back of the printer on one side of the cord, and the wall outlet on the other.
  • ON and choose settings on your printer. You get prompted to use the language, region / country, and other general setting dialog box.

123 HP DESKJET 3052A CONNECTIVITY MODES

Learn how to connect hp 3052a to wireless network

123 HP Deskjet 3052A Wireless Printer Setup

Setup, download and update information for starting your 123.hp.com/dj 3052A Wireless Setup is provided in the details given below. Learn how to ready for installation, download the HP Deskjet 3052A driver and connect wirelessly. For any questions or inquiries, please contact our professional expertise.

123.hp.com/dj 3052A Wireless Setup on Windows

If you want to start with wireless installation 123.hp.com/dj 3052A, first you should know the name and password of the network. Once you have the name of the network and password you can start installing the wireless system.

123-hp-com-wireless-setup-windows
  1. Switch on your printer, router, and computer machine HP Deskjet 3052A.
  2. You will learn about SSID network. The SSID is the identifier for service set and is the name of the network.
  3. Gather your WEP key or WPA, which is a password for your network
  4. Confirm your link to your wireless network.
  5. You should have actively accessed the internet.
  6. Confirm the connection of your 123HP printer to your machine, and make sure both are on the same network
  7. Switch on your 3052A HP Deskjet Printer
  8. Place your printer next to the machine 123.hp.com/dj 3052A. (Make sure printers and computers are placed within the router’s range during the setup and installation process.)
  9. If any of the USB cables or Ethernet cables are disconnected, link to your printer.

Connect to the HP DJ3052A Wireless Network

  1. With the aid of the Wireless Setup Wizard you will connect your HP Deskjet 3052a printer to your network. If the HP printer installer is attached, your printer will be located during the installation process.
  2. Swipe the Dashboard off the printer control panel
  3. Now tap the button of Wireless. Touch the icon and select Setup
  4. Go to Network Configuration, and go to Wireless Settings 123.hp.com/dj 3052A
    Wireless Setup Assistant
  5. Choose your network name from the list of networks available now Confirm on OK
  6. If your network name does not appear in the list , select Enter New Network Name
  7. Now follow the on-screen directions to reach your network
  8. Then enter the WEP or WPA key when asked Sign up with Done
  9. If you hit OK, return to home screen

Download the HP DJ3052A Driver for Windows

Make sure you download the new printer program from 123.hp.com/dj 3052A to its complete capacity.

  1. Go to 3052A/123.hp.com
  2. From the list pick your model number
  3. Click On Start
  4. Tap The Download
  5. Go to Downloads directory
  6. Double click HP file name Quick Start now
  7. Now follow the instructions on your computer and complete installation process for the system and driver.
  8. Finally, go to 123.hp.com to complete registration and activation.

HP Deskjet 3052A Wireless Setup on Mac

To start with, you should first gather the network name and password, 123 HP Deskjet 3052A Wireless Setup and Mount.
Once you have the name of the network and password you can start installing the wireless system.

123-hp-com-install-wireless-setup-install-for-mac

HP Deskjet 3052A Software installation For MAC

  1. Switch on your printer, router, and computer machine 123 HP Deskjet 3052A
    You will learn about SSID network. The SSID is the identifier for service set and is the name of the network.
  2. Gather your WEP or WPA key which is a password for the network
  3. Confirm your link to your wireless network.
  4. You will have the active access to the internet.
  5. Confirm that your printer attaches to your machine 123.hp.com/dj 3052A
  6. Make sure printer and machine are located on the same network
  7. Check that the machine turns on your printer, router, and.
  8. Place your Deskjet 3052A 123hp printer right next to your machine.
  9. During setup and installation process, position your printer and computer within the range of the router
  10. When connected to your 123HP Deskjet 3052A Printer, disconnect USB or Ethernet cables.

Connect to the HP DJ3052A Wireless Network

  • Using Wireless Setup Wizard, connect your 123 HP Deskjet 3052A Printer to your network.
  • During the installation procedure HP installer will find your printer 123.hp.com/dj 3052A
  • Swipe down the control panel of the 123HP printer and open the dashboard
  • Touch Icon Wireless
  • Choose The System
  • Go to Enable the Network
  • Go to Settings on Wireless
  • Wireless Setup Assistant
  • Now pick your network’s name from the list of available networks
  • Confirm on OK
  • If your network name does not appear in the list then select Enter New Network Name
  • Now follow the on-screen directions to reach your network
  • Then type in the WEP or WPA key
  • Sign up with Done
  • If you hit OK, return to home screen

Download the HP DJ3052A Driver for MAC

Make sure you download the new and full-featured printer program from the HP website (123.hp.com/dj 3052A or) 123.hp.com. Disconnect all attached USB Cable and Ethernet cable to your computer and the printer.

  • Tap Download At 123.hp.com/dj 3052A
  • Access the Downloads folder
  • Double-click on ‘HP Quick Start’ file name
  • Follow the instructions on your computer and finish setup and installation of the driver
  • From the Download screen pick HP Quick Scan
  • Tap Next
  • You will see Your app connected and checked on your computer
  • Tap Add Gadget
  • Now pick Print Test Page or Scan Test Page (this option confirms setup of the printer)
  • To complete the setup, continue and follow the on-screen instructions
0 comment