Category:

Hp Printer Setup

[Guide] How to Refill Canon 245 Ink Cartridge

by printerhelp

Steps To Refill Canon 245 Ink Cartridges

If the ink in the tin cartridge is small or empty, the cartridge of the Canon printer can be replenished. Fill the ink thoroughly into the cartridge without any spills using a manual of refilling the ink cartridge Canon 245 Printer.

Steps To Refill Canon 245 Ink Cartridge

1. In the event of a spill, place the cartridge on paper towels. 

2. Peel off the top tag.
3. Drill a cartridge hole.
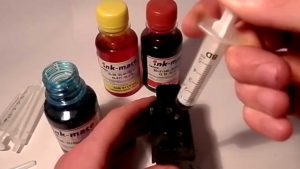
4. Fill the black ink syringe.
5. Stick the needle of the syringe in the hole.
6. Inject the ink into the sponge slowly.
7. Let the label off or cut it as short so that the hole is not covered.
8. Print a test page and prints the Canon printer without any issues effectively.

Developed Refilling Steps for Canon 245 Ink Cartridge

  • Put the cartridge on the papers towels in an area where you can tolerate a spill to refill the Canon 245 ink cartridge.
  • Peel the top tag off.
  • Drill a cartridge hole.
  • Then the syringe can be filled with almost 10 ml of black ink, the 245 XL can handle 18 ml ink.
  • Place the syringe needle in the boiled hole and in the sponge at least half way down.
  • Slowly inject ink into the sponge until you see ink in the abyss.
  • When finished, leave the label off or cut it short and make sure that the drilled hole isn’t covered.
  • This will be the vent hole of the cartridge. Replace the cartridge and operate 1 to 3 cleaning cycles in accordance with the Printer Instructions on Canon 245 ink cartridge filling.
0 comment

Quick Support for 123.hp.com/envy7155 Printer

by printerhelp

Are you searching for a 123.hp.com/envy7155 printer, which can easily perform all duties? Perform multiple tasks like printing, scanning and copying with your printer.

Setup and Installation of the HP Envy 7155 Printer Setup Steps Go to 123.hp.com/setup 7155.

  • Download HP Envy 7155 Printer driver software.
  • Enter your printer model and press Start to download your HP Envy 7155 Driver.
  • To download the driver, double-click on the driver file that you have uploaded to your desktop to begin the installation process.
  • Follow instructions on the screen and finish the setup and installation of the HP Envy7155 printer attachment and driver.
  • Now return to 123.hp.com/envy7155 Registration and activation finishes page.

UNPACKING YOUR NEW HP ENVY 7155 PRINTER

STEP 1: UNSEAL THE BOX SAFELY AND TAKE OUT THE PRINTER

  • 123.hp.com/envy7155 printer is covered with tags and stickers and with cables and cabinetry that help connect your Mac or Windows computer to the printing device.
  • Carefully remove the printer from the box and position on a clean surface; remove the tapes and packing materials around the printer.
  • The control panel of the printer has a protective sticker to remove.
  • Hold the printer’s side handles and raise the access gate of the HP Envy 7155 incubator until it fits in. Now remove from the printer all the supporting equipment and tape.
  • Bring the ink cartridge access gate down and closed it.
  • Lift the door upward, grab it so the paper tray is expanded and remove the packaging tape afterwards.

STEP 2: SET YOUR HP ENVY 7155 PRINTER AT YOUR COMPUTER:

  • Drag the tray forward and close until the tray can move anymore, before linking your printer to power outlet. Remove the covers used to pack the materials inside the printer.
  • Connect the printer to a power supply, energy the device and customize the preferred configuration.
    One end of the power cord should be linked to the back of the printer and the parallel end to an electrical outlet. Turn your printer back on 123.hp.com/envy7155.
  • On the printer control panel, select your favorite word and country / region, then click Yes to approve your choice.
  • The date and time must be set only if requested. This can be achieved by taping Yes and confirming your decision.

Step 3: PRINTING A PRINT JOB

  • If the cartridges have been correctly aligned on a printer, an alignment page will be printed.
  • Insert plain paper A4 or US letter size into the input cabinet of the printer.
  • Pull out the door of the input tray to open it and extend it softly to you.
  • Move the paper width guides to their extreme end.
  • Put a stack of A4 paper in the cabinet; notice that the lower end is to be shifted down the print side.
  • Push the stack in the cabinet until it moves no further.
  • Align the paper length guides so that the paper stack does not bend or curl. Slowly move the input tray forward and guarantee it is fixed.

STEP 4: SETTING UP INK CARTRIDGE SYSTEM

  • Lift the ink cartridge access gate and make sure it’s strongly positioned within.
  • Take the cartridge out of your pocket and hold the HP Envy 7155 Ink cartridge alone with the black plastic.
  • Peel off a plastic tape that covers your ink cartridge.
  • Upon the ink cartridge slot, place the lid.
  • Grip on his sides the ink box with the nozzles facing the printer 123.hp.com/envy7155. And then move the cartridge in its slot until it fixes strongly in position.
  • Shut the deck over the ink cartridge slot to move securely.
  • Follow the directions again to install the other ink cartridge in this step.
  • When the ink cartridge is replaced in its slot, closed the lid.
  • Check whether you put the black ink cartridge at the right and the color ink cartridge at the bottom.
  • Now bring the lid down to close the cartridge’s gate.

STEP 5: HP ENVY 7155 INK CARTRIDGE ALIGNMENT

  • Print the alignment page of 123.hp.com/envy7155 printer to ensure that printed quality is properly kept.
  • Pull the scanner lid up. Keep your alignment panel with the print side facing the scanner glass to see if the quality of the print is up to the limit. Confirm that the sheet is placed on the scanner glass in accordance with the incised guides.
  • To align the cartridges, click OK. On the control panel, click OK.

STEP 6: PRINTER SOFTWARE INSTALLATION

The HP Envy 7155 Setup is the first step to start a printer software installed by using your computer’s instructions.

  • You can either download the updated version of the software on our website or use the setup CD supplied with your printer box.

Setting up your 123.hp.com/envy7155 Printer for the First Time

Download your 123.hp.com/envy7155 Printer and install it on your Windows desktop

  • Make sure HP Envy 7155 Setup is running and powered on.
  • If it’s attached with a laptop or any other device, remove the USB cable from the printer.
  • Go to our website and enter the name and model of the HP Printer in the field of service.
  • Join the prompts for the downloads section on the windows screen.
  • Click Download under the driver or software of the printer. Open and then install the downloaded folder on your Windows desktop.

SIMPLE WIRELESS SETUP FOR HP 7155 PRINTER ON YOUR MAC AND WINDOWS DEVICE

You can setup your 123.hp.com/envy7155 printer for both Windows and Mac computers. Before starting the set-up process, make sure you use a printer that can print wirelessly through a local network.

  • Press Wireless Button on the printer’s control panel to install 123 HP Envy 7155 Wireless Connection.
  • Select Wireless Setup Wizard, then go to Settings.
  • To finish the wireless link, follow the on-screen directions.
  • Enter your information during the setup phase such as network username and password.
  • Insert the CD-ROM of your printer systems to install the printer driver software for 123 HP Envy 7155.
  • Follow the directions on the screen to finish the wireless configuration.

How do I switch from a USB to a wireless (Windows) network?

  • Click on the software icon123.hp.com/envy7155 and open it.
  • From the menu choices, click Tools. Tools.
  • Choose Device 123.hp.com/7155 and Software.
  • Tap Convert a linked USB printer to the wireless system, too.
  • Follow the on-screen directions for changing the link.

123 HP Envy 7155 WPS Setup Press the Control Panel Wireless button.

  • Go to Wireless Setup Wizard and select Settings.
  • Follow the wireless connection on-screen instructions.
  • Enter your information during the installation phase, such as network username and password.
  • Please insert your CD-ROM drivers to install driver software.
  • Follow the on-screen directions for completing the wireless configuration 123 HP Envy 7155.

STEP 1: Organize and guarantee that the installation specifications are fulfilled.

  • Network Name Password Network: The password is also known by other names such as WEP key or WPA passphrase.
  • A wireless HP Envy 7155 setup feature enables a network-based computer.
    Internet access: a broadband Internet connection is always possible.
  • When attached to the printer, the computer and router should be activated and installed over a comparable wireless network.

STEP 2: Wireless network connection of the printer.

  • Check that your 123.hp.com/envy7155 printer is already enabled, if it is not enabled.
  • Tap on the wireless icon from the printer control panel displaying the wireless display.
  • Access Settings on the control panel screen with a straightforward touch.
  • Wireless Setup Wizard Tap HP Envy 7155 and follow onscreen panel instructions. You should now connect your printer to your wireless network.

STEP 3: Download and install the appropriate HP Envy 7155 Setup Driver.

  • Let the printer switch on.
  • When the printer has been attached to the laptop by a USB cable, remove the cable from the printer.
  • If you have to pick a technique for selecting the printer model, enter it and go to the download section with the instructions on your computer screen.
  • Choose the full functional download, which is recommended for complete printer functionality. Click the Basic HP Envy 7155 Driver download button.

HP Envy 7155 All-in – one Printer PRINT Printer Functions

PRINT

A print is needed for the physical verification or storage of computer and mobile data. Set your favorite print settings when the setup is complete. To print a document or picture from your desktop or mobile telephone, please click here.

COPY

Make a quick photocopy of your 123.hp.com/envy7155 high-resolution e-All-in – one printer. Save the copied document in an image file format and repress them whenever necessary. Click here for easy measures to copy your printer on a one-sided and double-sided base.

SCAN

Experience quick scans with the HP Envy 7155 Setup and save your scanned document or picture as a PDF, emailable too. The saved scan file or the email helps you to pull the data from scanned files even when needed in future for printouts. There are many methods a document or picture can be scanned.

FAX

Fax is an simple tool for information transfer and exchange between various places in seconds. The fax function in the HP Envy 7155 printer is an additional feature which keeps your voltages away when you can’t print. Go to the link for easy fax configuration on your printer.

Simple Steps to Print a Document on 7155 Printer

The printer 123.hp.com/envy7155 supports various types and sizes of paper such as plain A4 paper, envelopes, cards, and labels. These steps are used to print a document from your Windows and Mac computers.

FOR WINDOWS:

  • Access the print window to alter or reset work printing and obtain high-quality printing.
    Settings for text size, font, design and appearance before printing.
  • To access the overall settings of the print app that was used to produce the document, click on File or Menu icon and then press Print.
  • Click on Printer Properties, Properties or Preferences that may alter in the OS version for sophisticated layout, quality and print environments.
  • This opens the Document Properties or Preferences window.
  • Ensure that the following settings are taken into account when printing a task from your printer. The configuration may differ according to the printer model. Access the configuration accordingly.
  • Orientation of portrait or landscape: layout, finishing or features tab Orientation menu.
    Paper tray or source: Source / Paper Source Tab of Paper Quality.
  • Type of paper: Type of paper / quality or tab characteristics, type of paper or media.
  • Size of paper: Advanced alternatives or functions tab Size or Size of paper.
  • Printing duplex: layout, finish or function tab-> Printing on both sides.
  • Change paper quality and color settings following the following choices: Paper / Quality Tab-> Settings for quality or media.
  • Click on Advanced printouts alternatives for better performance.
  • Paper / Quality Tab-> Black & White or Color Tab.
  • Click OK and then Print.

FOR MAC:

  • Access the print window to change print job settings. This shift is necessary to obtain high quality performance.
  • The possible or required parameters to change before printing a job are to modify the font size and style of the text, layout options and appearance for the app for which you produced the document.
  • To open the printer configuration window, click File and then click Print.
  • If the menus listed below are not noticeable, click Show Details.
  • From the Printer menu, select the corresponding printer.
  • Choose an option to alter the print job or type of document from the presets menu.
  • To choose different configurations, in the center of the window press on the unnamed menu and alter the next settings. Please note that the print settings can be modified depending on the printer model.
  • Access and alter the configurations listed below to achieve the highest outcomes.
  • Size and type of paper: Type / Quality or Settings for Media / Quality-> Type of paper or type of media.
  • Source: type / quality of paper and/or media & quality settings-> Feed from or paper source. Paper tray or source:
  • Quality: paper type / quality or media and quality settings–> quality or print quality. quality (Draft, Normal, Best and Maximum DPI).
  • Duplex Printing: Layout-> Bilateral or Paper Handling-> Printing pages.
  • Paper Handling Settings-> Scale to match the document size-> Destination Paper Size.
  • Click Print and finish the printing process.

Simple steps to copy a document or a Photo 7155 Printer

You can generate copies of papers and pictures that are mixed or printed. Follow the directions in the same order and easily begin copying your HP Envy 7155 Setup.

STEP 1: INSERT THE ACTUAL DOCUMENT OR PHOTO ON THE COPIER

  • Place the original paper on or over the copy of an automatic document in the ADF (automatic document feeder) trays.
  • The glass scanner is also used to create a one-sided and double-sided print.
    Check if the printer is already activated, if it is not activated.
  • ADF: When using the automatic document feeder to copy the document, place it on the document feeder tray with the print side facing up, and the top edge of the document moving first into the ADF tray. Put the document or image as indicated below.
  • Align the width guides in order to fit the document. The ADF tray accepts a maximum of 35 paper sheets at a moment. Use the scanner glass instead of the ADF to copy pictures to prevent harm to the pictures.
  • Insert the picture in real print with the scanner glass facing down and conform to the mark displayed near the glass; take the scanner lid down.

STEP 2: MAKING A PHOTOCOPY OF THE Document OR IMAGE

This step will improve copy quality by altering the settings such as paper size, paper size, type and appearance after putting in the ADF.

  • Tap the Copy icon from the printer control panel’s home screen.
  • Tap the keyboard icon or label the amount of photocopies needed.
  • Tap the Settings icon to set the sophisticated copy settings.
  • If you want to make a double-sided copy, then select On through scanner glass under the 2-sided copy option. If requested, the second page that requires a copy should be loaded on the glass.
  • Verify that the input panel is loaded with the corresponding paper size and type before starting the copy work.
  • Change the image size or copy it according to the original size by selecting the image size before pressing the copy button.
  • Click Back then Color Start or Black Start to copy.

Scan the document or picture using a Window and Mac Envy7155 printer

Scan choice helps keep the hardcopy of a document or picture on any storage device as a softcopy. There are a few applications that come with HP Envy 7155 Setup as an integrated functionality. Let’s take a look at how the scan works with the applications.

Before scanning, check whether your printer’s full function driver or fundamental HP Envy 7155 Driver is installed depending on its model number. These applications operate on Windows 8 or 10 versions of Windows.

FOR WINDOWS PC OR LAPTOP:

HP Scan Software: Press the start button, search the 123.hp.com/envy7155 HP and HP Scan key on your printer model, and twice click to start the scan.

Compatibility: launched HP Printers in 2011 and later, and operates on or above Windows XP. Another software is accessible called HP Solution Center, comparable to the above. The HP Scan Software technique is used to start scanning but operates on printers published in 2010 and earlier.

Windows Paint: Find and open the software from the Windows search box, type Paint. You can scan and edit a document or picture with a Windows Paint in picture files like JPEG, TIFF, GIF and PNG rather than as PDF. Compatible with and greater version of Windows XP.

HP Scan and Capture: You can download and install this specific software from the Microsoft Store on your PC. This simplifies your work by scanning from your desktop or computer camera and enables you to edit, save or share scanned documents.

FOR MAC:

There are a few applications for Windows which also help Mac equipment. Before starting the scan task, it is essential to verify if your computer has the suitable scan driver installed on your Mac.

HP Easy Scan App: No download or installation costs are incurred in the app and it is Mac OS or OS X 10.9 compliant and greater. Use the connection on our website to download the app on your Mac desktop and install it.

HP Scan Software: This software is endorsed by both Windows and Mac and should be equipped with a full HP Envy 7155 Setup Driver on your printer based Mac computer. It’s Mac OS X10.11 or higher compatible.

Apple Image Capture: An integrated Mac software that is compatible with Mac OS and OS X 10.11 and previous versions with only fundamental scan features. If you choose a scan choice, this application pops up on your Mac machine automatically.

EXPLORE THE SCAN EXTREMELY

It is essential to check that your 123.hp.com/envy7155 printer has been fitted with the necessary software scan in order to have an uninterrupted scan. This is followed by inserting the document or picture you want to scan into the scanner, then using the scan key from the front panel of the printer.

STEP 1: PLACE THE IMAGE or DOCUMENT

From here you learn how to search a picture or document using your 123.hp.com/setup 7155 printer and save the scanned file to your PC in a required folder.

  • Power the printer and activate it.
  • Choose a technique from below to scan: Scanner glass: Keep the materials with the printed side facing down on the scanner glass and position them on the glass as shown. Now closed the scanner’s lid.
  • ADF: If the ADF printer supports 123.hp.com/envy7155 by default, position the media on the ADF cabinet surface. Make sure the print side faces up and the top of the media moves first into the ADF cabinet. The guidelines for paper widths must be aligned to fit the document or picture.

STEP 2: PERFORMING THE DOCUMENT OR IMAGE YOU DESIRE SCAN OPERATION

This HP Envy 7155 system allows a number of ways to save the scanned document in the necessary format.

  • Touch the Scan option on the printer control panel and then type on the computer name to save the scanned document.
  • Choose a format for saving the scanned file that selects the scan choice related to the scanned document or picture. Supporting file format kinds are: PDF: Save the document without the choice of editing.
    OCR: HP Envy 7155 Setup Driver pre-installed portion which supports editing a word program.
  • JPEG: Appropriate format to save records as well as pictures.
  • Email as PDF & JPEG: attach the scanned PDF or document from 123.hp.com/Envy7155 printer as an unavailable email attachment.
0 comment

123.HP.COM/OJ3830 PRINTER SETUP

WIFI CONNECTIVITY

123.hp.com/oj3830 printer provides some awesome experiences of printing documents. Enhance the spirit of printing by connecting to a wireless network.123.hp.com/setup3830

SUPPORTS MAC

Get your printer connected to a MAC Device and start to print A1 Class images with rich quality and High Definition and print them flawless.123.hp.com/setup 3830

USER FRIENDLY

Now it is easy to use this printer. Anyone can easily take access to the printer. No matter what the age the printer is designed to be user friendly. 123 hp com oj3830

HP OFFICEJET 3830  PRINTER NETWORK CONNECTION

  • On your 123 hp com setup 3830 printer control panel display, select the Wi-Fi icon
  • Click the settings icon.
  • Navigate your wireless settings to the Hp Officejet 3830 wireless setup wizard.
  • Select your network name and password.
  • check for the connection.
  • Print the test page to know your network connection.

CONNECTING MAC TO YOUR HP oj3830 PRINTER

  • Using your Apple Menu,
  • Select the printer and your fax for Hardware selection.
  • Now select the Add option to add your printer.
  • Click the continue option to install your 123.hp.com/setup 3830 printer.
  • Print a test page to know whether your printer is connected.

INSTALLING HP OFFICEJET 3830 SOFTWARE

  • You can either use your software disc or download it from 123.hp.com/setup 3830 Printer Setup
  • Turn ON your 123.hp.com/oj3830 printer.
  • Disconnect your printer in case if you are connected through USB cable.
  • On your, 123.hp.com OJ3830 Drive click check now option to know whether your printer driver is outdated or not.
  • Select your printer model and follow the on-screen instructions.
  • Read the Hp Officejet 3830 Setup manual, before start the Printer installation.

HP OFFICEJET 3830 PRINTER SETUP & INSTALLATION

In case if you are a user who prints around 50 pages a month, you can use 123.hp.com/oj3830 Printer. The printer model is not a duplexer machine, at the same time the replacement cost of the printer is really high. It is advised to use Instant ink service. The other concern with the printer is the control panel functionality.

 HP OFFICEJET 3830 PRINTER UNBOXING

  • To start the Hp Officejet 3830 install process, proceed with the following.
  • Pull your printer from the packing.
  • Remove the safety cover from your printer.
  • Place your printer in a place where you can access it easily.
  • Connect your 123.hp.com/setup 3830 printer with the power cord.
  • You could find the printer power slot at the rear of the printer.
  • There is an added USB slot along with the power slot.
  • Then remove all the packing material from the scanner glass and the access areas.

HP OFFICEJET 3830 INK CARTRIDGE INSTALLATION

  • Get your ink cartridges along with your printer setup.
  • You can install your printer cartridges and start to print.
  • To install the cartridge, remove the cartridge from its packing.
  • Remove the plastic strip from the ink slot.
  • Now open the printer cartridge access door, wait until the carriage settles to the center of the printer.
  • Place the cartridge in the carriage and push it until it snaps the edges.
  • Now close the access doors and restart your printer.

 INSTALLING HP OFFICEJET 3830 DRIVER SOFTWARE 

  • Once you install your printer device,
  • You need to install your hp Officejet 3830 driver software and to perform printer functions.
  • The software installation process undergoes some basic steps.
  • If you are provided with the installation disc insert the disc to your computer.
  • Right-click and select the administrative run option.
  • Now install the setup file and process your printer.
  • You can even download your software from 123.hp.com/setup 3830 Printer.
  • Once you install the setup you can proceed further with functioning all your printer functions.

HP Officejet 3830 Printer Driver Installation

Once you connect your Officejet 3830, 3831, 3832, 3834 and 3835 Series Printer to a wireless network, you can start your printer driver installation process by following the given steps below. You might be prompted to connect your USB cable to your printer when required.

  • 123 HP Officejet 3830 Printer’s driver software is available on 123.hp.com/oj3830 Printer Setup.
  • Once you download the setup, double click the driver and select the administrative RUN option.
  • Follow the on-screen instructions and complete the process.
  • Once the process is done return to the browser to complete the registration and activation process.
  • Download hp Officejet 3830 scanner software Which is available here and starts scanning.

HP OFFICEJET 3830 PRINTER WIRELESS CONFIGURATION

Based on your printer compatibility you can follow either of the methods or configuration for your printer.

123.hp.com/setup 3830 Auto Wireless Connect

Compatibility:

  • Let your Hp Officejet 3830 connect to the computer automatically In this mode, you will not require any SSID and Password.
  • Windows Vista, Windows 7, Windows 8, Window 10 and MAC OS
  • Know your system’s dynamic address.
  • 11 b/g/n network.

Hp Officejet 3830 driver download Installation:

  • In case if you don’t have your software, you can use download your setup from 123.hp.com/setup 3830 Printer Setup.
  • Once you download you can install it to your system and access printer.

Wireless Setup Wizard:

  • Once you download your printer software to your computer.
  • Ensure that your software is compatible with your printer type and your computer OS.
  • Select your network type.
  • Send your settings to your printer to approve your software installation.

Network Printer Setup:

  • Connect your printer to the external power source.
  • The LCD screen which is available with icons can help you with accessing your printer.
  • Confirm your authentication through SSID and Password.
  • You can also seek the help of your network administrator for doubts.
  • On your control panel.
  • Select Setup -> Network menu -> Wireless Setup Wizard.
  • Select your wireless network name and enter your password.
  • The printer network connection gets established.

WPS METHOD

Installing Printer Software:

  • You can find your printer software on your printer box.
  • Make use of the printer driver disc to install your printer setup.
  • You can even download your printer software from 123.hp.com/setup 3830.
  • Select your network type
  • Send wireless settings to your printer and approve the software installation process.

Push-button method:

  • Ensure your router and your printer whether it supports Pushbutton mode.
  • Select WPS Pushbutton mode on your printer.
  • Also, Turn ON WPS button on the router.
  • Printer Connection through USB Connection.

Printer Setup:

  • Connect 123 HP Officejet 3830 Setup Printer to the power source
  • Then your 123.hp.com/oj3830 printer gets connected to your computer.

Printer Driver installation:

  • The printer can be connected to your computer through USB connections.
  • Make sure that the printer is not connected through USB Connection before installing the driver.
  • Select your network type.
  • To authenticate your settings on your printer send your wireless settings to your printer.

Printer Setup Installation:

  • Now connect your printer and your computer using the USB cable.
  • Your printer automatically gets detected on your computer once you connect using your USB cable.

123 HP OFFICEJET 3830 ePRINT SERVICE

123.hp.com/setup3830 has several sets of features and is supposed to be one of the interesting facts that this printer is a Home/Office printer setup. You can make use of the printer for both purposes. A free service is introduced which is the HP ePrint service that makes printing easy at any time from any place a possibility. The process for printing with HP ePrint is simple. All you have to do is to send the document, to your printer’s mail address. Once, you have signed up for an ePrint account, you don’t need special software or driver to use it. Visit the website 123.hp.com/setup 3830 Printer Setup and follow the instructions displayed there, to enroll in the HP ePrint service.

Requirements:

  • A working internet, Broadband connections are preferable.
  • The ePrint enabled Hp Officejet 3830 printer.

How to enable Eprint Service on HP Officejet 3830 Printer?

  • Turn ON your 123 HP Officejet 3830 Printer.
  • Select the ePrint option on your printer display.
  • You can even use the web services setup à network setting in case if you are not able to find the ePrint option.
  • To print your document from anywhere and at any time you need to know your printer mail address which you get through the above step.
  • Now compose a mail with an attachment not exceedingly 10MB
  • Supported document type,
  • Text, PDF, HTML, MS-Word, MS-PowerPoint, MS-Excel
  • The ePrint option also supports images like .bmp,.gif,.jpg and so on.
  • Some documents which ePrint does not support are digitally signed or encrypted documents.
  • Printing on both sides is not possible with the ePrint option.

TO PRINT WITH HP EPRINT

  • You must enable Web services to enroll for ePrint.
  • To enable web services, press the ePrint icon or button on the HP Officejet 3830 printer’s control panel.
  • When the Terms of Use are displayed, click Accept.
  • Follow the instructions to complete the process.
  • Once the process is successful, print the ePrint information page through your 123.hp.com/oj3830 printer.
  • Sign up for an ePrint account.
  • To send documents to print, open the email application on your mobile device or on your computer.
  • After creating a new email message, attach the documents/photos, to print, to it
  • In the ‘To’ field, enter your 123 HP Officejet 3830 ePrint mail id. Without adding any addresses to the ‘cc’ and ‘bcc’ field, hit Send.
  • If ‘cc’ and ‘bcc’ field are filled, your 123 hp com setup 3830 printers will not recognize the email sent.
0 comment

123.hp.com/oj4650 – HP Officejet 4650 Setup

HP Officejet 4650 Printer unboxing, Setup, and Installation

The 123.hp.com/setup 4650 Printer comes with a 35-page document feeder, a 60-sheet input tray, and a 25-sheet output tray. The printer also allows printing from your smartphone and other remote devices to your printer with the help of the ePrint feature. You just have to download the copier app to avail of remote printing even on your Amazon devices. With a speed of approximately 11 pages per minute for printing text documents, the 123.hp.com/oj4650 printer is one of the most economical multifunctional devices available in the market. The first time printer setups are fairly easy and in case of difficulties refer to the 123 HP Officejet 4650 manual PDF for some constructive guidance.

Executing the first time unboxing and HP Officejet 4650 printer setup:

  • As you open the box, you will find a handy pamphlet that will provide you with instructions as to how to install the printer
  • An in-depth card is also available that will give you step by step instructions to getting started with the printer
  • Along with the package also comes with the installation CD that also contains the software and 123 HP Officejet 4650 driver download.
  • Gently pull the printer out of the box
  • Remove all the tapes around it.
  •  Connect the printer to the power outlet with the help of the power cord that comes along with the printer
  • [Note: The power cord has to go in all the way for the power to get connected]
  • Press the power button on the control panel to put the printer on
  • Wait for the printer to initialize
  • The control panel will automatically display instructions to set preferences such as language, region. Date and time and press ‘Confirm’ for all the prompts
  • Prompts will now ask you to install the ink cartridges
  • Pull out the trays of the cartridge access area and let the slots align up for placement of the ink cartridges
  • Open the ink cartridges from their packages (black and color cartridges) and place them inside their respective areas
  • Close the cartridge access area trays
  • Now, press ‘Ok’
  • The 123.hp.com/oj4650 printer will ask you to load the paper
  • Place the paper in carefully in the slot to the back of the printer, adjust the slider width guides and click on ‘Yes’
  • The printer will now print an alignment page, which has to be placed on the scanner to run through the alignment
  • Lift the lid of the scanner glass and press ‘Ok’
  • A message will display on the control panel stating that ‘Scanning was successful’, after which you can click on ‘Finish’.

123.hp.com/oj4650 – HP Officejet 4650 Printer Setup Configuration

123.hp.com/setup 4650 is a high-performance printer. The 123 HP Officejet 4650 printer is easy to maintain, has twin cartridges, and provides high-quality prints at extremely low costs. You can perform the 123 HP Setup 4650 ink refill with the Instant Ink facility from HP. The subscription allows you to print a particular number of pages per month and even prompts if you have overdone your limit or still have pages that you can carry forward. Since the 4650 is a wireless printer, you can, along with installation, configure and complete the 123 HP Officejet 4650 wireless setup too. The touch screen control is white in color, which is easy to view and the printer has a straight-through paper path. The wireless connection allows you to print from mobile devices. If you research the internet, you will notice that any printer review will consider it as a bargain printer that is compact and one of the most affordable devices for small offices and home users. It acts as a printer, copier, scanner and faxing machine. It is not unusual to find a very helpful 123.hp.com/oj4650 manual that will provide comprehensive instructions on the setup. The printer offers great value for an all-in-one printer.

123 HP Officejet 4650 Printer Setup for Windows

Step 1:  HP Officejet 4650 Setup

Before starting the installation process you should uninstall any old driver present on your Computer.

  1. Make your Printer Active.
  2. Check the USB Ports.
  3. Use Direct USB connection and try to avoid USB Hub or Docking station which doesn’t provide optimum power supply to HP Officejet 4650 Printer.
  4. In the beginning, Remove the USB cable from the computer and the screen will prompt to attach the USB cable while HP Officejet 4650 driver installation.

Step 2: HP Officejet 4650 Driver Installation and Connection setup

Select the appropriate Printer device from the provided list options. Selecting the right Printers will support the maximum features.

  1. Visit 123.hp.com/oj4650 and select the correct printer drivers with the help of the Printer model number.
  2. The HP easy start has begun Download, based on the Hp Printer model.
  3. After HP Easy Start App download Completion, Follow the on-screen Prompt.
  4. Then Download the HP Officejet 4650 Printer Driver Software.
  5. Enter the printer model and Confirm the OS Version of your computer.

123 HP Officejet 4650 Printer Setup for Mac

HP Officejet 4650 USB Connection Setup for MAC

  1. Ensure you have all Requirements for Installation which includes a Computer, Internet access, etc,…
  2. Use the Similar Wifi Network for 123.hp.com/setup 4650 Configuration to the Computer.
  3. Setup the HP Officejet 4650 Printer and Install the Ink cartridges.
  4. Make sure and keep the Printer within the Wifi range during Installation.

Install the driver and setup the connection

  1. Download Hp Easy Start App.
  2. After Launching Hp start App Select “My Printer is not Shown” Option.
  3. Select Wireless Network Connection by clicking Continue.
  4. Follow the ON-Screen Prompts to complete the Setup.
  5. If you are facing any difficulties while the HP Officejet 4650 Driver Software download, Contact our 24/7 Technical support Experts.
4650 printer setup

123 HP Officejet 4650 Printer Driver Download

Hp Officejet 4650 driver Software Download for windows

  1. Switch ON your 123.hp.com/setup 4650 Printer and connect all the peripherals like Printer, computer s, USB cable, etc,…
  2. Visit 123.hp.com/oj4650 and Download the Driver Package with Complete features available.
  3. Make sure the driver supports Windows OS.
  4. Click Devices and Printers Options on your computer.
  5. Find and select the Correct Driver for HP Officejet 4650 Printer from the available devices which is listed on the screen.
  6. Add your Printer and save the changes.
  7. Finally, Confirm that your 123 hp com oj4650 setup Printer is added or not in the list.

Hp Officejet 4650 driver Software Download for MAC OS

  1. Combine your 123.HP.com/oj4650 install Printer and MAC Devices using USB or Wireless Network Setup.
  2. Search for an appropriate HP Officejet 4650 driver Software and Download on your MAC Device.
  3. From Device menu, select the system preference option.
  4. Then Add your HP Officejet 4650 printer to the MAC OS Device and check whether the Printer is present in the list or not.
  5. If the Printer is not on the list. Repeat the steps again or contact our Technical support Experts.

HP Officejet 4650 wireless printer setup

How to connect Hp Officejet 4650 to wifi Windows

  1. Ensure that the 123.hp.com/oj4650 Printer and its components is connected with computer, before Starting wireless setup.
  2. You require the Good active Internet Connection with network username, Wifi network hp Officejet 4650 wifi password and the computer should connect with same network as your printer device connected.
  3. Turn the Printer ON. Try to place the 123.hp.com/setup 4650 Printer and the Computer as close to each other for better Internet Connection.
  4. Remove Ethernet and USB cable from the Printer. Install the Printer Driver Software to hp Officejet 4650 setup wifi.
  5. Connect the USB cable after showing prompt from the screen. It will transfer some wireless data to the Printer.

How to connect Hp Officejet 4650 to wifi Mac

  1. Make sure the Printer and Computer are get connected and all we need is a well active Network connection, its SSID and Password for HP Officejet 4650 wireless setup installation. The Mac device and the Printer should be connected closer to each other for better Network Connection.
  2. During Installation, the Device screen will prompt for USB Connection.
  3. Visit 123.hp.com/oj4650 for driver installation by choosing your product and printer model number in the list.
  4. Follow the ON-SCREEN Instruction to complete The HP Officejet 4650 wifi setup for MAC

Scan a document or a photo using the 123 HP Officejet 4650 Printer

To complete the driver and software download, you just have to insert the installation CD that is provided along with the package to do the needful. Alternatively, you can also visit a legitimate URL to download the latest version of the drivers and software. However, it is imperative to complete the hardware setup first before embarking on the driver installation. The text quality is of the 4650 is sharp and clear and the scanner produces color copies equal to the originals. You can also use the 123 HP Officejet 4650 scan to email feature and even send quick faxes. Find detailed information on the 123.hp.com/setup 4650 how to scan from the printer’s manual. Refer to the online troubleshooting manual for the scanner, not working issues.

To scan a photo or a document on the 4650:

  • You can scan a .jpeg or a .pdf document file also to the computer:
  • Loading the media before scanning:
    • The printer driver and software have to be installed into the printer before using the scanner
    • Also, make sure that the printer connected to the computer through the wireless or the USB cable
    • Turn the 123.hp.com/oj4650 printer on by pressing the power button on the front
    • You can load the document onto the scanner glass:
      • Place the document with the printed side facing down on the scanner glass
      • Take assistance from the guides provided around the glass for placement of the document
      • Close the lid of the scanner
      • If you are using the ADF or automatic document feeder:
        • Load documents with the printed side facing upward
      • To execute the scanning:
        • Touch ‘Scan’ on the printer’s control panel
        • Select the computer name where you want to save the scan
        • There are saving options available such as:
          • Save as PDF: Documents are not editable
          • Save as JPEG: Set to JPEG when photos are involved
          • Email as PDF: Non-editable documents can be emailed
          • Email as JPEG: Images can be emailed directly
          • Everyday Scan: A customized scan option that is commonly used
        • Touch ‘Ok’ once completed.

HP Officejet 4650 AirPrint Setup

You can also use the USB cable to connect to a port that is provided at the back of the printer. But using the wireless will give you several advantages over the wired, such as the ePrint and the AirPrint. For all your problems you can open the 123.hp.com/oj4650 troubleshooting manual online to get instructions on the repairs. Every time you see that there is the 123 HP setup 4650 not printing error also, you can use the troubleshooting manual for referral instructions. For buying information go to the HP Officejet 4650 Amazon site for some wonderful delivery deals. AirPrint compatibility has been provided for Apple iOS 4.2 version and the operating systems that have been introduced later. The 4650 comes with attractive pricing that is absolutely irresistible. Running costs of the printer are extremely good and are the best option when you have presentations, photos or reports that you may have to print continuously. The AirPrint is an amazing attribute that lets the user print from the iPhone, iPad or iPod over a wireless network to your printer.

HP AirPrint Setup (Apple iOS):

  • Check printing requirements:
    • If the device is running the iOS 4.2 version and later
    • Check if the HP printer supports AirPrint: Go to the relevant URL that will give you a list of printers and their compatibility information to AirPrint
    • The iOS device and the printer must be on the same network and both of them should support Wi-Fi Direct
    • When you try to print, the error message ‘No AirPrint Printers’ will be displayed
  • If the error message is displayed you must setup a wireless connection as follows:
    • Disconnect any USB or Ethernet cable
    • To connect the printer to a network:
      • On the printer’s control panel select ‘Setup’
      • Then choose the ‘Wireless’ menu
      • In the ‘Wireless Setup Wizard’ follow instructions available on-screen for connecting the printer to the network
    • The printer should be able to print a page
  • When the printer is still not able to print a page, you may have to look for the Wi-Fi Direct or Wireless direct connection
    • To achieve this first connect the iOS device to the printer directly:
      • A solid blue light should be seen next to the Wi-Fi Direct or HP Wireless Direct button
      • Press the ‘Wi-Fi Direct’ or the ‘HP Wireless Direct’ button on the printer’s control panel [Note: In some cases, you may have to navigate through the menu settings to look for the buttons]
      • Tap on ‘Settings’ in the Apple iOS device and then select ‘Wi-Fi’
      • Select your printer under ‘Choose a network’ menu: The printer name usually be displayed with ‘DIRECT’ in the beginning
      • Type the password when prompted
    • Printing from the iOS device:
      • The 123.hp.com/oj4650 printer should be in a ‘Ready’ state
      • Open the document that you wish to print: it could be a photo, email or webpage
      • Tap on the ‘Action’ icon: A set of menu options will be displayed
      • Then press on ‘Print’
      • Under ‘Printer Options’ choose.
0 comment

123.hp.com/envy4520 Printer Setup

123 HP ENVY 4520 Printer Illustration

With the sleekest design, this printer is designed for moderate use in home and office workshops. The HP Setup Envy 4520 printer has several mobile printing apps such as the HP AiO Remote app, Mopria Print Service, ePrint, Airprint and more.

You will be surprised to know that you can also print from a kindle device. Kindle printing serves an easy way to print to HP Envy 4520 Setup Printers. Connect to a wireless network which your Kindle can discover and then start printing.

123.hp.com/envy4520 Printer Features

123 HP Envy 4520 Kindle printing

If you own the Kindle app, then it is simple to bring millions of books in your hands. We make it easy for you to print directly to your WiFi printers. Simply download the app and find your printing easier than ever from 123.hp.com/setup 4520.

123 HP Envy 4520 AiO Remote app

It is actually cool when you are able to share documents and images through email, text messages, and cloud services; the HP Envy 4520 All-in-One Printer Remote app assists you to scan and print documents and images with your printers.

123 HP Envy 4520 Mopria certified

Print Documents, photographs and more on your Android Smartphones and Tablets to Mopria Certified Printers. If you have a Mopria certified printer, you can print from anywhere using your Android devices.

123.hp.com/envy4520 Mobile Application

123 HP Envy 4520 Airprint

AirPrint is an exceptional feature with which you can print a document or a photo from an Apple device by connecting your HP compatible printer to a wireless network. If you are using an HP AirPrint compatible printer that contains wireless features, then these instructions help you set up AirPrint.

Read More

123 HP Envy 4520 ePrint

HP ePrint is a cloud-based service that generates prints easily from your Android, Smartphone or Tablets. Print from anywhere with a live Internet connection. You can email the document or photo you need to print directly to the 123 HP ePrint enabled printer.

Read More

123 HP Envy 4520 Cloud Print

Google Cloud Print allows you share printers with just a click. Any type of app when connected to a web-connected device, can use Cloud Print. You can connect a printer to your Google Cloud Print account and start printing on it. Handling printers and print jobs in Cloud-ready printers is simple.

Read More

123.hp.com/envy4520 Latest Driver & Manual Download

123 HP Envy 4520 Driver

Download the Updated Printer Driver:

  • Avail the latest version of the printer driver from 123.hp.com/envy 4520 us within seconds.
  • Click the link to download 123 HP Envy 4520 for Windows and Mac compatible printer.

Driver Download

123.hp.com/envy4520 Manual

Download the Easy Procedural Guide:

  • Our easy step-by-step instructions help you setup and troubleshoot printer on your own.
  • Click the link to download the user manual for your corresponding 123 HP Envy 4520.

Manual Download

123 HP Envy 4520 Printer Quick Tips

  • Place the printer on a smooth and even surface.
  • Change the print quality to ‘Draft’ for optimized print speed.
  • Make use of reliable cartridges to avoid cartridge problems.
  • Remove the tapes and stickers on the 123 hp envy 4520 cartridges before you use them.

123.hp.com/envy4520 Printer Troubleshooting

HP Printers – Printer Icons Do Not Work After Windows 8 Upgrade

After updating your Windows computer from Windows 7 to Windows 8, the printer icons that are designated for scanning and printer settings do not work anymore. This happens when the links between the icons and the drivers are broken at the time of upgrade. To resolve the issue, all you need to do is simply Uninstall and then reinstall the printer software.

Step 1: Uninstall the software

Here are some steps that are to be followed to uninstall the software.

  • Detach the USB cable from the printer and the computer if you have connected one already.
  • Turn on the printer using the power button.
  • Click the Start button and then click Programs and Features.
  • Right-click on your HP Envy 4520, and then click Uninstall.
  • Go on with the prompts on the screen to uninstall the software.
  • Reiterate the above steps for each of your printer’s HP Setup Envy 4520 (if there are multiple icons) until none persist in the list.

Step 2: Download and install the Full Feature Windows 8 driver on your Windows computer

Read and perform these instructions on your computer to download and install the Full Feature driver from our website 123.hp.com/setup 4520.

  • Power on the Envy 4520 printer using the power button.
  • Detach the USB cable from the printer and the computer if you have connected one already.
  • Go to our website 123.hp.com/envy 4520 to download the full feature driver for your HP Setup Envy 4520
  • Enter the printer model Envy 4520 and then click Download.
  • Click on the downloaded file and then install it on your Windows computer.

What if an error message displays while uninstalling the printer software?

If an error message displays during the uninstall process, you can simply access the administrative tools to uninstall the printer software.

  • Once the error message displays, click OK to close the error message.
  • Right-click on the Start button that is displayed in the lower left corner of the screen, click Search, and then type administrative tools in the search field.
  • Click Administrative Tools in the list of search results.
  • Double-click on Print Management, and then double-click All Drivers.
  • Look for every instance of the printer you are trying to uninstall, right-click on the name, and then click Delete.
  • Close the Print Management window, get back to Programs and Features, and then proceed to uninstall the remaining printer software.
0 comment

123.hp.com/ojpro8720 setup Printer Installation

123 HP Officejet Pro 8720 Setup Printer Configuration

The Officejet Pro 8720 is an inkjet printer offering scan and copy features on one device, it also has an ADF and built-in faxing from 123.hp.com/ojp8720. Connect this flexible printer using both WiFi and Ethernet networking. It works with Windows, Mac OS, and Linux. There’s an ADF to permit you to copy or scan a load of pages in one process. The ADF can even copy or scan both sides of the pages.

The 123.hp.com/ojpro8720 printer has a medium-size 2.7-inch display screen with a touchscreen interface. You can link directly to a PC with a USB cable, or to your network router both wirelessly with WiFi and with an Ethernet cable.

123.hp.com/ojpro8720 Printer Features

123 HP OJPro 8720 Mobile printing

Print with just a tap of your NFC-enabled mobile device to the printer-no company network required. Protect information and contact to confidential print jobs with HP Jet Advantage Private Print. Effortlessly print documents, photos, and more from a range of smartphones and tablets. Print from your mobile device without retrieving the company network, from anywhere in the office.

Innovative design for superb office efficiency

Speed over print jobs, using super fast two-sided printing. Print more and reload less. Increased paper volume to 500 sheets with a second 250-sheet paper tray. Gust through multi page documents with two-sided scanning and a 50-page automatic document feeder.

Affordable and professional color

123.hp.com/ojpro8720 will accomplish your budget with professional-quality color at up to 50% less cost per page than lasers. Print up to 3x as numerous pages with optional Original HP high-yield ink cartridges. Professional-quality prints for up to 50% less per page. Save even more with Instant Ink. Save up to 50% on ink and never run out of ink. Print color or black-and-white for the same price.

123.hp.com/ojpro8720 Mobile Printing Setup

123 HP Officejet Pro 8720 Airprint Setup

AirPrint is an exceptional feature with which you can print a document or a photo from an Apple device by connecting your HP compatible printer to a wireless network. If you are using an HP AirPrint compatible printer that contains wireless features, then these instructions help you set up AirPrint.

123 HP Officejet Pro 8720 ePrint Setup

HP ePrint is a cloud-based service that generates prints easily from your Android, Smartphone or Tablets. Print from anywhere with a live Internet connection. You can email the document or photo you need to print directly to the 123 HP ePrint enabled printer.

123 HP Officejet Pro 8720 Cloud Print Setup

Google Cloud Print allows you share printers with just a click. Any type of app when connected to a web-connected device, can use Cloud Print. You can connect a printer to your Cloud Print account and start printing on it. Handling printers and print jobs in Cloudy-ready printers is simple.

123.hp.com/ojpro8720 – Latest Driver & Manual Download

HP Officejet Pro 8720 Driver

Download the Updated Printer Driver:

  • Avail the latest version of the printer driver from 123.hp.com/ojp8720 us within seconds.
  • Click the link to download 123 HP Officejet Pro 8720 for Windows and Mac compatible printer.

HP Officejet Pro 8720 Manual

Download the Easy Procedural Guide:

  • Our easy step-by-step instructions help you 123.hp.com/ojpro8720 setup and troubleshoot printer on your own.
  • Click the link to download from 123.hp.com/setup 8720 the user manual for your corresponding 123 HP Officejet Pro 8720.

123 HP Officejet Pro 8720 Printer Quick Tips

  • Verify the print settings.
  • Load only one type of paper.
  • Stick with the manufacturer’s ink.

123.hp.com/ojpro8720 Printer Troubleshooting

123.hp.com/ojpro8720 Printer USB Scanner Connection Error (Mac)

Step 1: Restart the computer and printer

  • Switch off the printer.
  • Ensure that the printer power cord links straight to an electrical outlet and not over a surge protector or power strip.
  • Shut all running programs on your computer, then power down the computer.
  • Switch on the computer and the printer.
  • Attempt to scan.

Step 2: Monitor the USB connection

Re-link the USB cable to a varied port straight on the computer. If issues continue, release all other devices from all USB ports on the computer, then use a diverse USB cable to link the printer.

Step 3: Eliminate and re-add the printer to the Mac

  1. Browse the Mac for Print, and then choose Print & FaxPrint & Scan, or Printers & Scanners in the list of options.
  2. Examine if the name of your printer exhibits in the PrintersDo one of the steps below, depending on whether the printer is listed or not.
    • If your printer is listed, eliminate and re-add the printer to examine communication and that the correct driver is used. Choose the name of your printer 123 hp ojpro 8720, click the minus sign, and then eliminate the printer. Once the printer is detached, tap the plus sign, select name of the printer and AddPrinter or Scanner, then proceed with the remaining steps.
    • If your printer is not registered, click the plus sign, select Add Printer or Scanner, choose the name of your printer, then proceed with the remaining steps.
  3. Select the Use or Print Usingbox, then choose the name of your printer in the pop-up menu.
  4. Select Add to add the printer to the list.
  5. Shut the System Preferences window.
  6. Attempt to scan.

Step 4: Uninstall the printer driver and software:

  • Detach the printer USB cable from the Mac.
  • On the desktop, double-click Macintosh HD, select Applications, and then choose the Hewlett-Packard or HP
  • Double-click HP Uninstaller, then trial the on-screen instructions to remove the HP software from the computer.
  • after finishing the uninstall, select the Trash icon on the Dock, then choose the Empty
  • In Macintosh HD, right-click the Library folder, then right-click the Printers
  • Ctrl + click the HPfolder, and then choose Move to Trash.
  • Double-click the PPDs, the Contents folder, and then the Resources
  • Ctrl + click your printer in the option, then choose Move to Trash.
  • Select the Trash icon on the Dock, then choose the Empty
  • Select the Apple menu, then choose System Preferences.
  • Contingent to your operating system, select Print & FaxPrint & Scan, or Printers & Scanners.
  • In the Printers option, choose your printer, then select the Minus button to remove the printer.
Step 5: Reinstall the up-to-date drivers and software
  • Switch on the printer.
  • If your printer is linked to the computer with a USB cable, detach the cable from the computer.
  • Select Download from 123.hp.com/ojp8720 next to HP Easy Start or next to the full feature driver, depending on the menu that displays.
  • Access the Downloads folder, then HP Easy Start file or the full feature driver to start the installation.
  • Trial the on-screen instructions to fix up the printer connection and mount the software.
  • Select the name of your printer, choose the Use or Print Using menu, click the name of your 123.hp.com/ojpro8720 printer in the pop-up option, then select Add.
0 comment

HP Printer Setup and Configuration Steps:

It is mandatory to follow the proper HP Printer installation procedure when using an HP AIO printer. You can configure your printer successfully following the instructions and using the right drivers and software. For any clarifications, you may refer to the printer manual that was sent to the printer. Make sure you put the printer in a dust-free area after removing it. Do not directly expose it to the sun. Follow below for the configuration of the HP printer.

  • Since the box contains different contents depending on your country/region, look at the box back to see the contents.
  • Then remove the printer and place it on a smooth, flat surface, then remove the undesirable wrap from the different printer locations.
  • Remove the scanner deck, then remove the scanner wrapping material, and then remove the plastic sticker.
  • Remove the input and output trays from all plastic tape and then place them in their initial position. Reuse the undesired wrap if required.
  • Please ensure that you plug into one end of the power cord at the rear of the printer and help set up an HP printer at the other end.
  • Switch on the printer, select the language you want and tap Yes to confirm. Continue on the next 123 HP Printer step to install the cartridges.
  • Then remove the plastic band from it and lifting a cartridge access door. Take the cartridge from the box.
  • Now hold it carefully and twist the orange cap to remove the cartouche and install the slot in front of it with the copper contacts.
  • Make sure the previous steps are followed to install additional cartridges. Make sure to remove the input tray as far as possible to insert the paper.
  • Change the paper width guide and push back the input tray. Now download the printer software to print.
    Contact our contact number experts to obtain additional information or support for the set up of HP printers.

HP envy printing installation?

You know it’s pretty easy to set up an HP Envy printer? Initially, it would be a bit tricky if you were a beginner. If you know-how, you can set up almost anywhere with much less effort. Refer to the printer manual or CD that was shipped with the printer for reference. On the HP Envy Printer setup, you can take the basic steps below.

  • Make sure you remove all the wrap you’ve requested, then insert the paper tray carefully into it and then proceed to setup your HP printer.
  • Now, take the tray extensor out and unfold, then check for varying content in the box.
  • Connect the power cable to the power and socket, then enable 123 HP Printer to be configured.
  • You can get an instant to change language and country/region after the printer is switched on.
  • Enter the correct two-digit MM-DD-YYY format, then tap OK. Make sure to select Basic Parameters.
  • Now enter the time (HH: MM) in the right format, then set AM or PM, and then select OK.
  • Make sure that in the main paper tray you in serve plain and white paper and slide down the paper width to set up HP Printer Guide.
  • Ensure that you insert the paper stack on the right-hand side of the paper tray.
  • Check that the stack of paper fits under the line marker on the edges of the tray.
  • Take out of the package the new ink cartridge, then discard the packaging material, choose the Align cartridge and then OK.

Our veterans will contact you on the contact number for additional information or support for the setup of the HP Envy Printer.

HP Officejet and Burejet Pro printer configuration?

Usually, a simple task is to configure an HP Printer to Officejet or an Officejet Pro printer. You need not do much more than connect your 123 HP Printer configuration, turn on the printer and then install the printer for you automatically. Sometimes, when the manual installation process does not work, you may have to start the printer using it and run the installation procedure automatically. Follow the basic instructions to configure the following HP Printer instructions.

  • The essential step is that the printer is unboxed and all the undesirable packaging material is discarded.
  • Now plug the power cable and then check whether the cable is activated. Put the preferences together now.
  • Once the preference is finished, ensure that the paper is loaded into the input tray.
  • It is very important to insert the tin cardboard to achieve the best print quality.
  • Remove the cartouches from the box and then remove the plastic tape and raise the cartouche entrance door.
  • Note that the Printer configuration can be found on the Control Panel of your Windows computer.
  • You can find it in System Preferences when using a Mac system. Go to the next installation step for 123 HP Printer.
  • Please follow the prompts to add a printer to the control panel after you look for the option.
  • You could now attempt to print a test page. This will inform you about the HP Printer configuration status.
  • Note that there may be a dialog box. Make sure you find and select the printer from the list and click on the print option then.

Please contact our technical experts about the contact number for additional information or support regarding how to set up an HP printer.

HP Deskjet Printer Installation?

Let’s start the HP Deskjet printer configuration. In order to start, connect your printer to your system, then turn on your printer and allow your PC to install it for you automatically. Check whether you have the CD which the printer had shipped. In some situations, the manual method of installation may be required for the printer to be activated. You can take the basic steps to set up the HP printer.

  • Make sure you look for a list of items in the box on the packaging.
  • Ensure the Deskjet printer is removed and all unwanted wrapping materials are then discarded from your HP wireless printer setup.
  • Now connect the power cord end to the back of the printer on one side and the electric socket on the other. Tap the required language, country/region and tap Yes for a confirmation of your choice. You must press the Power button to switch on the printer.
  • If you can’t view the language you want, make sure you click Down Arrow in the menu for a scroll.
  • Remove the cardboard pad and take the new cardboard out of your pack.
  • The color of the cartridge on the cartridge latch should be verified and the cartridge inserted carefully.
  • Now load the paper onto the paper rack and follow the control panel instructions for starting the cartridge alignment.
  • Download and install the Deskjet printer compatible driver. Continue to the next setup step of 123 HP Printer.
  • On the printer’s control panel, select the connection option and then follow on-screen instructions to connect the printer.

Please contact our contact numbers experts for additional information or support on how to set up the HP printer.

HP Laserjet installation and Laserjet printing?

When printing material, whether a computer is for private home use or in the office, a printer is a must. Good quality pictures are available from high-end printers. Make sure your computer hardware is supported by the printer. It’s easy to upgrade and run your new HP Laserjet or laserjet pro printer. Don’t worry. Don’t worry. The basic steps to set up HP Printer are below.

  • The most important step is to unbox your printer and then remove from the HP Printer setup all the unwanted packaging material.
  • Since content may vary per country/region, check for a list of items in the box for the package.
  • Now plug in the rear of the printer on one end of the power cord, and in the other end the electric outlet on the wireless HP printer.
  • Turn on the printer, then enter the OK option by tapping the down arrow to select the language in the printer control panel.
  • Now select the country/region down arrow and enter the OK option.
  • Only make sure you place plain and blank paper into the input table once the preferences are established.
  • Now, glance thoroughly into the 123 HP Setup Guides in paper width until they rest on the paper’s edges.
  • Retire the cartouche from its package, remove it from it and then follow the instructions on the panel to start the alignment of the cartouche.
  • When the alignment page is printed, ensure that the page is put on the scanner glass with the print side.
  • Note that even the core tasks are performed by drivers. Download HP wireless printing software from the latest version.

Please contact our technicians with the contact number for further information and support on how to set up the HP printer.

0 comment

How To Download and install Hp Printer Setup?

This procedure will explain how to download an HP in one printer configuration, provided that the full-featured print driver is no longer available to your printer. Five steps are available: identify the correct compatible driver, install the driver, set the driver, update the Device Manager and printer a test page. Determine the driver compatible that your printer can use. Download and configure HP Printer from our web site and follow the step-by-step user manual. How to download HP Printer? After installing the driver and HP Printer installation software, you can only begin printing.

  • Make sure you don’t connect your USB cable to your printer. Turn off the USB cable if connected.
  • Search Devices and Printers from the Windows Taskbar. Opens the window Devices and Printers. To add a printer, click on it.
  • Open the Add Printer window. Click Add local printer. Local Printer. You are going to open the Choose a Printer Port screen. Click on the port to use.
  • Click on the Dropdown list of the existing port and choose the printer port. To open the Printer Driver window, click Next.
  • Select the HP and select the compatible alternative driver for your printer from the Manufacturer and Printers section.
  • To select extra print drivers, click Windows Update if there is no alternate driver in the printer list.
  • Click Next after you select a printer. Open the Type a Name of the Printer window. The name of the printer will be displayed in the text box.
  • You can type another name if you want. When the facility is finished. Possibly open the Printer Sharing screen.
  • Make choices when the Printer Sharing screen doesn’t open for sharing your printer. Type a single share name, place and comments.
  • After a complete install is done, a screen is opened, indicating a successful addition of the printer driver. Take a test page to print it.

Make sure you update your computer regularly with the printer and software. Downloading the installation software of HP Printer helps you to fix bugs and flaws.

How can I download hp envy printer configuration?

hp all in one printer setup download

The first step is to unbox your printer once you receive a freight printer. All in one printer settings download Remove any cassette pieces which hold stuff. The duplexer is to be placed on the back side of the printer’s slot. How to download HP Printer configuration to Connect the printer power cord to the wall outlet and power your printer up. On the printer controller panel, select your preferred language and then continue clicking. Download and install the latest driver and software in one printer configuration.

  • The new print is chosen as the default printer by default. If you want, you can opt out of this option.
  • Click Print a test page to complete the driver setup. Connect your printer and computer with the USB cable.
  • If the setup fails, then the download wizard for HP Wireless Printer Setup is opened. To closing the window, click Close.
  • Select the Devices and Printer icon by clicking the Windows icon. Right-click on your printer name in the Devices and Printers window.
  • Choose Ports tab and click Printer Properties. Change the connectivity option according to the port you chose during installation.
  • Right-click on computer, then click Manage to click the Windows icon. Open the window for computer management. Click Device Manager under System Tools.
  • In the right panel of the window a list of installed devices is shown. In the Other Devices List, right-click the name of your printer.
  • To locate the driver, click Update Driver Software and open a dialog box. Choose My Driver Software Computer Browse.
  • You can open a screen, locate and select HP P from our websitrinter installation software download driver software. Choose Let Me Choose From My Computer Driver List and click Next.
  • Choose the type of device and choose the option Printers. Select and finish installing an alternative driver for the printer.

How can hp Officejet and Officejet pro printer be downloaded?

With the drivers incorporated into the Windows operating system, you can install a HP printer without software. The driver provides your HP printer with basic functionality. Make sure you don’t connect to your computer with a USB cable before you install your driver. How to download the HP Printer configuration and confirm that your printer is automatically downloading the driver software. Download the software manually from our website, if not. Try to print a sample document after installation to check your printer’s performance.

  • After unboxing, place the cartridges and load the paper printed on the panel after you unbox your printing system and its elements.
  • HP download a driver on our Web site in one printer setup or use the installation CD to install the driver. Check for the latest printer driver configuration.
  • Make sure your computer is set to download a driver automatically. Change installation settings for the device and click OK.
  • Select the option to download your driver automatically in the Device Installation Settings window. Connect a USB cable or a local network to your PC and printer.
  • If your printer is not listed, open and choose Devices and Printers, and then add your printer to the list.
  • You can also download our website to the HP wireless printer installation wizard. Duplicate the driver file that has been downloaded, click Run, and the installation will start.
  • You can also download the HP Printer driver setup software from the driver CD. Load and start installing the CD on the drive.
  • You can choose to install customized and easy. All functions should always be installed, so select Easy Install.
  • Track and install the driver, follow the instructions on screen. Check that after installation you can print a document.
  • If you can not print, follow the problem solving procedure or call our technology support for help.

How can HP Deskjet printer installation be downloaded?

Printing feature such as watermark, double-topprinting, collation, portrait / country, paper types, toner use, double-sided printing, paper dimension, resolution, margins, etc. is included in a basic printer driver. The driver software helps to convert data into a format that can be read by the printer. Use this directive to install the driver and program your device to download HP Printer setup. The installation CD allows you to install the printer driver. Ensure you have the driver updated in your printer to improve performance. Discharge and remove the printer packaging material. Connect a power end to the printer’s back and a wall end to the other end.

  • Switch your printer on and wait until it starts. You will have to select your language from the control panel of your printer.
  • Continue selecting your country, date and touch. Open the access door of the ink cartridge. Insert the cartridges in the printer in their respective slots.
  • Close the entrance door of the tin cartridge with every cartridge installed. In the input tray, load unused paper. Alignment page is printed by the printer.
  • You can do so by downloading HP Printer software from Windows or Mac. Open a web browser on your machine.
  • Go to the HP driver and select Driver Download from a printer setup page. Enter the name or model number of your printer and select the operating system of your computer.
  • Click Download and execute the file you download. It extracts the files and launches them.
  • Windows may request you during the installation to confirm that you want the file to be opened or that your computer can be changed.
  • To proceed with the installation, click Yes. Extract and launch HP Easy Start utility files.
  • Follow the prompts on the screen for the driver setup to finish. After installation, restart your computer.

HP LaserJet or Laserjet Pro Setup Download?

Find an area for your HP printer configuration. Unbox your printer by removing your printer and its accessories from your tape and all packaging materials. Place the duplexer on the back of the printer and put it slowly in the printer. How to download HP Printer to Power your printer by plugging your printer power cord into the wall outlet. Fulfill the sheet of paper that must be printed in the paper tray. Open the access door to the ink cartridge and put the cartridges into your holder.

  • To activate the printer, first press the Power button. Make sure that the printer is ready and no error messages on the screen are displayed.
  • Connect the USB cable to the back of the printer’s USB port and connect to your Mac.
  • Select System Preferences and click the Apple menu. Choose Printers and Scanners from the Hardware section. Click the plus sign if your printer is not listed.
  • Click Add Printer or Scanner if a drop-down menu opens. Click on the Use box and in the pop-up menu select the name of the printer.
  • To add a printer to this list, click Add. To install Apple driver software, click HP to complete the installation on the single printer setup and install it.
  • Check that your printer appears on the list after installation. To use updated software functions, quit the HP Printer software setup applications and restart them.
  • Open System Preferences now and select Printers & Scanners. In the printer list that is connected to your system, your printer will be displayed.
  • You can download the driver from our website as well. The file that is downloaded is.dmg, double-click, and execute the file.
  • To complete the setup, follow the instructions on the screen. Easy Install helps to install all of your printer running features.
  • Open your printed document. Click on the Print icon and select the name of your printer in a printer list. Change the settings if required, and click Print to download the HP Printer configuration guide.
0 comment


123.hp.com/oj5740 Printer Setup Manual

CONNECTIVITY

It is possible to connect your HP Officejet 5740 printer through USB connection. You are provided with the USB port to easily connect your personal Devices.123.hp.com/setup 5740

WIRELESS CONNECTION

To improve the performance of the printing machine, it is provided with the wireless connectivity option that you can access the printer from anywhere.123.hp.com/oj5740

DRIVER INSTALLATION

Now it is easy to use 123 HP Officejet 5740 printer. Any one can easily take access of the printer. No matter what the age the printer is designed to be user friendly.123.hp.com/setup 5740

123.hp.com/oj5740 Printer setup

123 HP OFFICEJET 5740 PRINTER SETUP

123 HP Officejet 5740 All-in-One Wireless InkJet Printer is a powerful and economical brand that is designed especially for the Office-centric purpose. It can Print, Fax, Copy and Scan all from one device thus minimize your Office space. Your HP Officejet Pro 5740 Setup Printer can be Network connected through USB, Ethernet, Wireless and Wi-Fi Direct Access. You get a Turnkey Solution in the form of Near Field Communication facility available on your Officejet 5740 Printer. Using NFC touch-to-print you can stay connected to your mobile devices and notebooks all the time. Your 123 hp com Officejet 5740 may also be operated from Google Cloud Print, ePrint and AirPrint thus eliminates the need for Network Access.Download the driver and manuals from the website link 123.hp.com/oj5740 or 123.hp.com/setup 5740.

123.hp.com/oj5740 SETUP & INSTALLATION

HP OFFICEJET 5740 PRINTER SETUP SOFTWARE

How to Install and open the HP Printer Software in Windows OS:

Insert the HP installation Drive onto the CD Drive of your Computer and follow the Automatic Setup onscreen instructions to complete the HP Officejet 5740 installation Download. Select from the list of Windows Versions to run the HP Officejet 5740 Printer Software. Alternately, open the Control Panel in your Windows OS and double-click to open the Printer folder. Click New Printer Installation and select the 123.hp.com/dj5740 Printers and follow the onscreen instructions to complete the Setup.

  • Windows 10: Click the Start Menu and click All Apps, select HP Tab and click the desired 123 HP Officejet 5740 Setup
  • Windows 8.1: Click the down arrow in the Start Menu, to select the desired HP Officejet 5740 Printer
  • Windows 8: Click the Start Menu and Right Click on the empty space in Start Menu, now select the desired Printer Open any File and Click Print and select 123.hp.com/oj5740 printer.
  • Windows 7, Windows Vista and Windows XP: Click the Start Menu and select All Programs Tab, Select the HP Tab and Click on the Printer Folder. Select and Open the desired HP OJ 5740 Printer

123.hp.com/oj5740 –  Printer Setup and Installation for MAC OS X:

Insert the HP installation Drive onto the CD Drive of your Computer and follow the Automatic onscreen instructions Setup to complete the HP Officejet 5740 Printer Software installation. If Auto Setup Installation did not work then open the CD Drive from the Disk drives access and run the 123.hp.com/setup 5740 Printer Setup executables to manually install the HP Officejet 5740 Printer Software.

Open any File and Click Print and select 123 HP OJ5740 printer. Select the Properties button to open the Properties dialog box. According to Mac OS select Properties:

  • For Apple OS X v10.6: To access the print options, Click the blue triangle available next to Printer selection
  • For Apple OS X Lion and Mountain Lion: To access the print options, Click show details button available next to Printer selection
  • From Print options menu, select the Page Orientation, Size and Scaling Percentage etc., and then click Print

Turn the Printer OFF: Press the Power Button located in the front part of the Printer to turn OFF the HP officejet 5740 Printer. Wait until the Power light indicator turns OFF to unplug the Power Cord. If you imperfectly turn the HP 5740 Printer OFF, the Print Carriage will not return to its original position thus resulting in poor Print Quality and 123 HP Officejet 5740 Ink Cartridge problems.

123 HP OFFICEJET 5740 ALL-IN-ONE PRINTER DRIVER INSTALLATION

123.hp.com/oj5740 Printer offers innovative, web-enabled solutions that can easily access every document over the Network for Printing. After Completing Web Driver setup, ensure that your 123 HP Officejet 5740 Printer Setup is connected to the Network using either USB Cable, Ethernet or Wireless Connection. Wireless Printing or Mobile Printing is enabled through Web Services like HP ePrint, AirPrint, and Google Cloud Print applications. This particular ePrint web feature of your HP OJ5740 Printer may be used to send documents via email on a secured cloud-based service for instant Printing. HP Printables is a Web Service using which you can Print Coupons, Tickets, and Forms over the Printer Control panel. You can also scan template and edit from preview screen and store it on the Web.

Install Web Services using Printer Control Panel:

Touch or Swipe down the tab in the Control Panel to open the Printer Dashboard. Touch HP Setup and tap Web Services Setup. Touch Accept tab to agree to the terms of use for the Web Services. Follow the onscreen instructions and Touch Yes to select Install Automatically, upon completion, print the information page to know about the Printer Email address, Status of HP ePrint, Printer Network and HP Printables. Download the HP Officejet 5740 driver and manuals from the website link 123.hp.com/oj5740 or 123.hp.com/setup 5740.

Procedure to Setup Web Services using Embedded Web Server:

Open the HP OJ5740 Printer Setup EWS home page on your Web Browser. Click the Web Services tab and select the Web Services settings. Click Setup and follow the on screen instruction and Click Yes to accept the terms of use. Click Yes if prompted for software update otherwise restart your HP Officejet 5740 Printer. After establishing your Printer and Web Server connection then you may print the Information Page to finish the Setup.

123.hp.com/oj5740 – WEB SERVICES SETUP FOR OFFICEJET PRINTER SERIES

Your HP Officejet 5741, 5742, 5743, 5744 and 5745 Printers is similar to steps involved in Web Services Setup of HP Officejet 5740 Printer. HP Officejet 5740, 5741, 5742, 5743, 5744 and 5745 Printers are well suited for Wireless Printing through HP ePrint, AirPrint, and HP AiO Remote Apps. While HP Officejet 5746 and 5748 Printers can best edit Color Prints over the Preview Screen for High-Quality Prints.

Install Web Services using HP oj5740 Printer Software in Windows OS:

Click Start menu and Open the HP Officejet 5740 Printer software. Click Print, Scan & Fax and double click to open it. Under the Print Section select the check box Connect Printer to the Web. Now you can use the same procedure that is being used in setting up Web Services through EWS. Alternately, Click Start menu and Open the Control Panel. Open the Printer folder and Click New Printer Setup. Follow the on screen instruction and when prompted for network connections select either USB/Wireless. Select 123 HP setup 5740 Printers from the Installer. Once completed the Web Services Setup then Print the Information Page.

Install Web Services using HP Utility in Mac OS X:

Insert the HP Utility disk on your CD drive and open the HP Easy Start Setup. Follow the on-screen instructions to setup the 123.hp.com/OJ5740 Printer Setup Connections and Install the printer software. Alternately, Open Mac Utility folder and double-click Printer and Devices. Click Add Printer to create a print queue on the Mac OS menu. Click either Use or Print Using and select 123 HP Officejet 5740 Printer. Click Add button and proceed with the on-screen installer. Select the Printer Network either USB or Wireless connection to finish the Web Services Setup.

123.hp.com/oj5740-  INKJET CARTRIDGE INSTALLATION

HP Officejet 5740 Printer requires a set of Tri-color and Black InkJet Cartridges for Instant Ink ready Printing. Your HP Officejet 5740 All-in-One Printer InkJet Cartridges are long-lasting and affordable. The ink from the InkJet Cartridge are drawn out through evaporation and residual process and thus results in keeping the print nozzles clear and the ink flow smooth. Ensure that you turn off the HP OJ5740 Printer while not in use to reduce the ink waste and to avoid ink coagulation.

Information on InkJet cartridges and the print head:

Always keep your InkJet Cartridges protected in the original sealed packages and kept at room temperature. Avoid drop and jarring InkJet cartridges from Installation. Abandon unnecessary cleaning the Print Head since it shortens the life of the Cartridges and results in Ink waste.

123 HP OFFICEJET 5740 INKJET CARTRIDGE REPLACEMENT

Switch Off the Printer Setup power and wait until the print carriage stops moving. Push upward to open the Cartridge Access door. Push the front part of the Inkjet Cartridge to release and remove it. Remove the packing and plastic taps present in the Inkjet Cartridge. Slide to Install the Inkjet Cartridge according to color-coded letters. Repeat the process to completely install all the InkJet Cartridges. Push Downward to close the Cartridge Access Door. Power up your Printer.

Use 123.hp.com/oj5740 Printer Setup in Single Cartridge Mode:

You can operate the Printer on a Single Cartridge Mode with the help of instruction from your Computer. Whenever an ink Cartridge is removed or depleted then your HP OJ5740 Printer goes into Single Cartridge Mode.

TROUBLESHOOT OFFICEJET 5740 PRINTER WIRELESS CONNECTION

Open the HP Officejet 5740 Printer Setup and Scan Doctor utility to diagnose and automatically fix wireless connection issues. Use HP online troubleshooting wizard to resolve HP Officejet 5740 wireless Setup connection problems. Ensure that you have enabled the Wireless feature in Copier. Check for the Wireless Direct light is lit on Solid Blue color in the Printer Control Panel. Using the Router check for the HP Officejet 5740 Printer configurations. If you have security lapses then you can change the password from WEP Key to WPA passphrase.

Troubleshoot a Printer WPS connection:

Switch ON the Wi-Fi Protected Setup in your Printer Setup. Enable the Wi-Fi Direct feature from your computer or mobile devices. Always use either a password or WPS Pin to establish a Wi-Fi Protected Setup connection. Furthermore, you may also try installing the correct Mobile Apps in your Mobile or Tablet and establish the WPS Printer connection. Download the driver and manuals from the website link 123.hp.com/oj5740 or 123.hp.com/setup 5740.

0 comment

HP SMART APP SETUP AND TROUBLESHOOTING

With the HP SMART APP, you can quickly customize your printer on a wireless network and repair printer-related issues readily. It’s also easy to print and download on the other hand. 

Download the HP SMART APP and link with an HP printer to your mobile device. 

Hp Smart App Setup For Android Appliances

  1. For Android devices with the Android OS 4.4 edition (kitkat) or newer, the HP Smart App is enabled.
  2. Upon opening the file, attach your HP printer.
  • Ensure that your android device has the same wireless network as your printer.
  1. Go to Google Play Store to download the HP SMART APP.
  2. Open the app and begin the tap after the software is installed.
  3. Consider the method’s terms and conditions.
  • Tap (+) to sign in to your home screen, pick the printer you want to use if you have more than one printer attached to your wireless network.
  • You can add the new HP printer by choosing the Hp printer template attach concern or setting the new printer.
  • To complete the installation process, click on the screen instructions.  

Hp Smart App Setup For Apple iOS device

  1. The HP Smart App is supported on Apple iOS 9 or later computers.   
  2. Start and connect the app to your printer once the app has been downloaded.
  • Ensure that your iOS device is in the same network as your printer.
  1. Download your iphone with the HP SMART APP. 
  2. Tap start opening the app after the configuration process.    
  3. The device begins searching for network printers in order to continue to understand the terms and conditions.
  • Choose the printer you want to use if more than one printer is connected to a Wireless Network. Tap (+) Sign on Home Screen   
  • By selecting a printer or configuring a fresh HP printer you can add a fresh printer.

HP SMART APP DOWNLOAD

Download link

Hp smart app Scan and print Function

1. Follow the instructions on the monitor to complete the installation process.

  • Print an image or a document.
  1. You can print photos and records of your Android and iOS. You can also print on your Android device on Google Drive, Dropbox, Facebook and Instagram.
  2. Go to HP SMART APP, type Print Documents, and print photos to begin printing.
  • The file can be accessed from the internet, social media or mobile devices.
  1. Select the document or the image you want to print, the preview will be displayed.
  2. Tap print to start printing.
  • Your printer scanning 
  1. Begin the scanning by placing the photo or documents on a Scanner Glass or an automated file feeder.
  2. Go to the SMART HP APP. 
  • This offers 3 forms of scanning, email scanning and Cloud scanning. Choose the sort of scan you like
  1. The scan origin can be selected by selecting the Settings icon.
  2. Tap executed. Tap done. Tap done.
  3. To adjust boundaries, select the scan.
  • Additional pages can be added by clicking the icon for additional pages.
  • When you have finished scanning, select Send, save, share or print as needed. Mobile camera phone scan file.
  1. Using your mobile camera, you can scan documents or photographs as a PDF or JPEG file, save them to your mobile device, cloud account, or share them via email.   
  2. To search, select the document or image.
  • Open the HP Smart application
  1. Choose your mobile device and scan form.
  • Tap email scanning camera, cloud scanning camera or capture of documents on Android devices.
  • Press Email scanning, database scanning or camera scanning on apple devices.
  1. Show the scan preview after clicking on the image. In android phones: it is possible to manually change the boundary by adjusting the blue points.
  • The edges are automatically detected in automotive mode in Apple iOS and multi-page scanning is easily possible, while manual mode is preferred to scan one or two pages or where the auto mode does not recognize the edges of the object.
  1. You can modify the preview screen.
  • You can add additional pages by clicking the icon for additional pages.   
  • Once the scanning process has been completed, pick Send, save, share, or print as per your needs.

Copy and scan using HP Smart App

With your mobile camera, you can copy and search documents or photographs using the HP Smart app. HP Smart offers editing tools to alter the scanned image before saving, publishing, or pressing it. You can print, store and share your scans locally or in the cloud through emails, text messages, Facebook, Instagram, and so on. Follow instructions for copying or scanning using HP Smart in the following paragraph, depending on the type of computer you use.

  • Copy and scan from an Android or iOS.
  • Scan from a Windows 10  

Each segment provides basic instructions for copying and downloading from Android, iOS or Windows 10 devices using HP Smart apps.

Print and download from an Android or iOS device

Download from Android or iOS device

  1. Open the smart app for HP.
  2. If you need to switch to another printer, press the Plus button.
  3. Click the Copy key. The integrated camera is going to open.
  4. Place a document or picture before the camera, choose a choice to help determine the original size and then press the round button at the bottom of the screen to grab a file.

TIP: Change the camera position to inside the frame provided on the preview screen for the best results.

  1. Set the number of copies or if necessary make other adjustments:
  • To attach more files or images, click the Attach Page button.
  • To remove files or images, click the Delete button.
  • Click Resize to change the size of the paper’s initial.
  1. Tap Start Black or Start Color to make a copy.

HP SMART APP SUPPORT CALL TOLL FREE

To scan from an Android or iOS device:

  1. Open the smart app for HP.
  2. To move to another printer or add a new printer, press the Plus button.
  3. Select the option to scan, then tap Camera.
  4. The built-in camera is locked. If the scanned file or image has been changed, save, upload or print it. Scan your picture or document using your camera.

Scan from a Windows 10 device:

Using a scanner from a Windows 10 device, you can scan a document or photo.

If your phone has a screen, you can use the HP Smart app to scan a printed document or image using a camera app. You can then use HP Smart to upload, import, print or view the image.

  1. Enable Smart HP. See Use the HP Smart App for writing, copying, scanning or troubleshooting to know more.
  2. Tap the Search button and then tap View.
  3. Please select a photo or photograph in front of your screen, then push or tap the round button at the bottom of the frame.
  4. Select or tap button Submit.
  5. If required, make other changes:
  • To add additional documentation or images, press or select Add Pages.
  • Click or tap To rotate or copy or adjust the contrast, intensity, saturation or angle of the report or image.
  1. To save it or tap Sharing icon to share it with others, click or tap Save key.

Editing a document or image:

HP Smart, which has already been scanned, offers tools for editing, such as cropping or rotating, so you can put a scanned document or image on your device.

  1. Open Smart HP. See the print, save, search, and problem-solving HP Smart software.
  2. Use Print, then Export.
    Choose the folder or photo you want to modify and press Open or tap Open.
  3. If required, change the boundaries. If required, click or tap the Apply button.

Make more adjustments:

  • For additional documents or images, click or select Add Pages.
  • Click or Select Edit to rotate or crop or adjust the file or image’s contrast, intensity, saturation or direction.
  1. Choose the file type you like, press Save or Transfer, or transfer it to others.

HP SMART APP FUNCTIONS-Tin level check, order supplies, configurations of printers and reporting.

Hp Smart App For Android phones:

  1. By clicking on the supported cartridge, you can obtain data from the ink cartridge and can order the ink cartridges by buying them now.
  2. You can open the HP Instant Ink dashboard by going to the HP Instant Ink screen.
  • You can obtain information on the setting, document and instruments of your printer with the printer data icon.
  1. Printer perspective and upgrade settings: Print settings such as paper trays, remote, auto-off, and more can be changed by setting the printer.
    Printing Printer Report:
  2. You can get settings, diagnostic quality printer, and status reports from your printer model through the selection of printer reports.
  3. Printer Tools: Print reliability tools, for maintenance purposes such as print head washing, are compatible with the click of the ink cartridge.    
  • To get information about the printer: to get the printer’s status, printer name, serial number and film ware version, tap printer settings or print information.
  • Advanced access tools: You can use sophisticated configurations to set power saving mode and verify the status of the network and set your printer’s network settings.

Hp Smart App setup for Apple iOS devices:

  1. You can get the information about the ink cartridge by clicking on the supported cartridge and you can buy now option to purchase the ink cartridges.  
  2. By going to the HP Instant Ink option, you can open the HP Instant Ink dashboard.
  3. You can find data about the settings, report and instruments of the printer by using the printer data icon.
  • The printer screen and upgrade feature: you can change printer settings like paper trays, quiet mode, auto off, and more by setting the printer.
  • Printing Printer report: The configuration tab, and the diagnostic performance and status reports of the printer can be accessed by downloading printer reports from your template.
  • Printer tools: Print performance instruments are associated with the ink cartridge tap to conduct maintenance tasks such as print head washing.
0 comment